Stake out lines
Unlock the full set of features for topo, set-out, and as-built surveys
This guide shows how to stake out lines to find their actual ground position using Emlid Flow.
Overview
Line stakeout is a survey tool in Emlid Flow that enables precise positioning along lines, polygons, and their segments.
The tool provides two guidance types depending on the Reach receiver model:
- Map-based guidance, which indicates your position relative to the target line with a directional vector on the map and provides real-time instructions, including distance, offset, and cut-and-fill values, to accurately guide you to the correct location.
- Augmented-reality (AR) guidance, which overlays the target line on the live camera view and provides real-world context, including distance, offset, and cut-and-fill values, to accurately guide you to the correct location. This type is available for the Reach RS4 Pro model only.
Using Line stakeout, you can do the following:
- Collecting precise data about alignments, such as road centerlines, pipeline routes, and utility corridors
- Placing stakes at specified intervals along alignments
- Applying horizontal and vertical offsets relative to the reference alignment
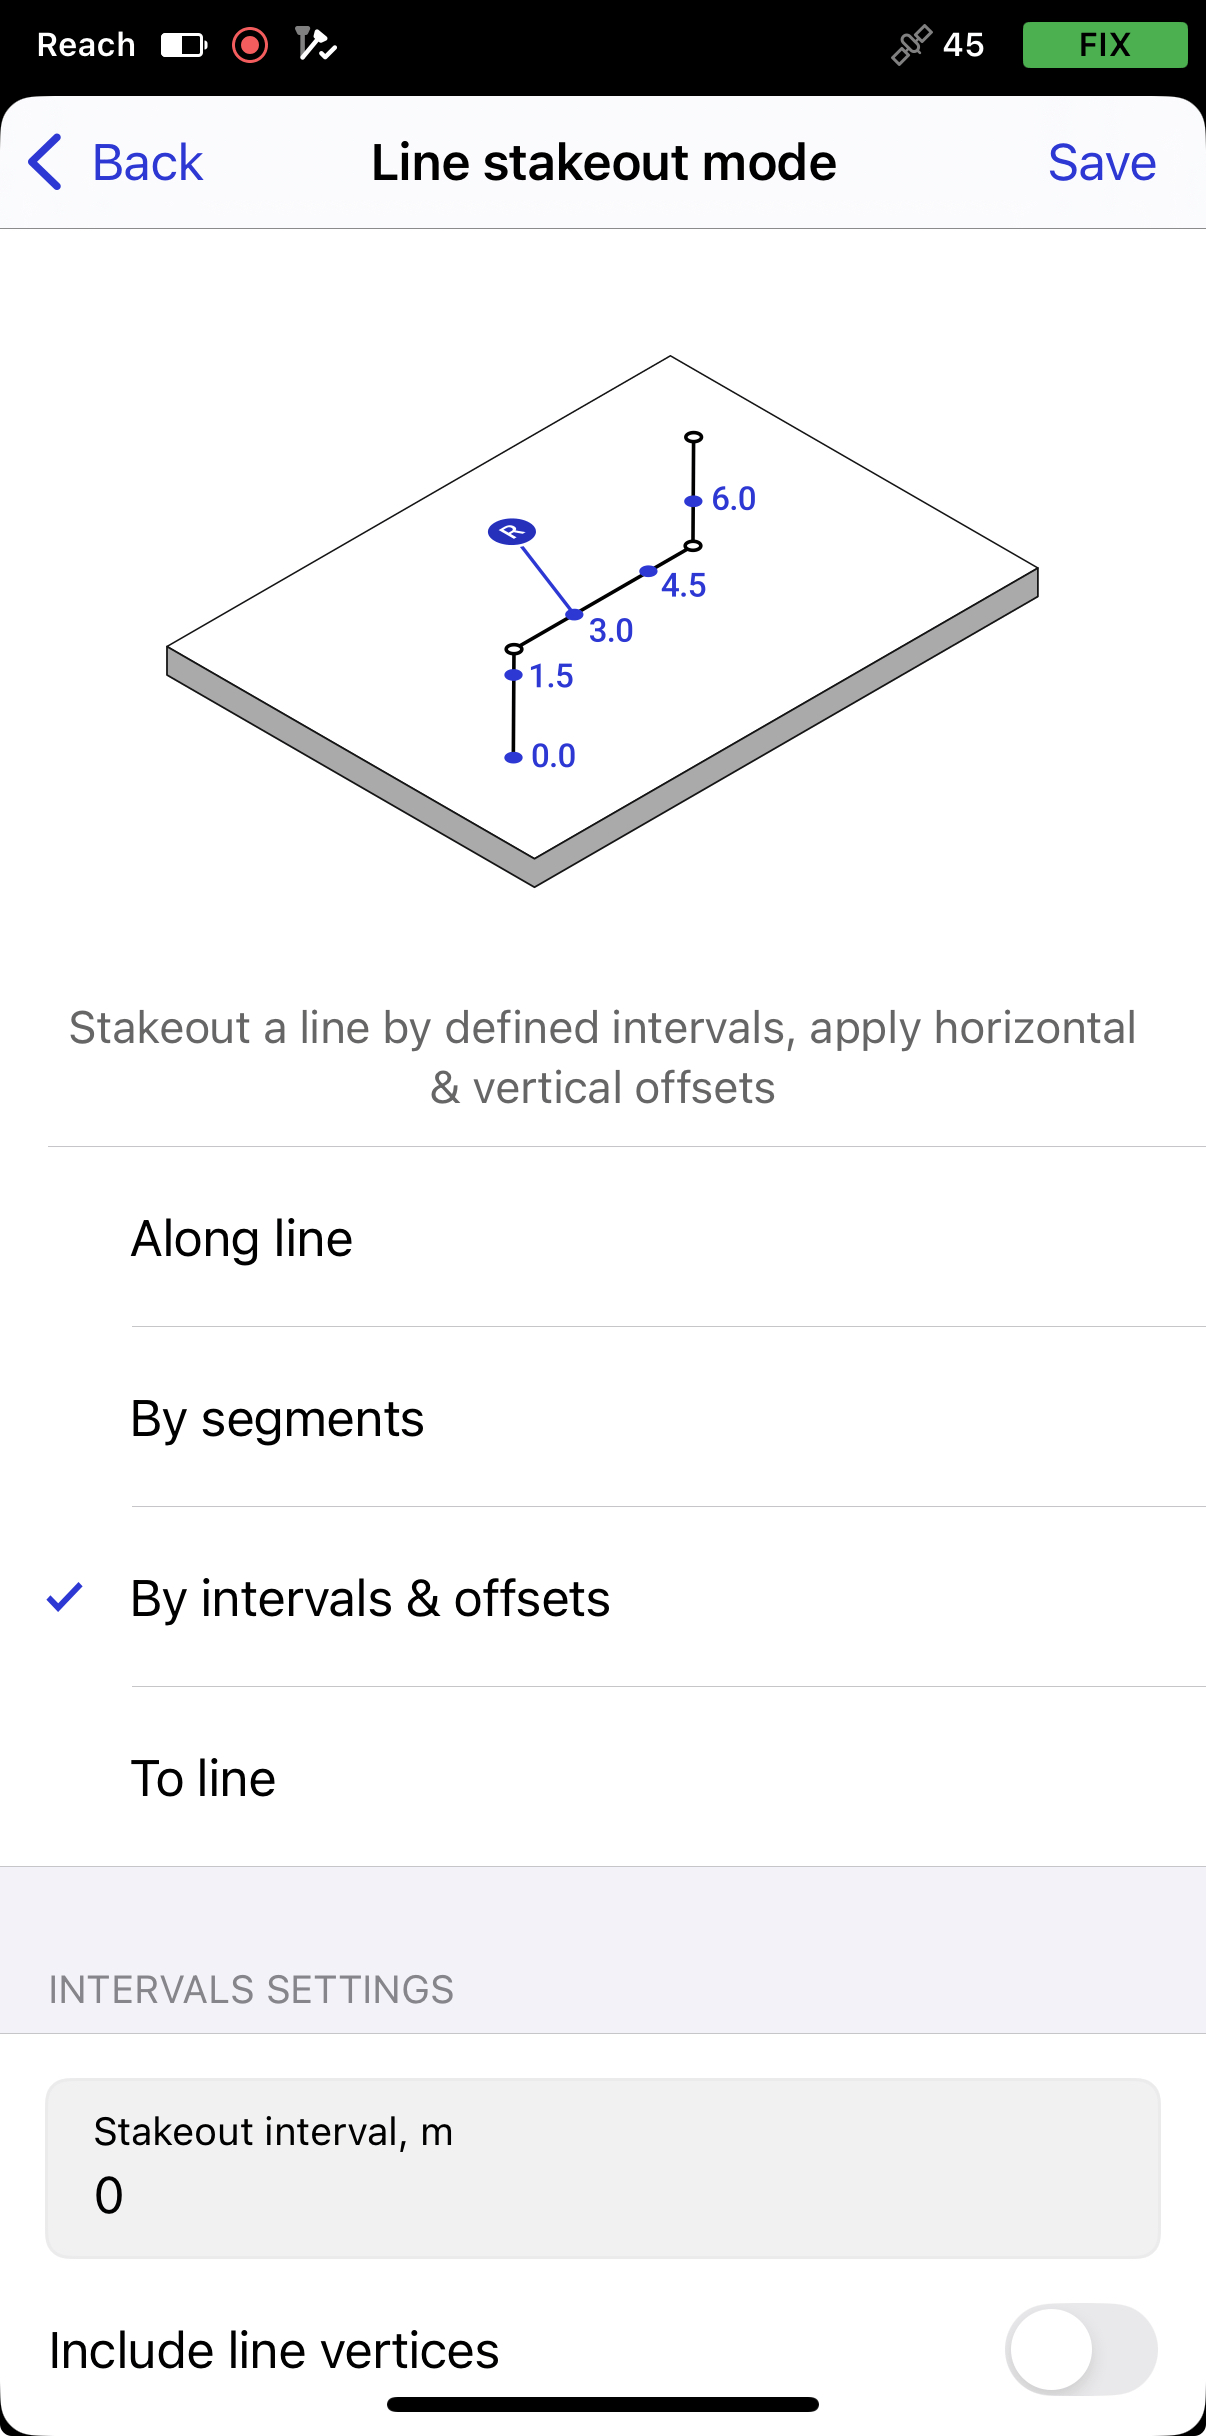
Choosing line stakeout mode
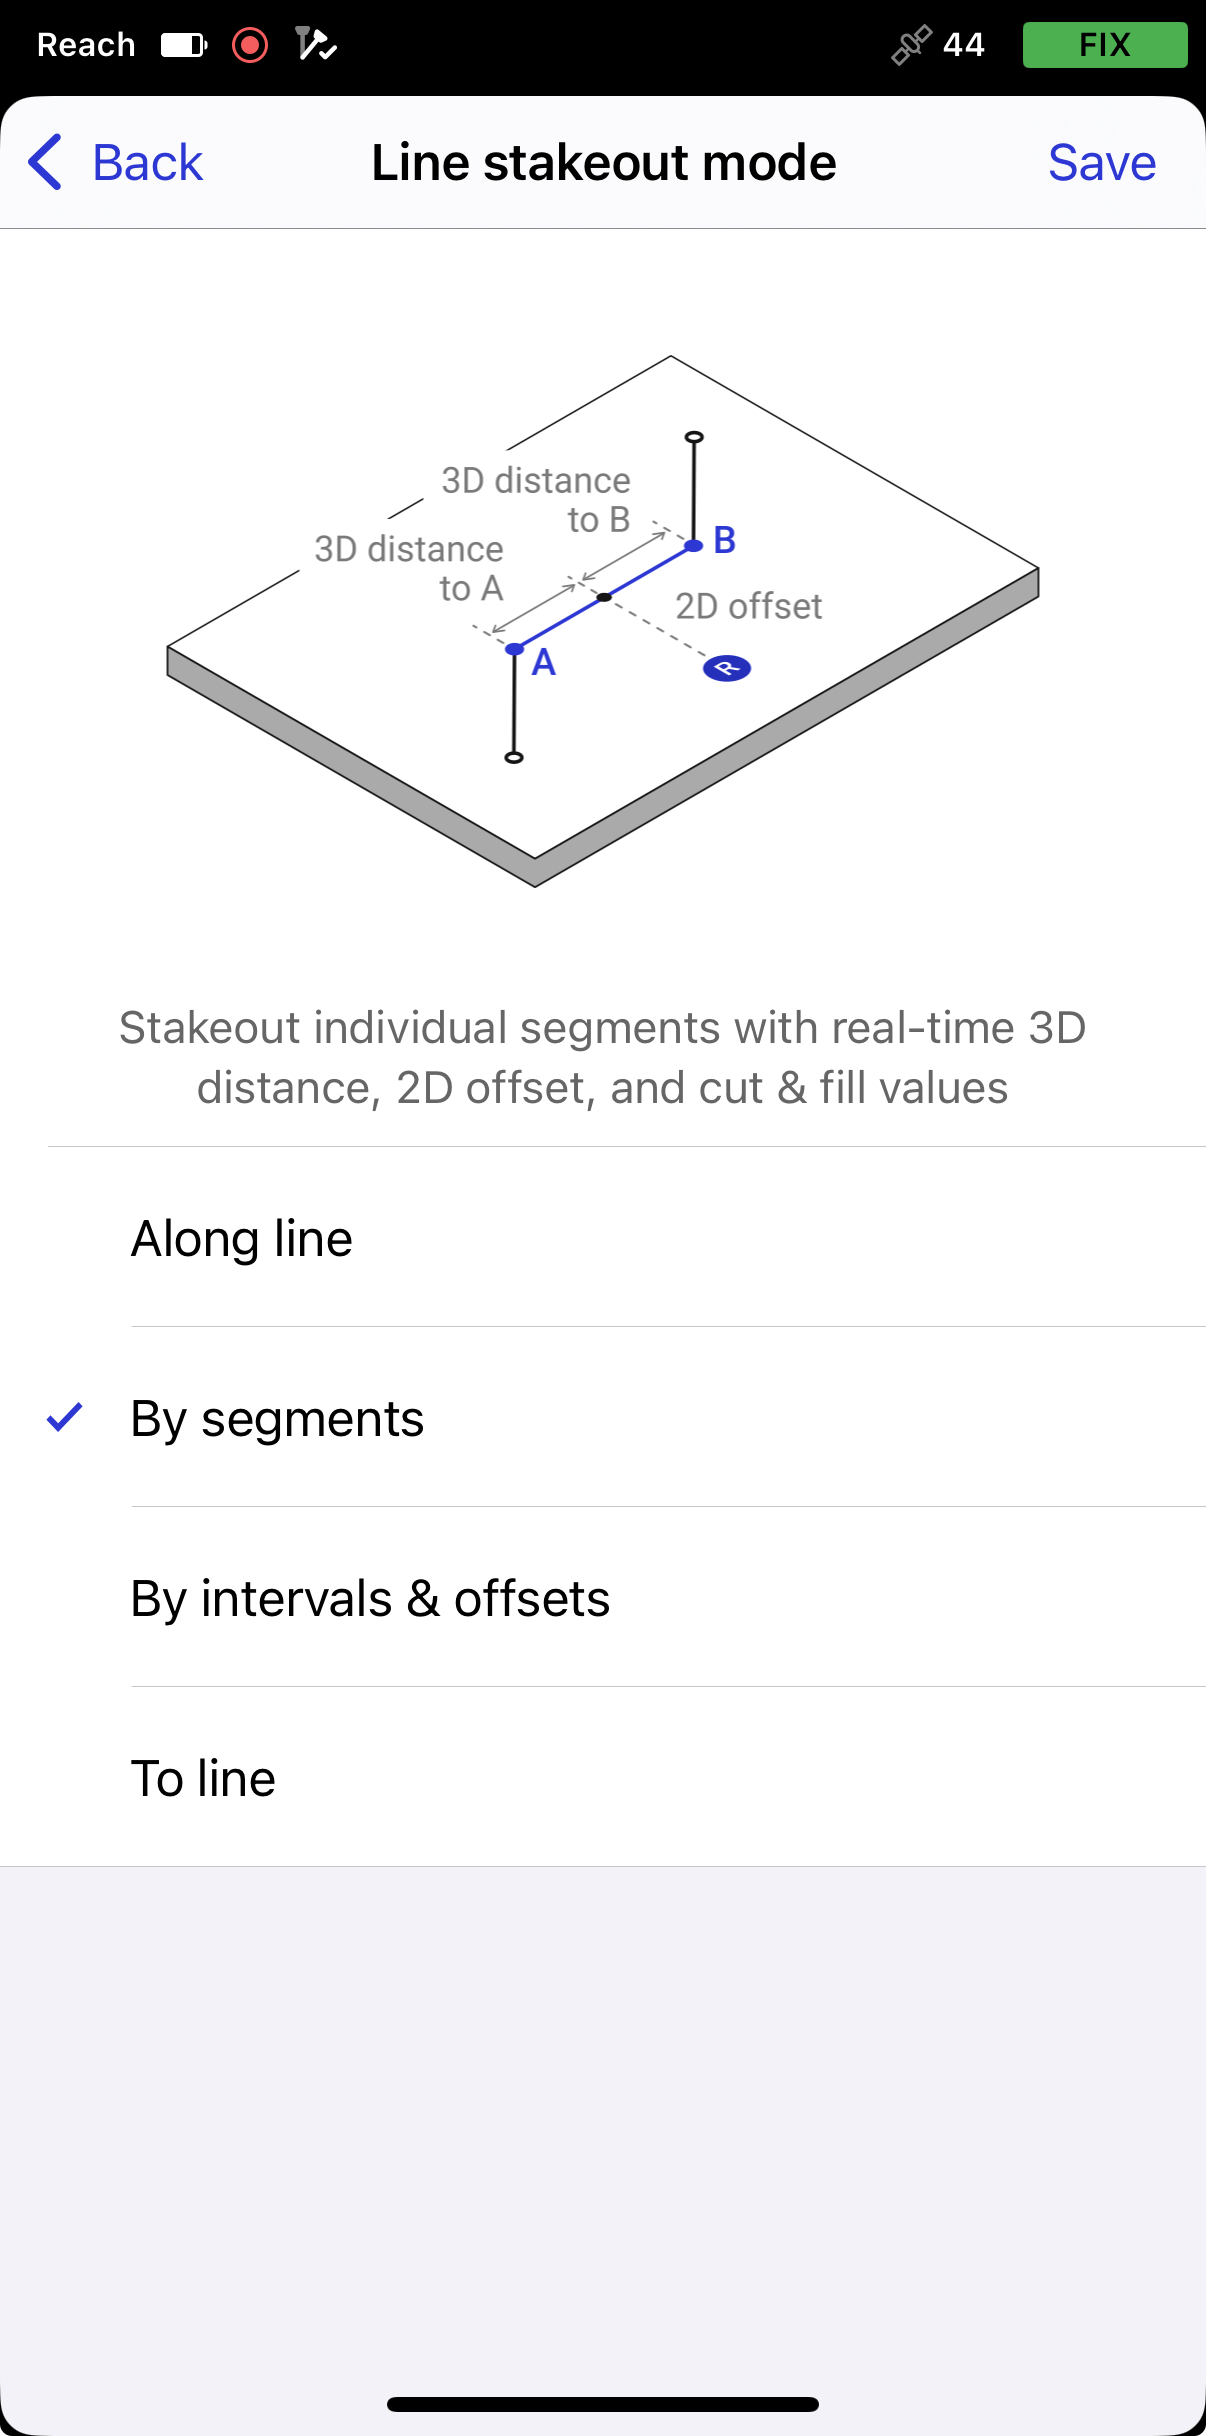
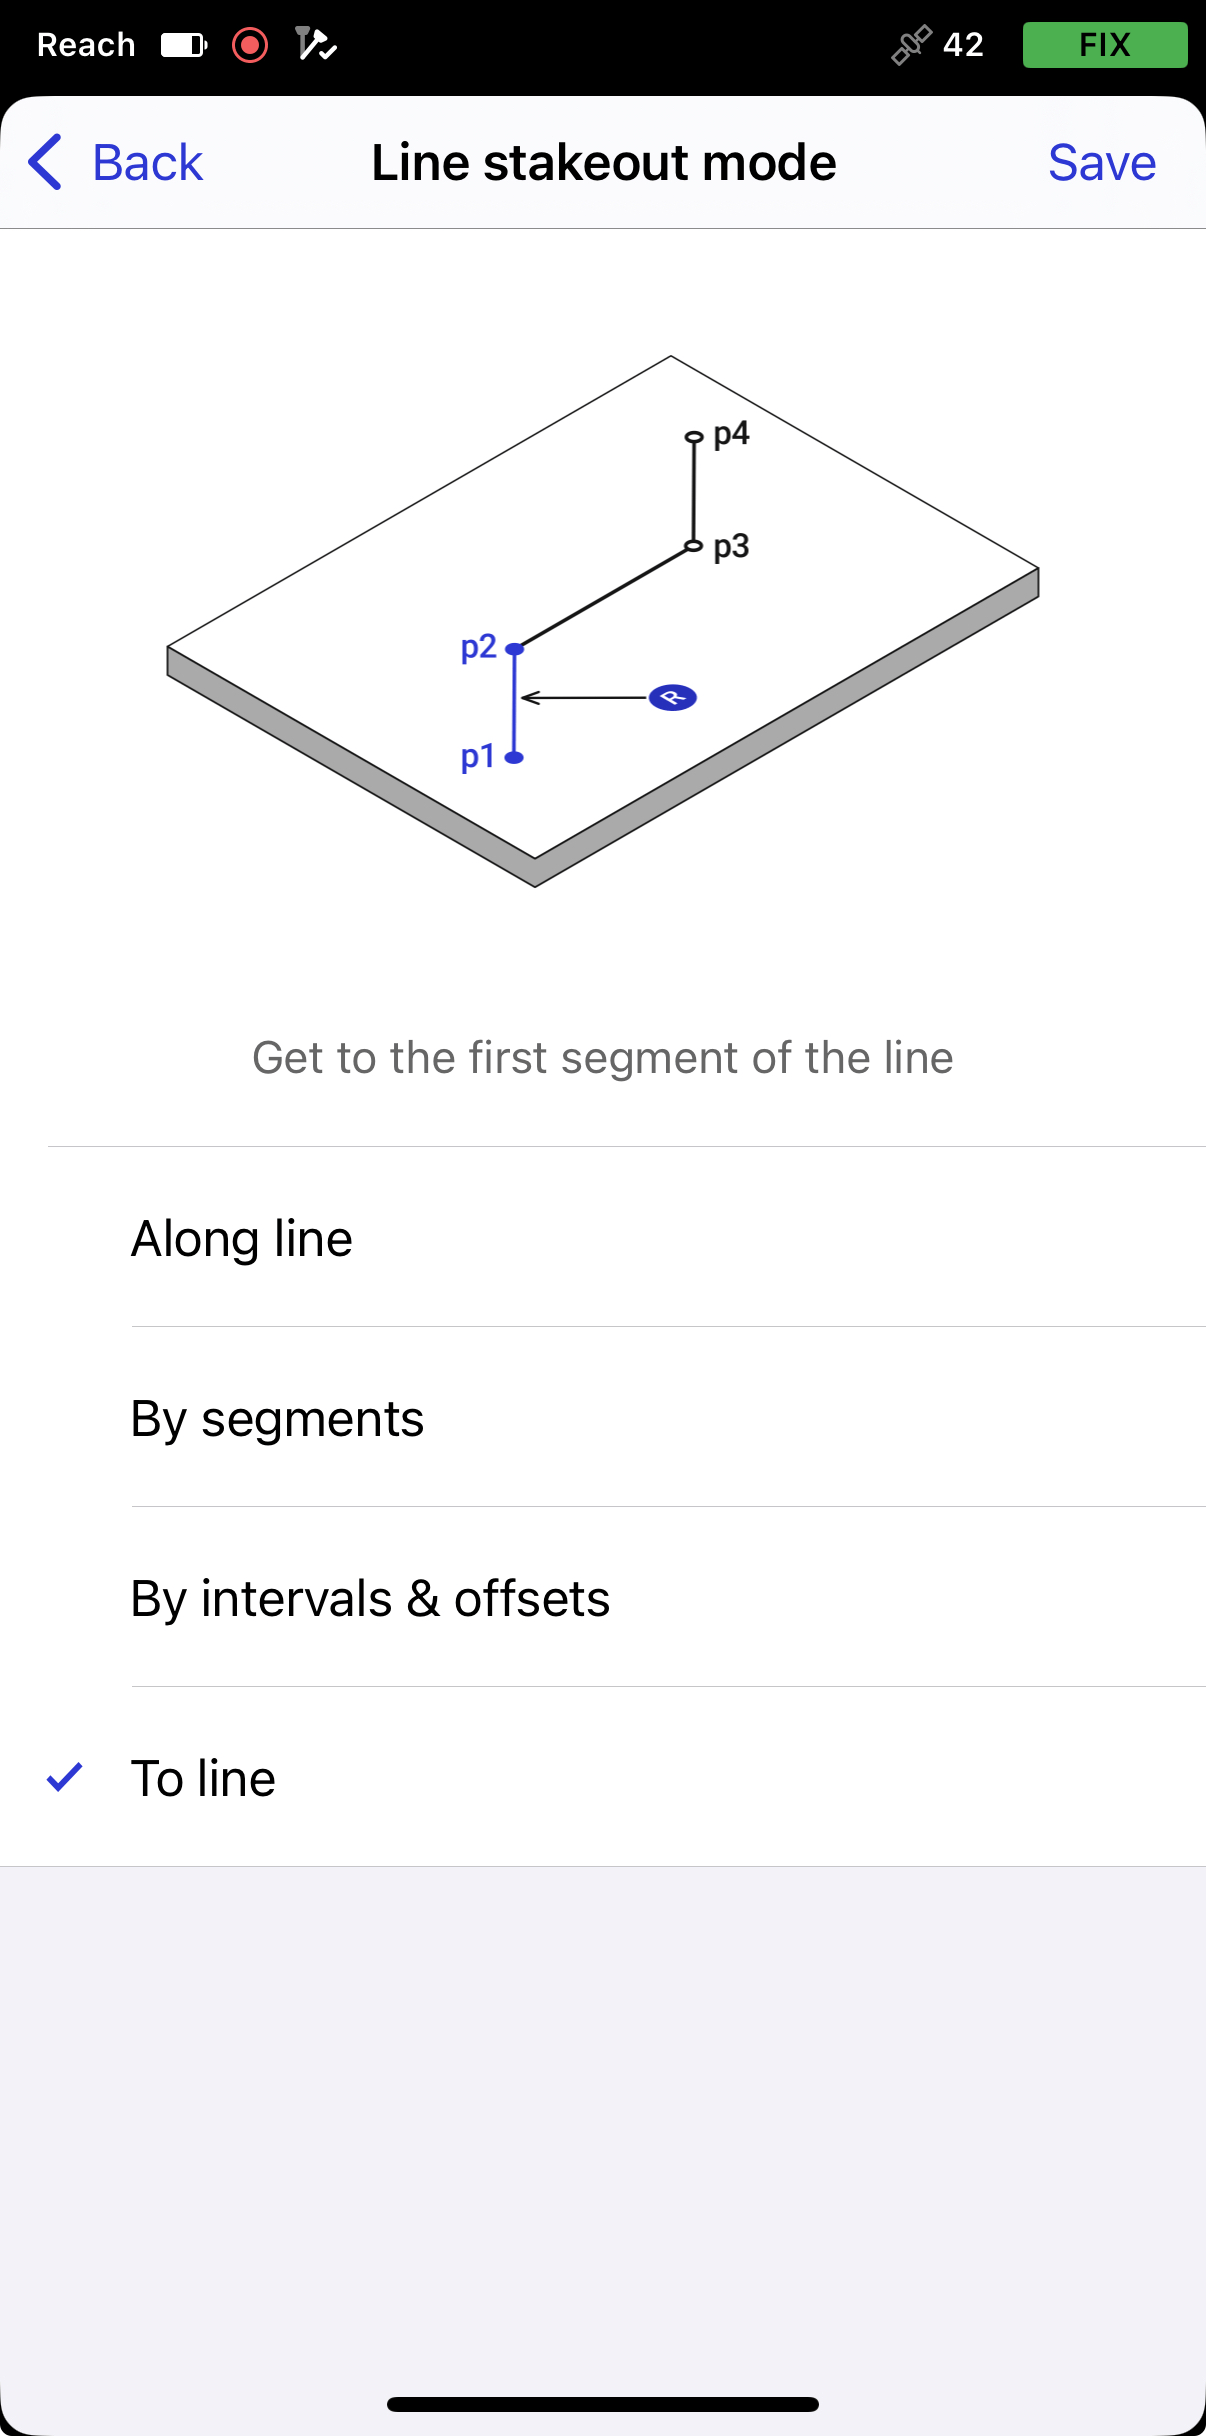
The Line stakeout tool has four modes:
Currently, AR stakeout on Reach RS4 Pro supports only Along lines and By intervals & offsets modes. See the Staking out lines with AR section for more details.

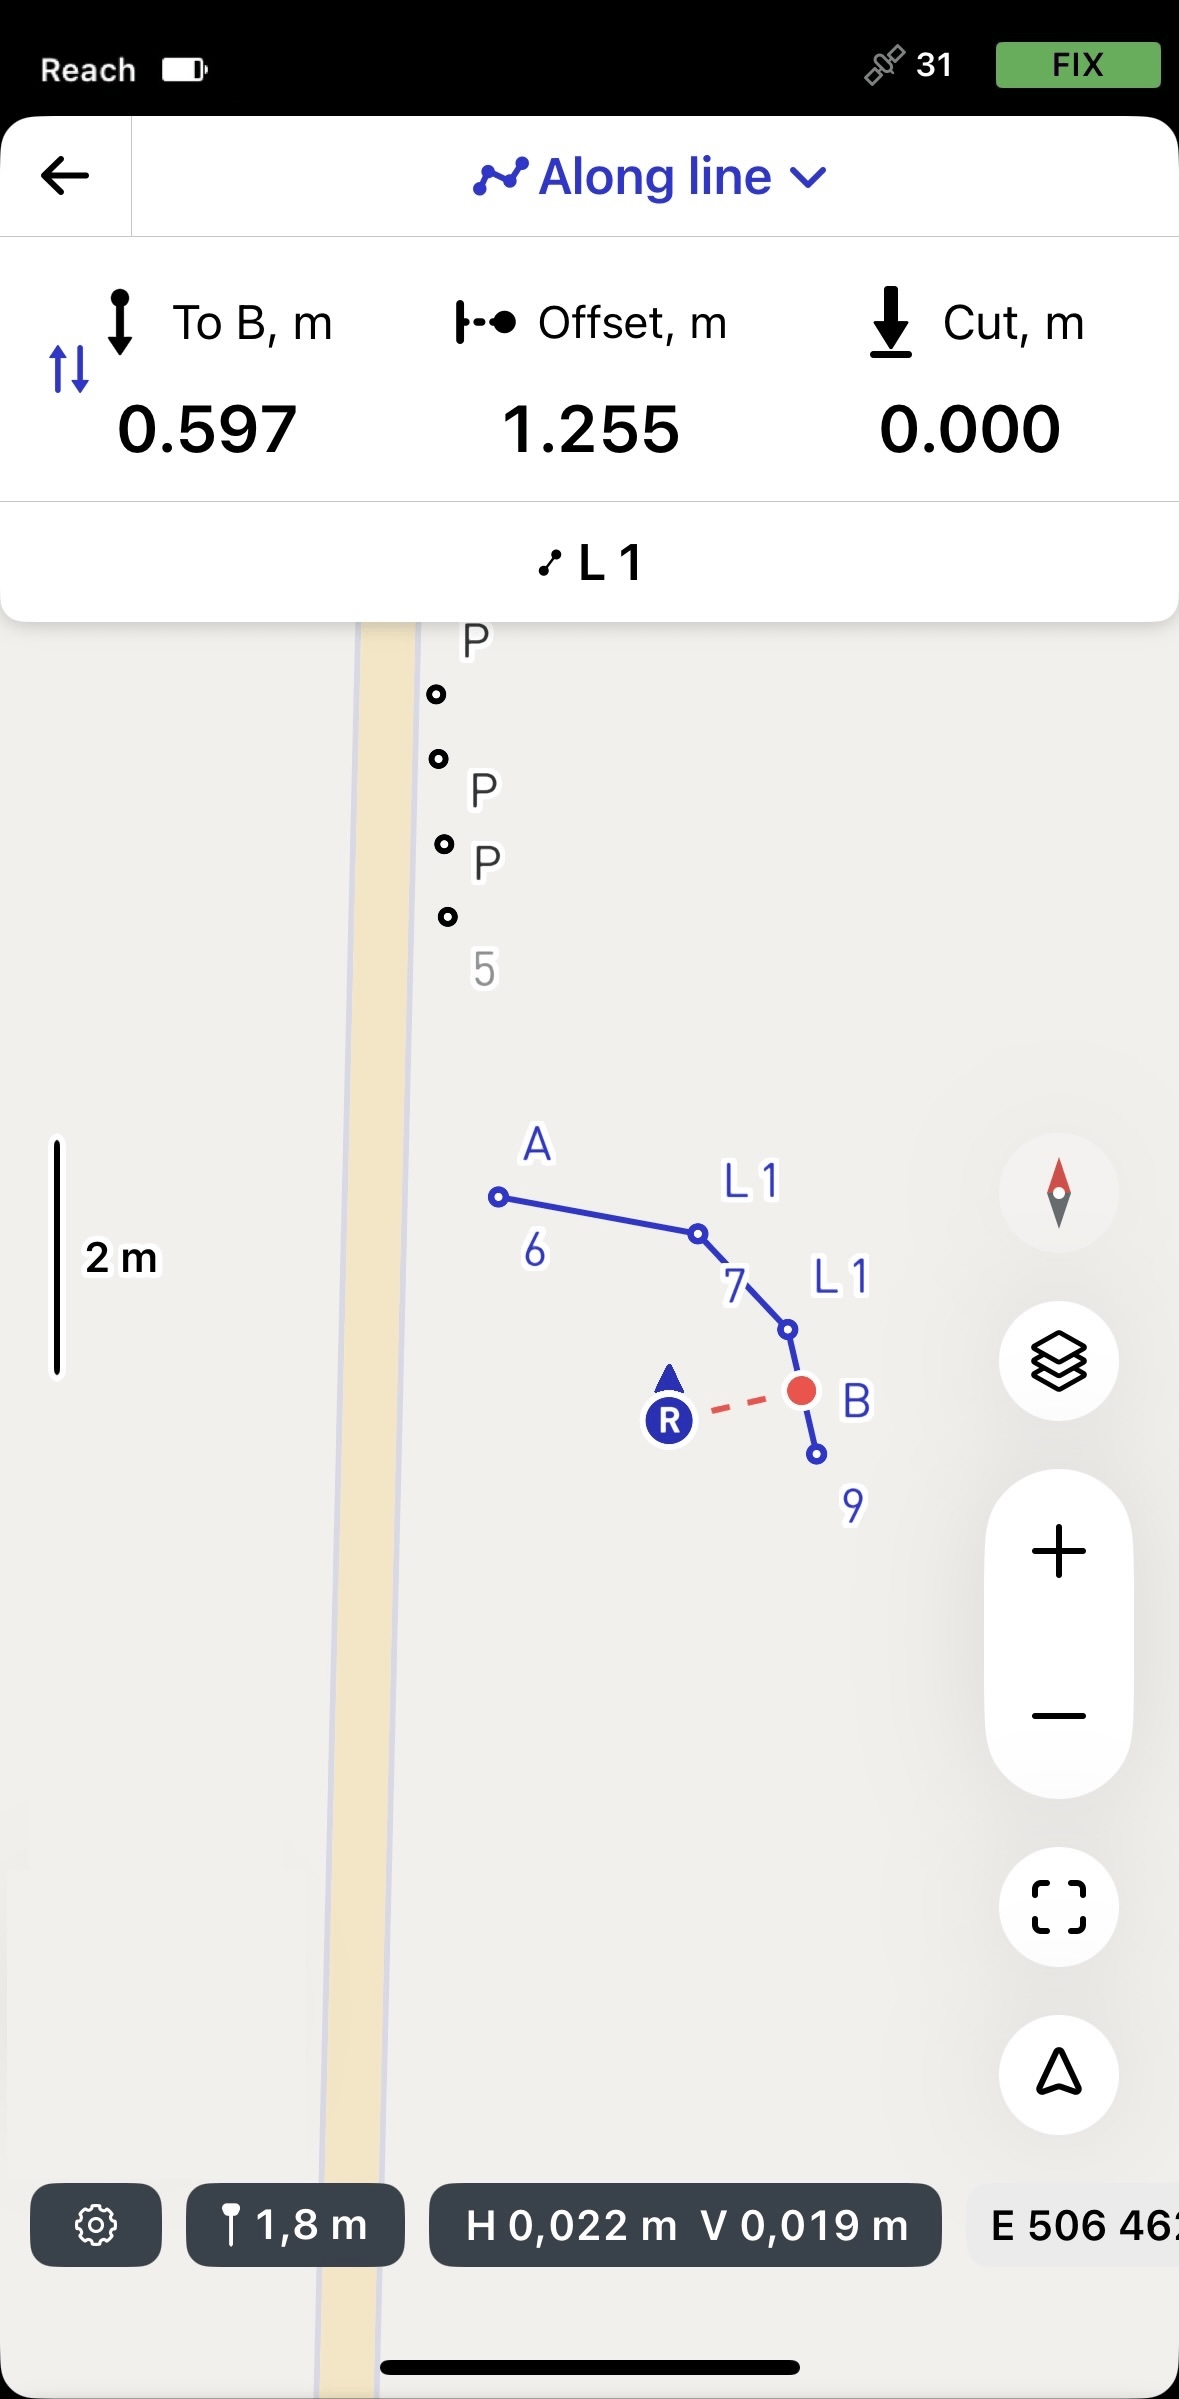
Along line
In this mode, you can stake out the entire line with 3D distance, offset, and cut and fill values. It is activated by default.
By segments
In this mode, you can stake out individual segments with 3D distance, offset, and cut & fill values.
To line
In this mode, you can receive guidance on locating a line, polygon, or segment on the site. You can also select the first point of the line and stake it out separately to reach the starting position more easily.
By intervals and offsets
In this mode, you can stake out points along a line, polygon, or segment at predefined intervals, i.e stake them out with chainage. You can also apply horizontal and vertical offsets to shift each point relative to the original line geometry.
Staking out with map-based guidance
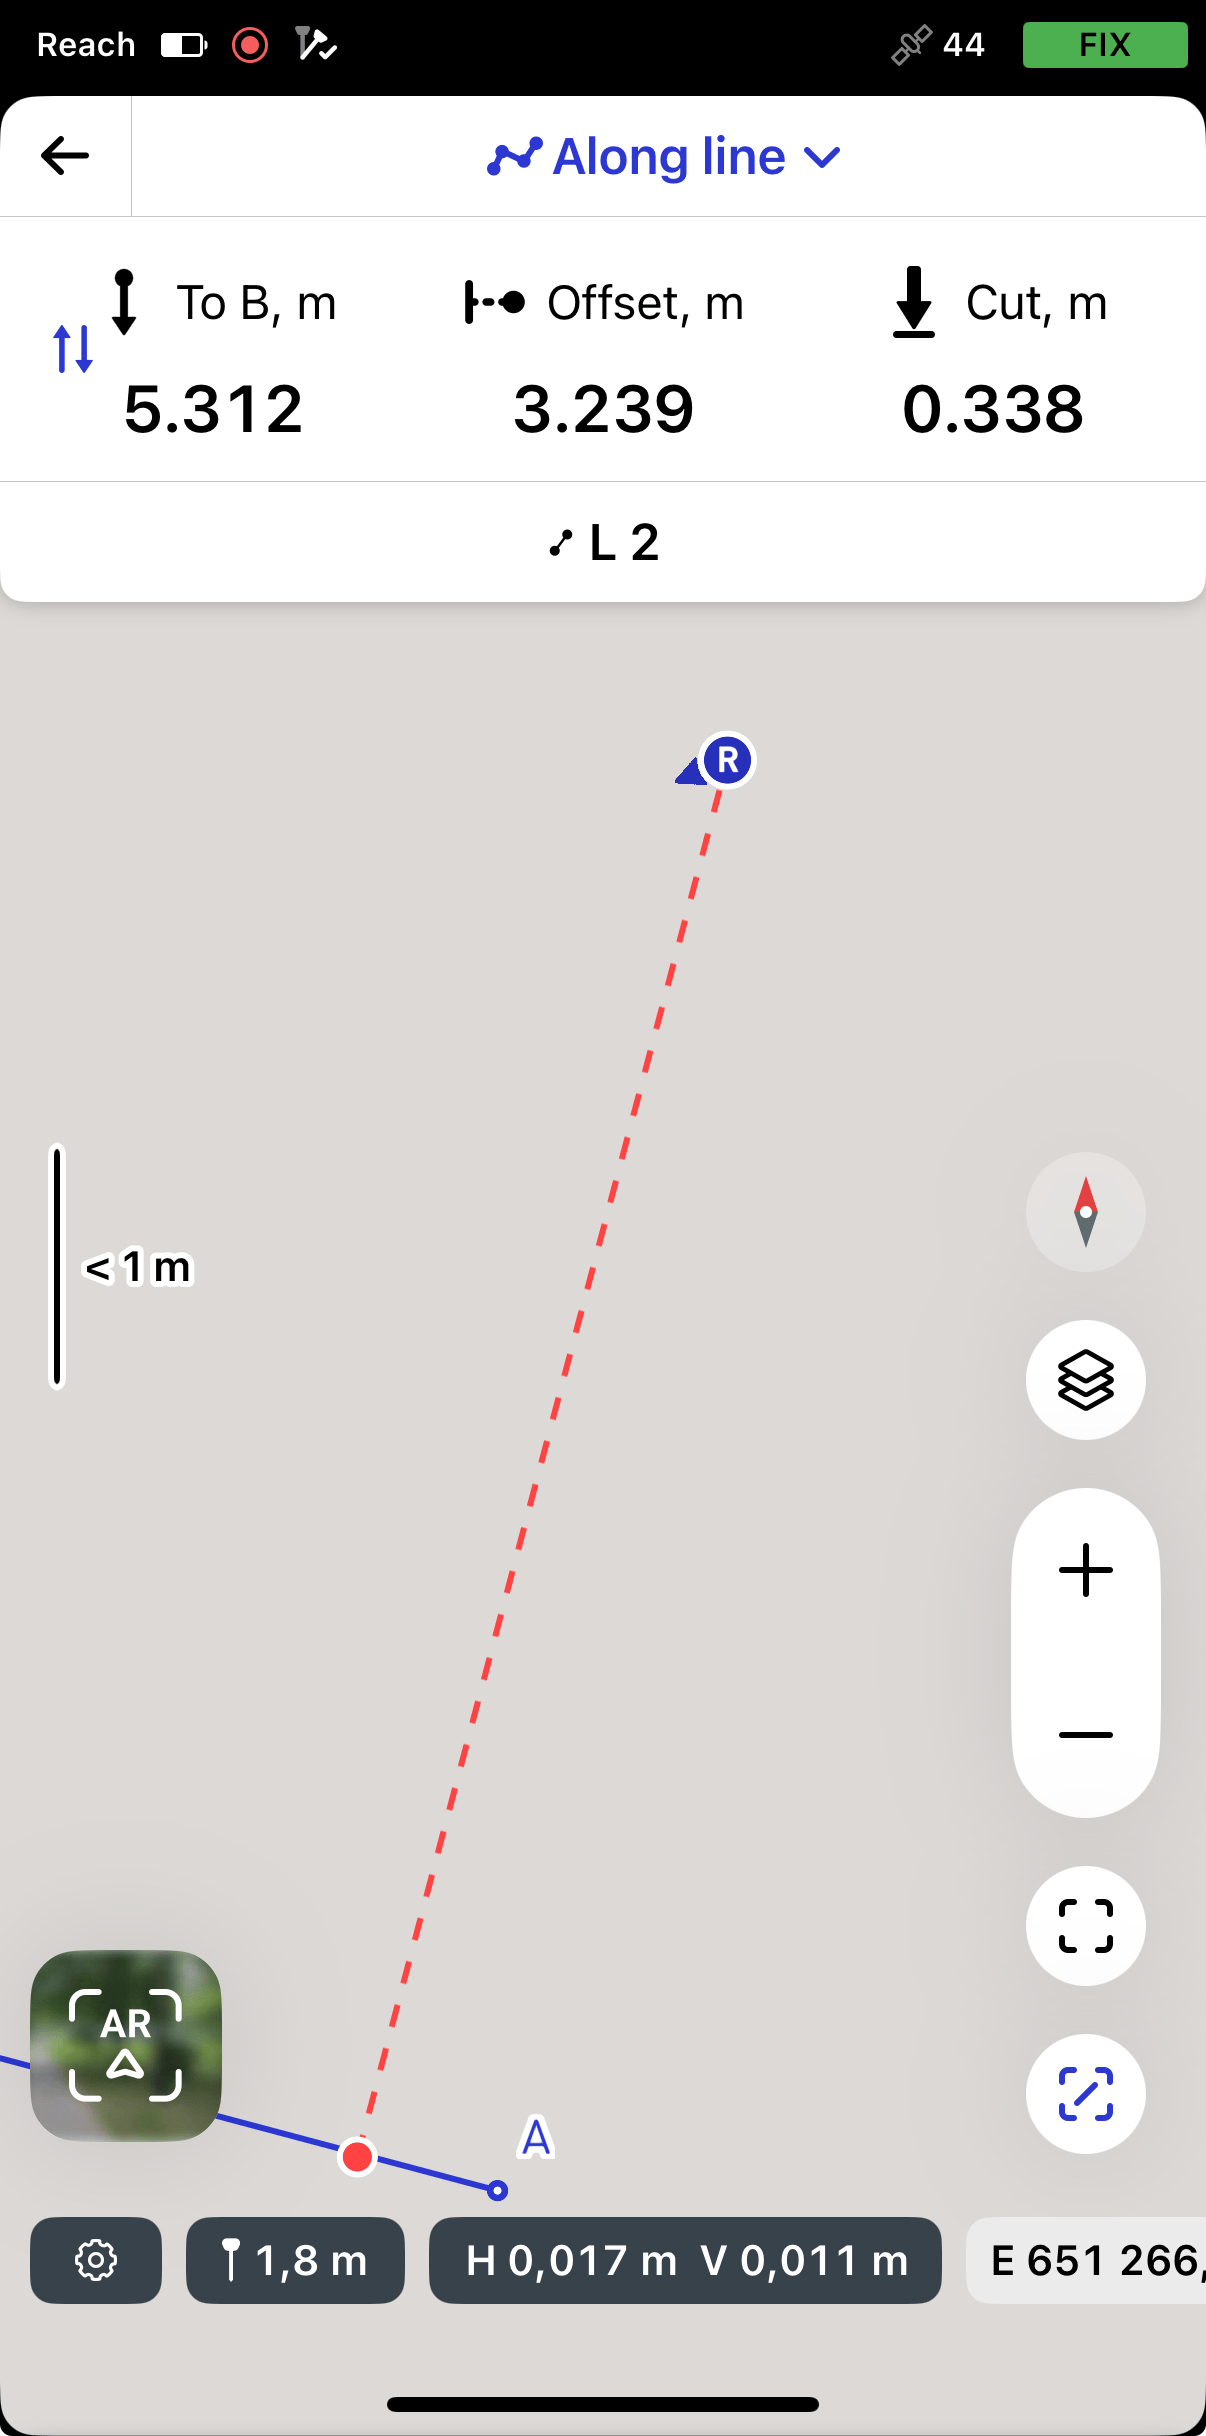
Map-based stakeout using Along line mode
To stake out the entire line using the Along line mode, do as follows:
-
In Emlid Flow, open your project.
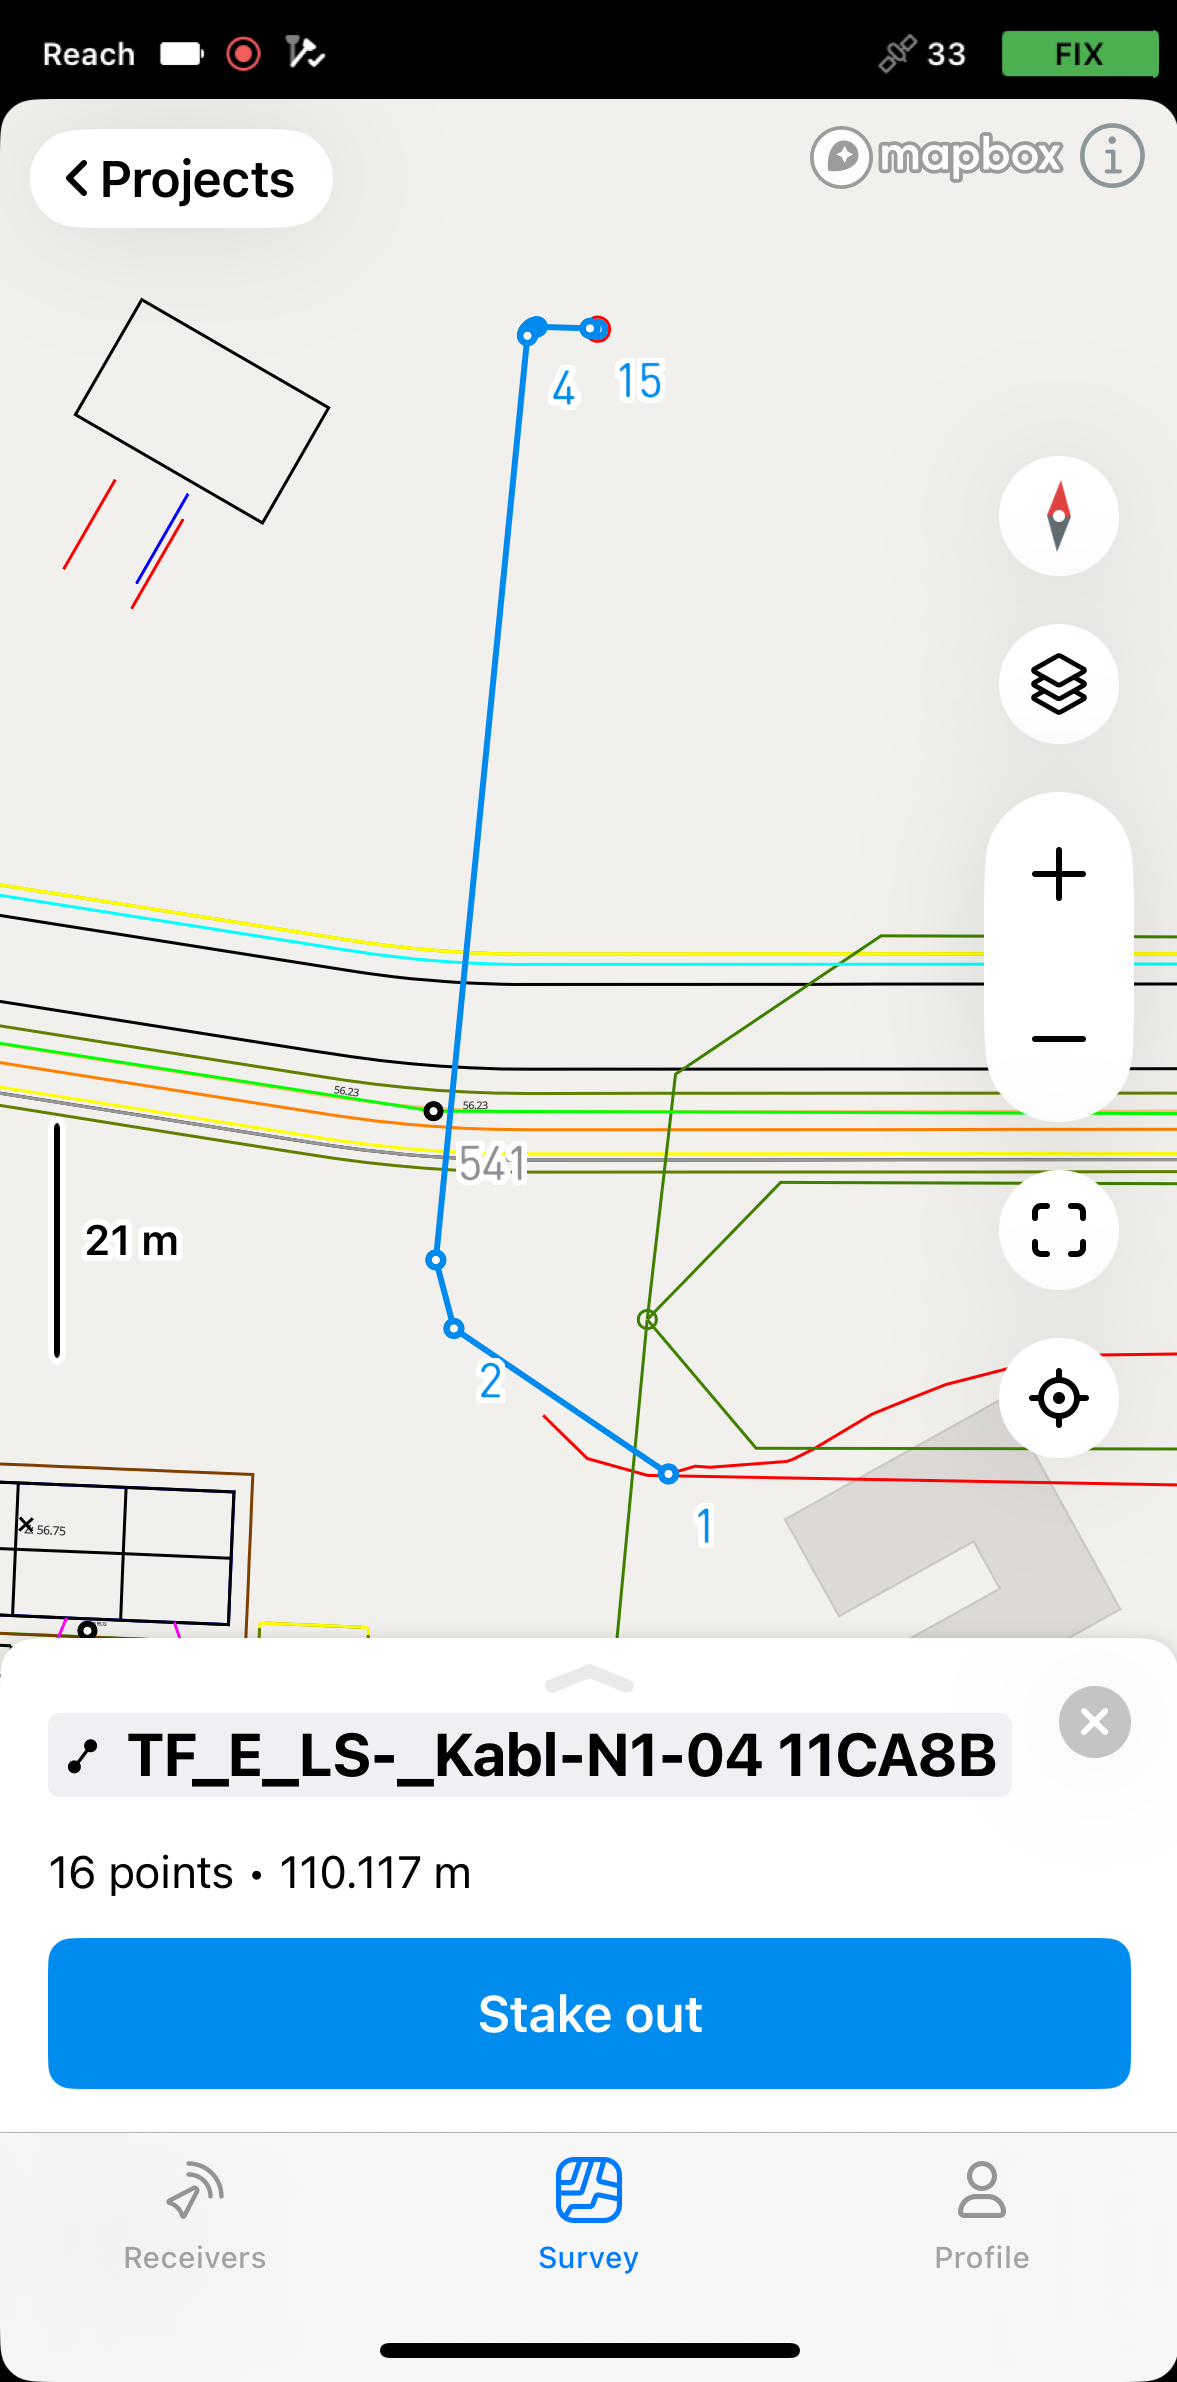
-
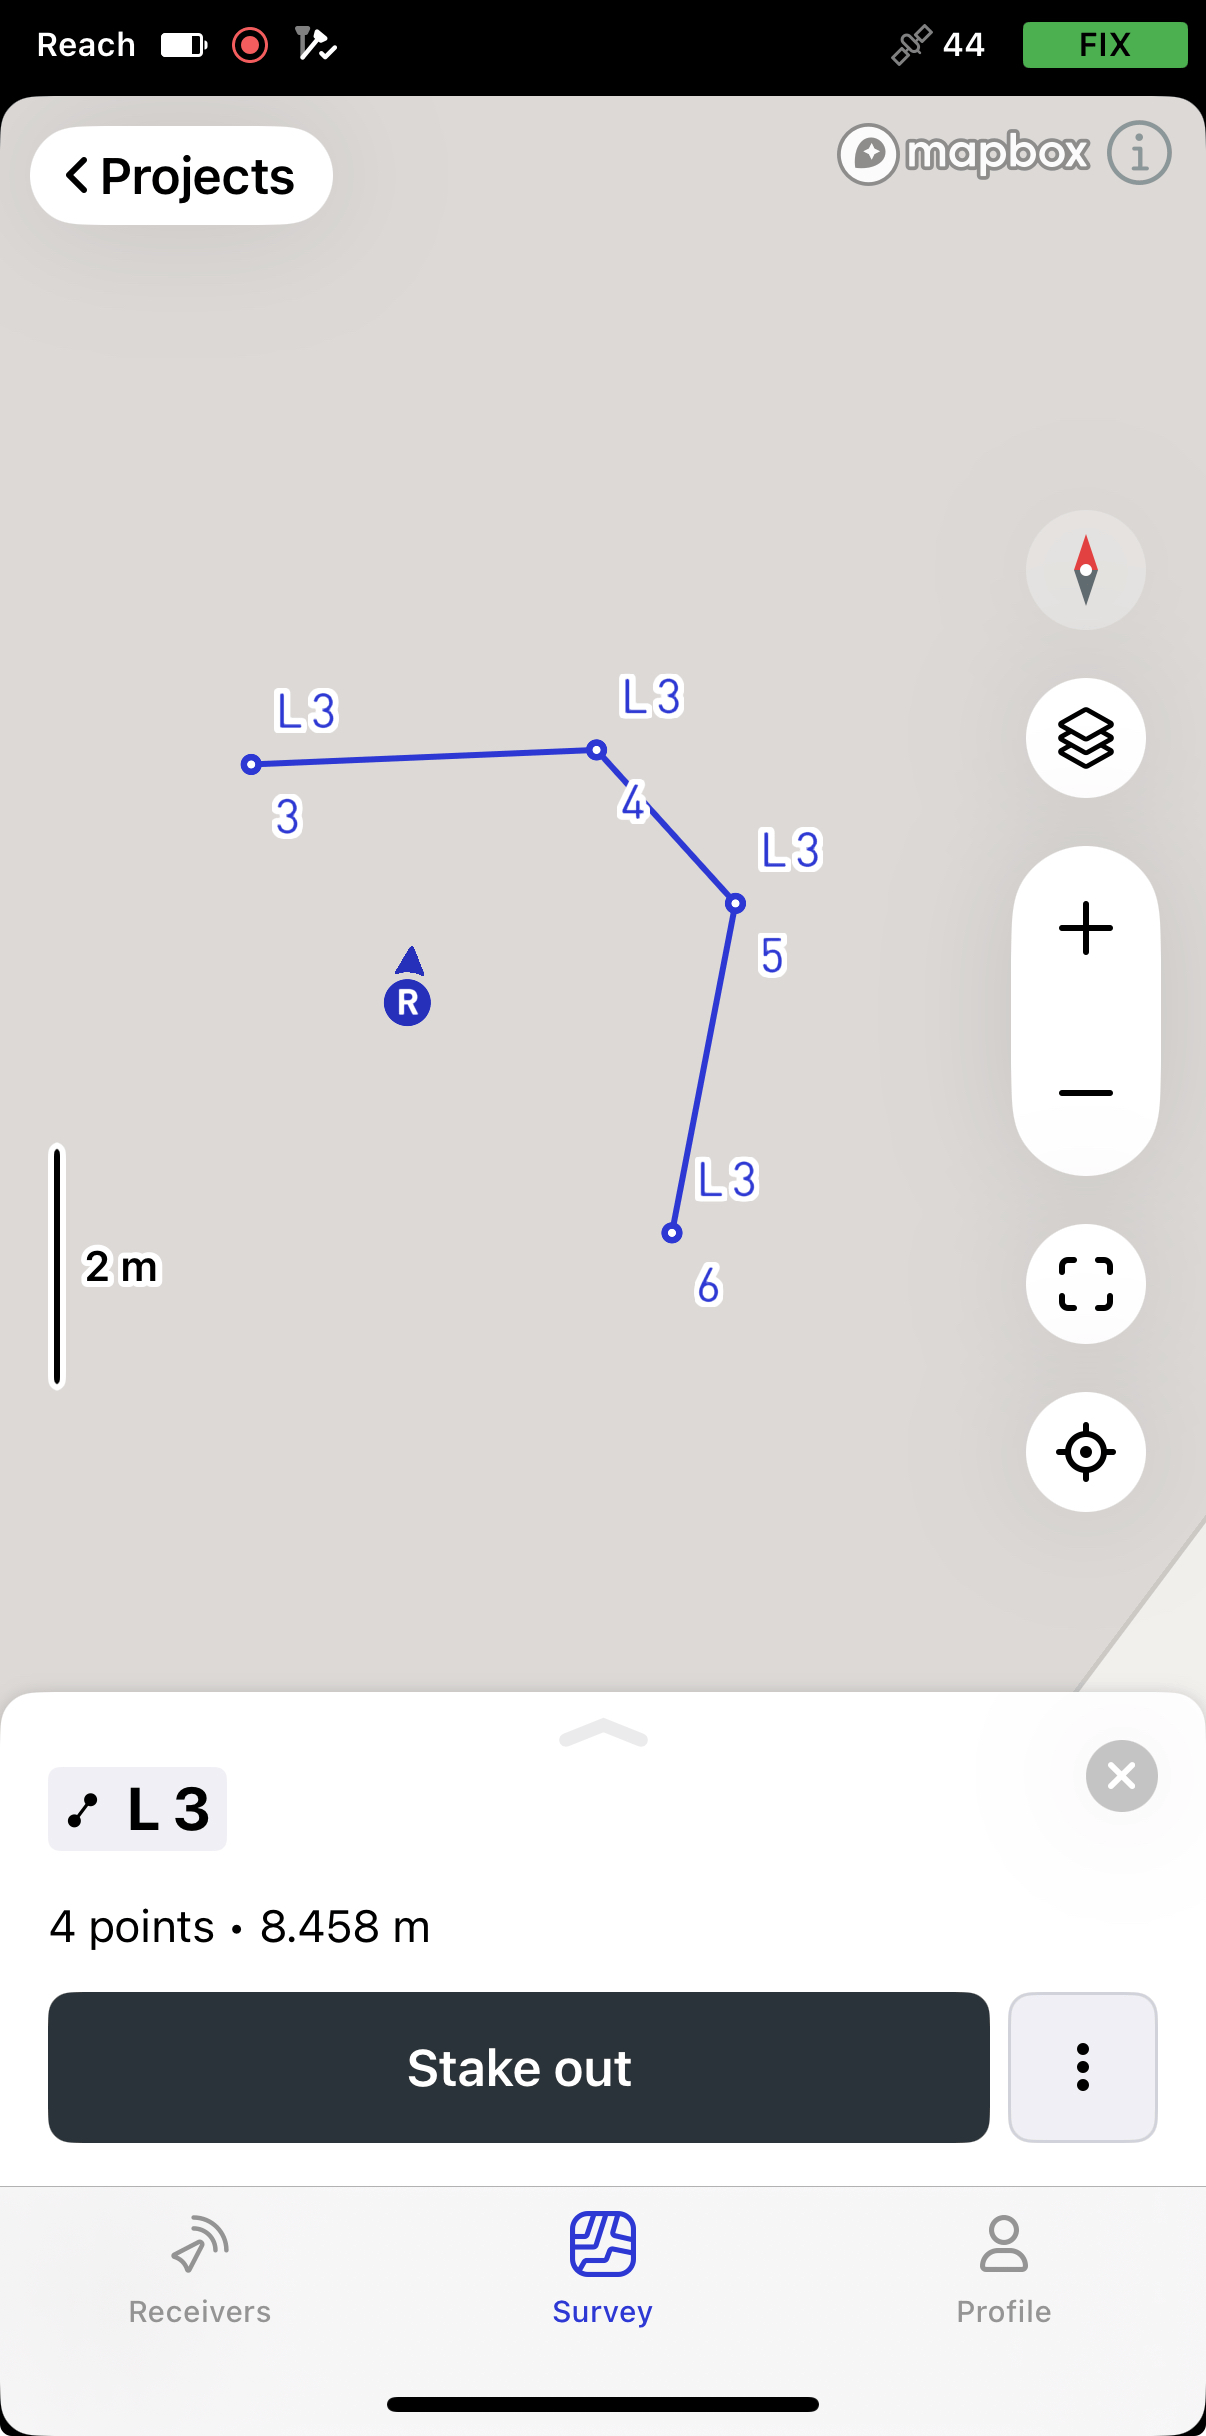
Choose a line on the map or from the list. The selected line will be highlighted in blue on the map.

-
Tap the Stake out button. The Along line mode is applied by default. The line will get the A and B labels at the start and the end points.
 note
noteEmlid Flow remembers the last mode used. If you’ve previously used the Line stakeout tool and a different mode is active, tap the top of the Stakeout plate or tap the survey settings to access the menu with all available modes, then select Along line.
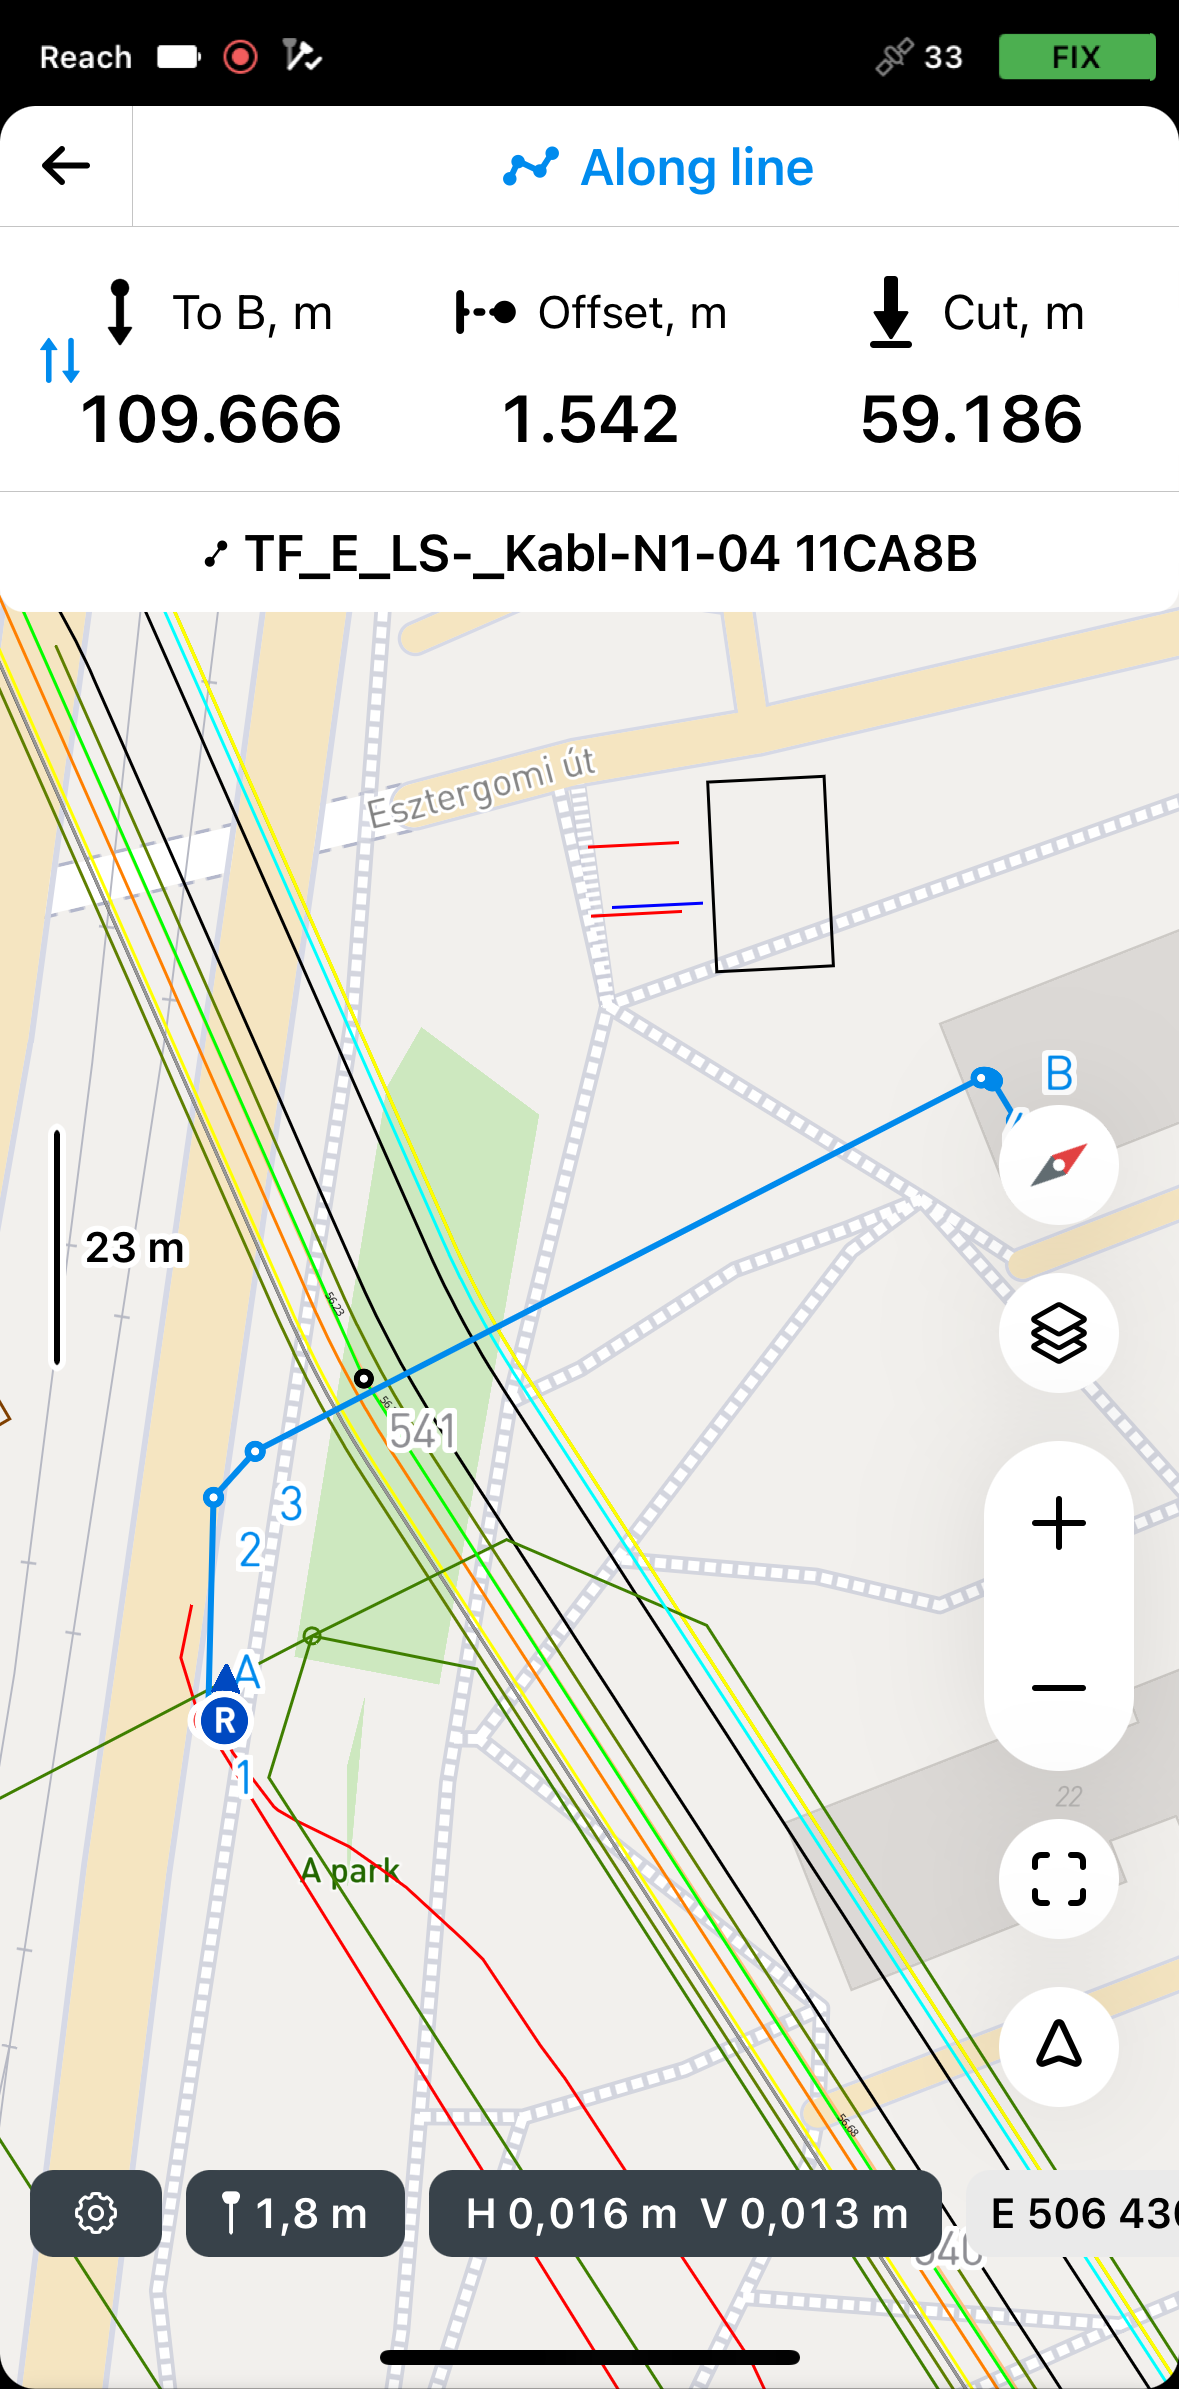
tipThe stakeout plate displays the offset direction using positive and negative values. A negative value appears when the rover is positioned on the left side of the line, and a positive value when on the right. Additionally, the offset icon flips to reflect the rover’s position relative to the line.
-
Tap the To B section to choose the end of the line from which the stakeout will begin.
-
Move your Reach so that the Offset section turns green, showing that your Reach is less than 2.5 cm (0.08 ft) away from the line you are staking out.
 note
noteEnsure the pole isn't tilted if you use a Reach receiver model other than Reach RS3.
-
Watching the Offset section, check if the line is set out according to the project.
tipYou can also stake out a line with a chainage watching the To A or To B section.
-
Watching the Cut & Fill section, check the height value, if necessary.
-
To finish staking out the line, tap the back button on the Stakeout plate.
Once you've finished staking out the line, you can either tap another line on the map to start a new stakeout or tap the back button to exit the Line stakeout tool.
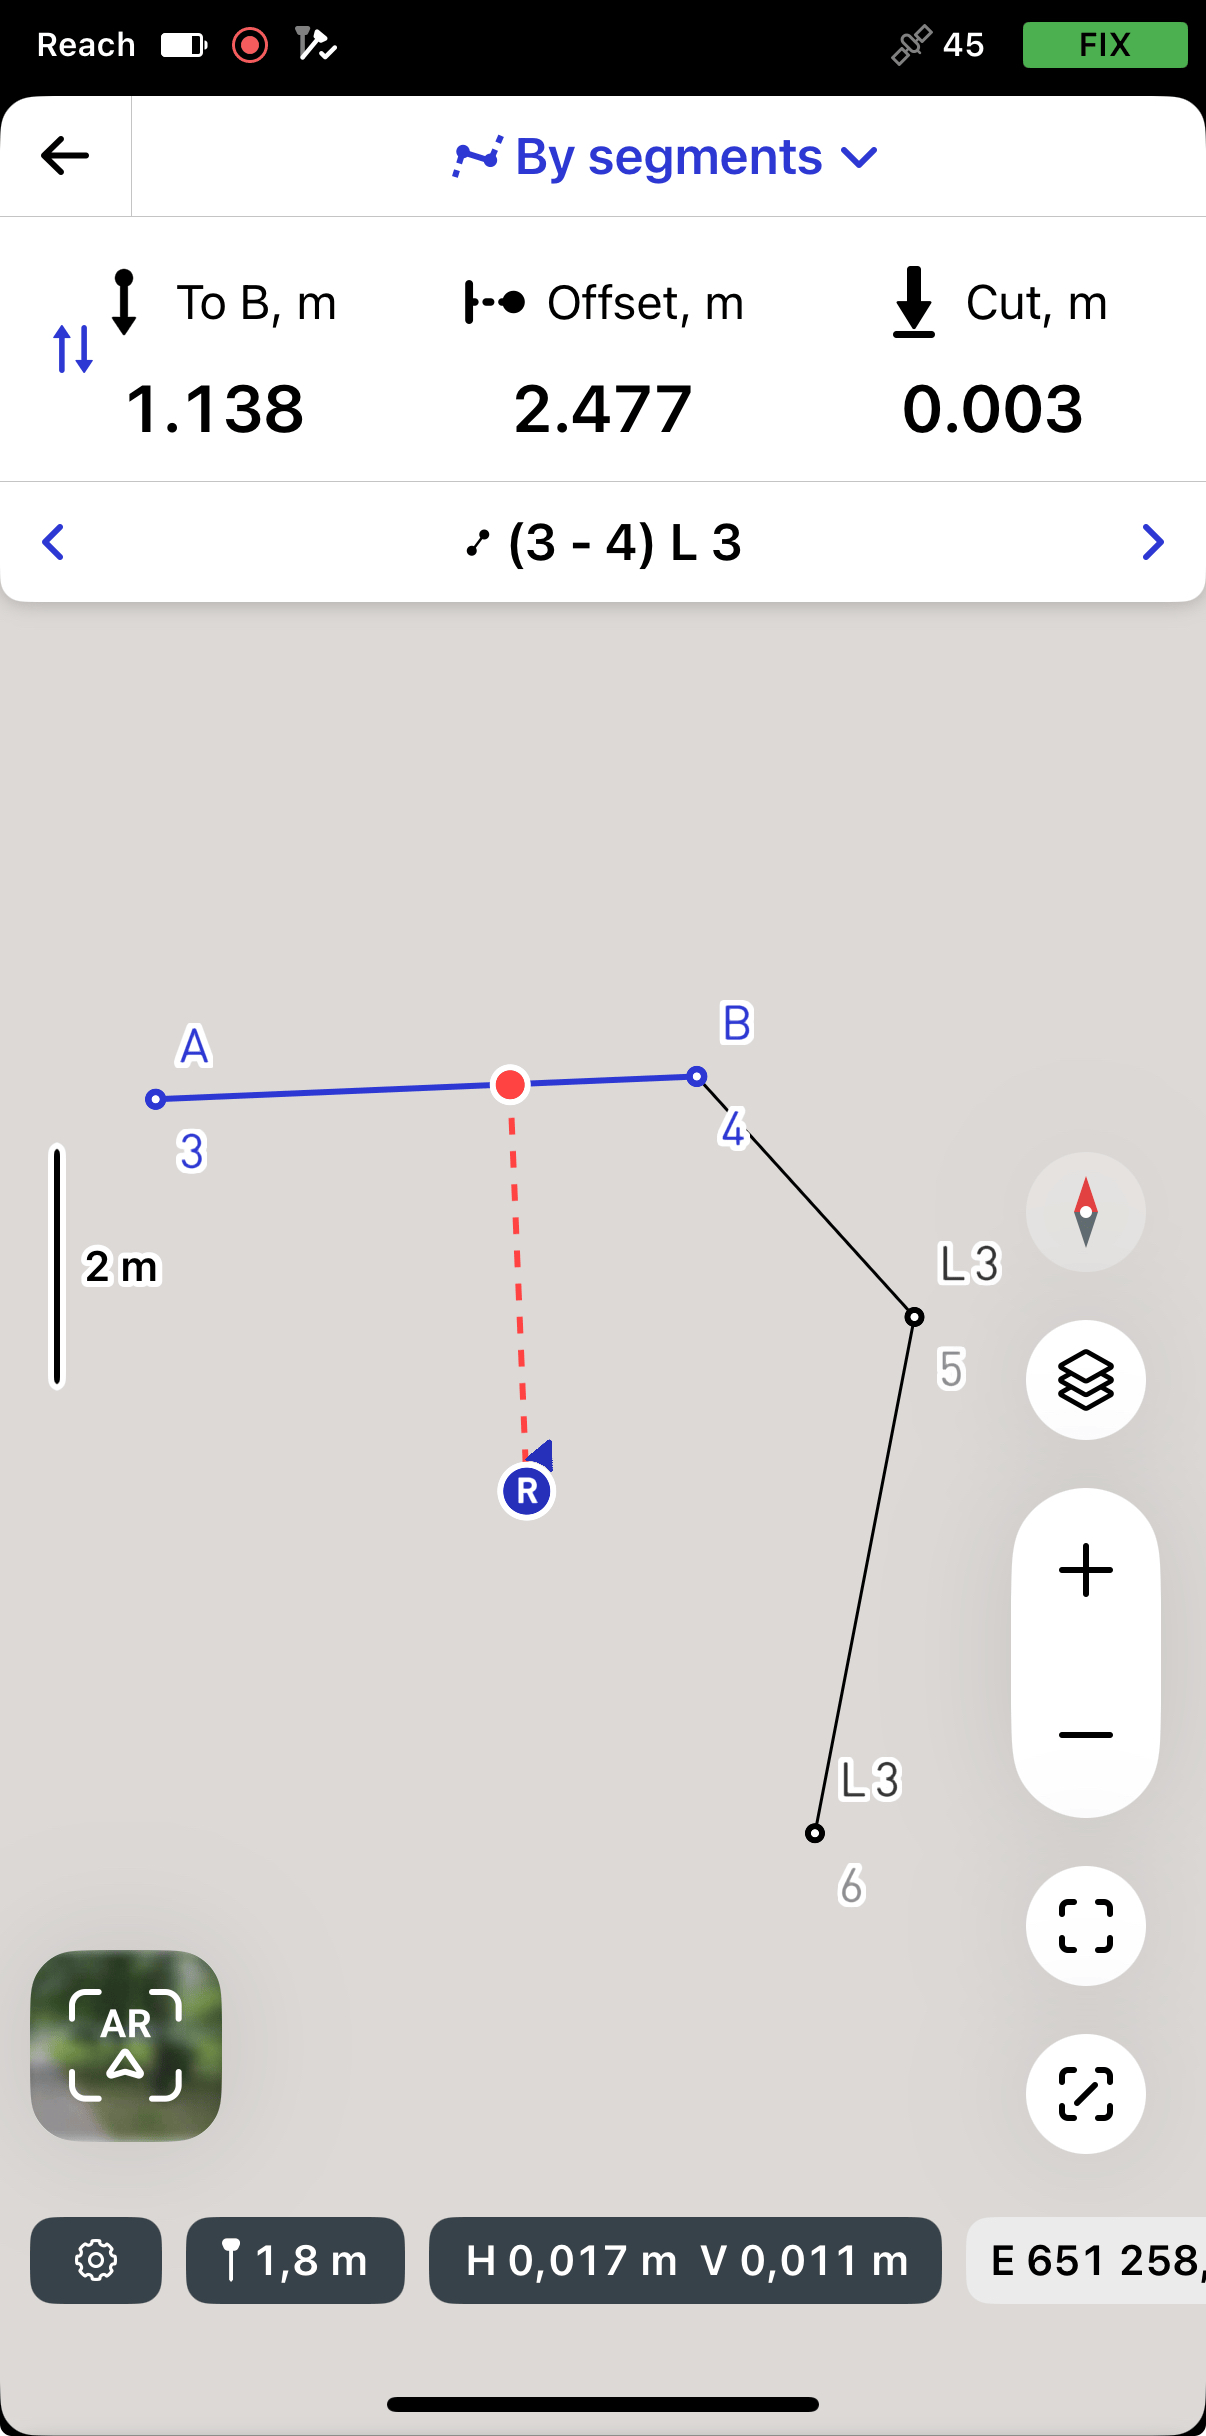
Map-based stakeout using By segments mode
To stake out segments of a line or polygon using the By segments mode, follow the steps below:
-
In Emlid Flow, open your project.
-
Tap the Stake out button. The Along line mode is applied by default. The segment will get the A and B labels at the start and the end points.

 note
noteEmlid Flow remembers the last mode used. If you’ve previously used the Line stakeout tool and a different mode is active, tap the stakeout plate to view all available modes.
tipEmlid Flow indicates the direction of the offset using positive and negative values. The stakeout plate displays a negative offset when the rover is on the left side of the line. If the rover is on the right, the offset value will be positive. Additionally, the offset icon flips based on the rover’s position to visually represent the direction.
-
To access the modes, tap the stakeout plate, select By segments, and tap Save.

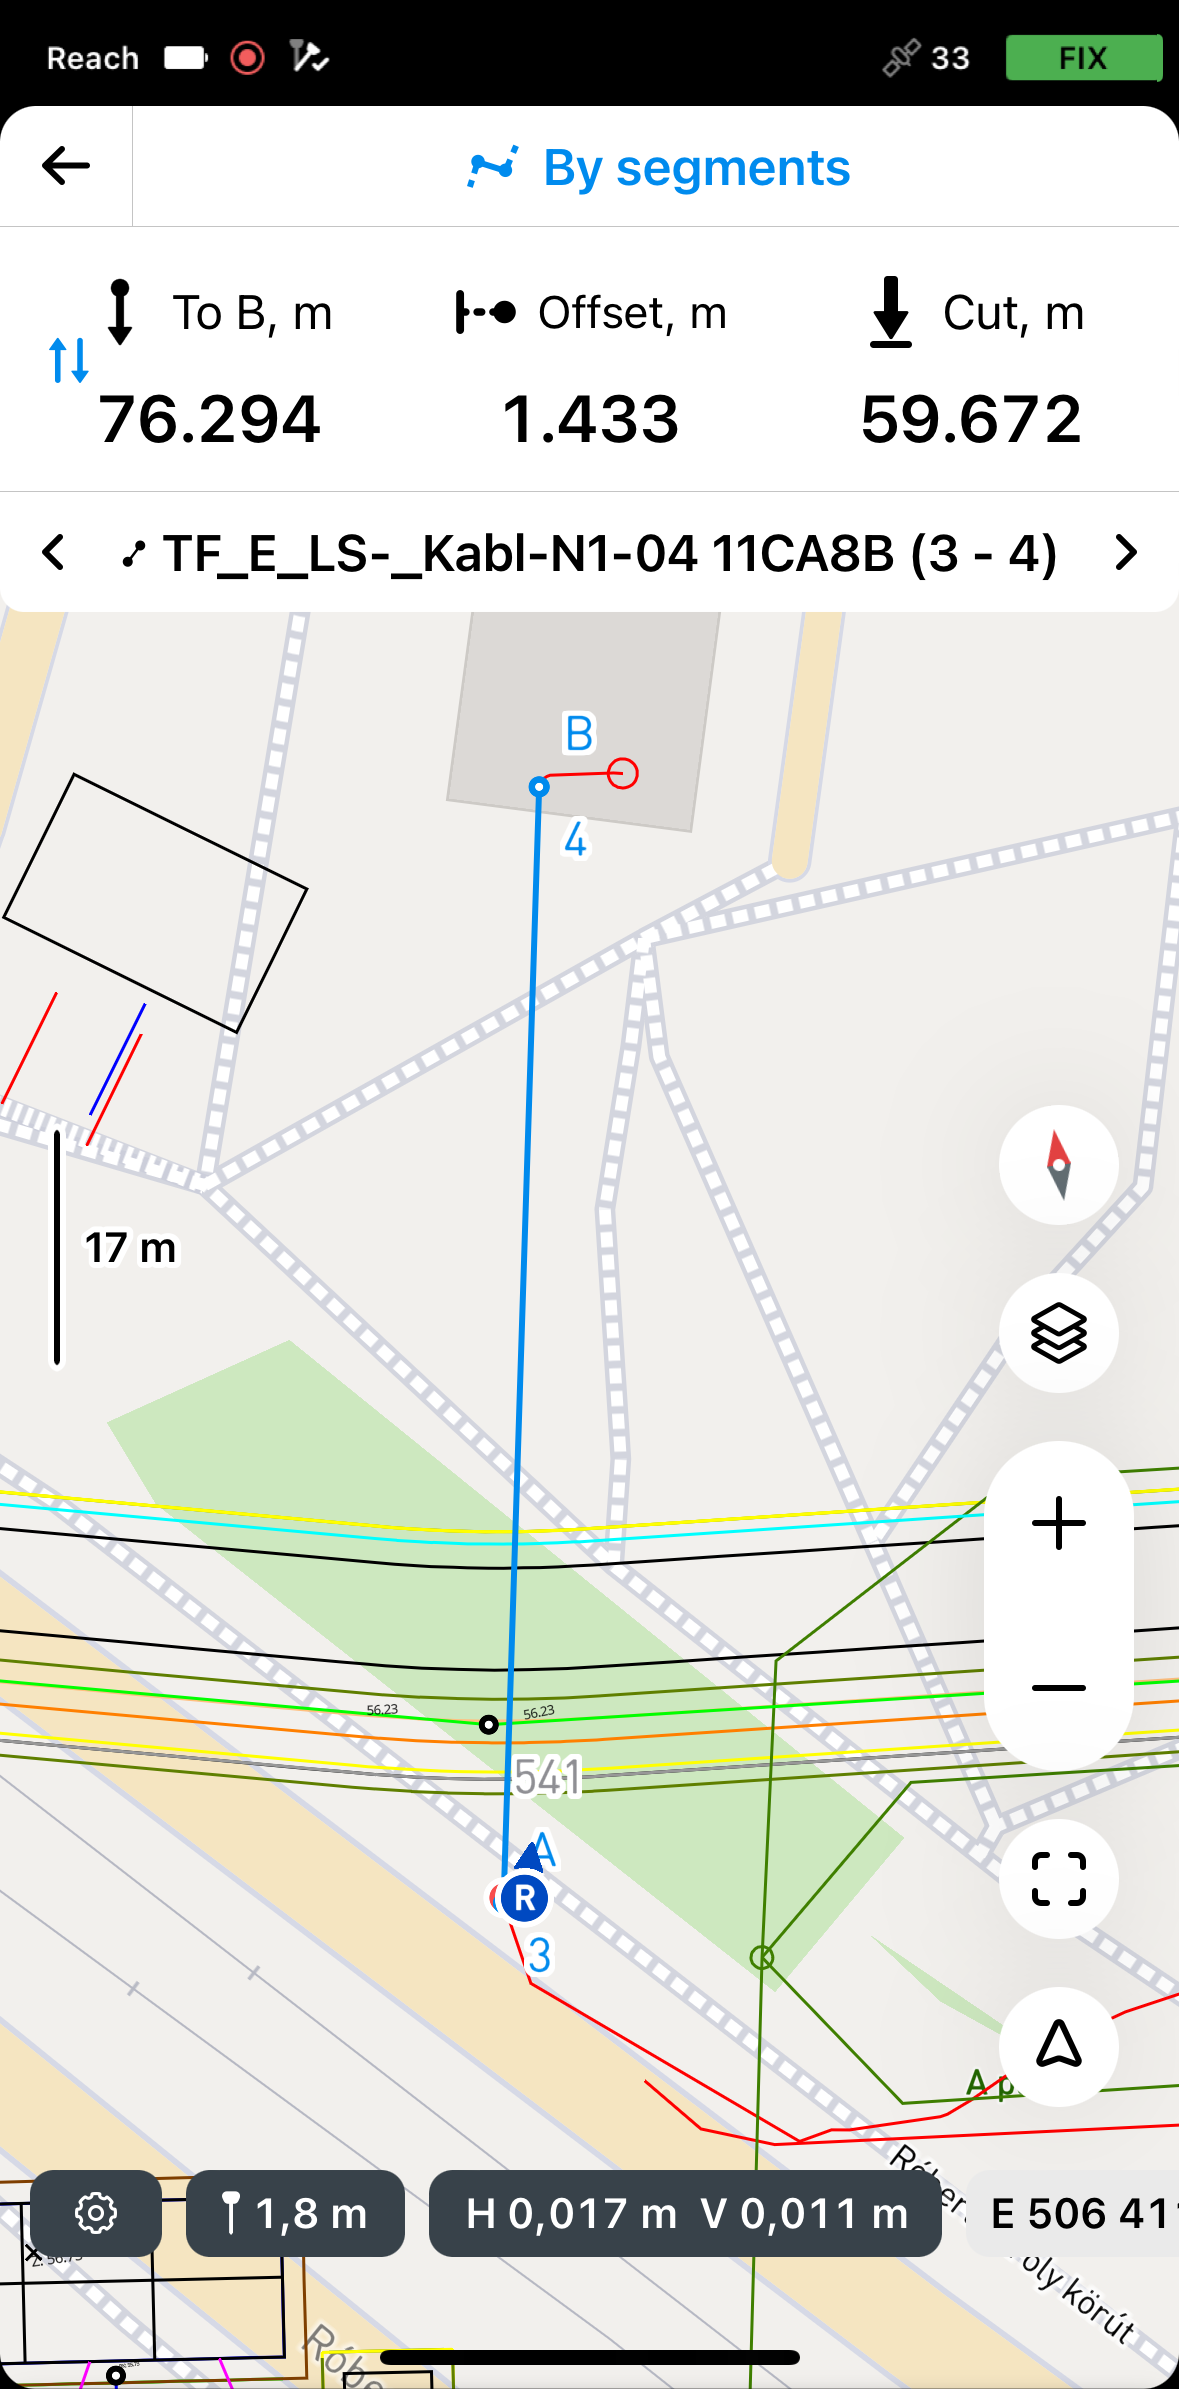
By default, the stakeout process begins from the nearest segment. To stake out a specific segment, use the arrows on the Stakeout plate to navigate to the desired segment.
-
Tap the To B section to choose the end of the line from which the stakeout will begin.
-
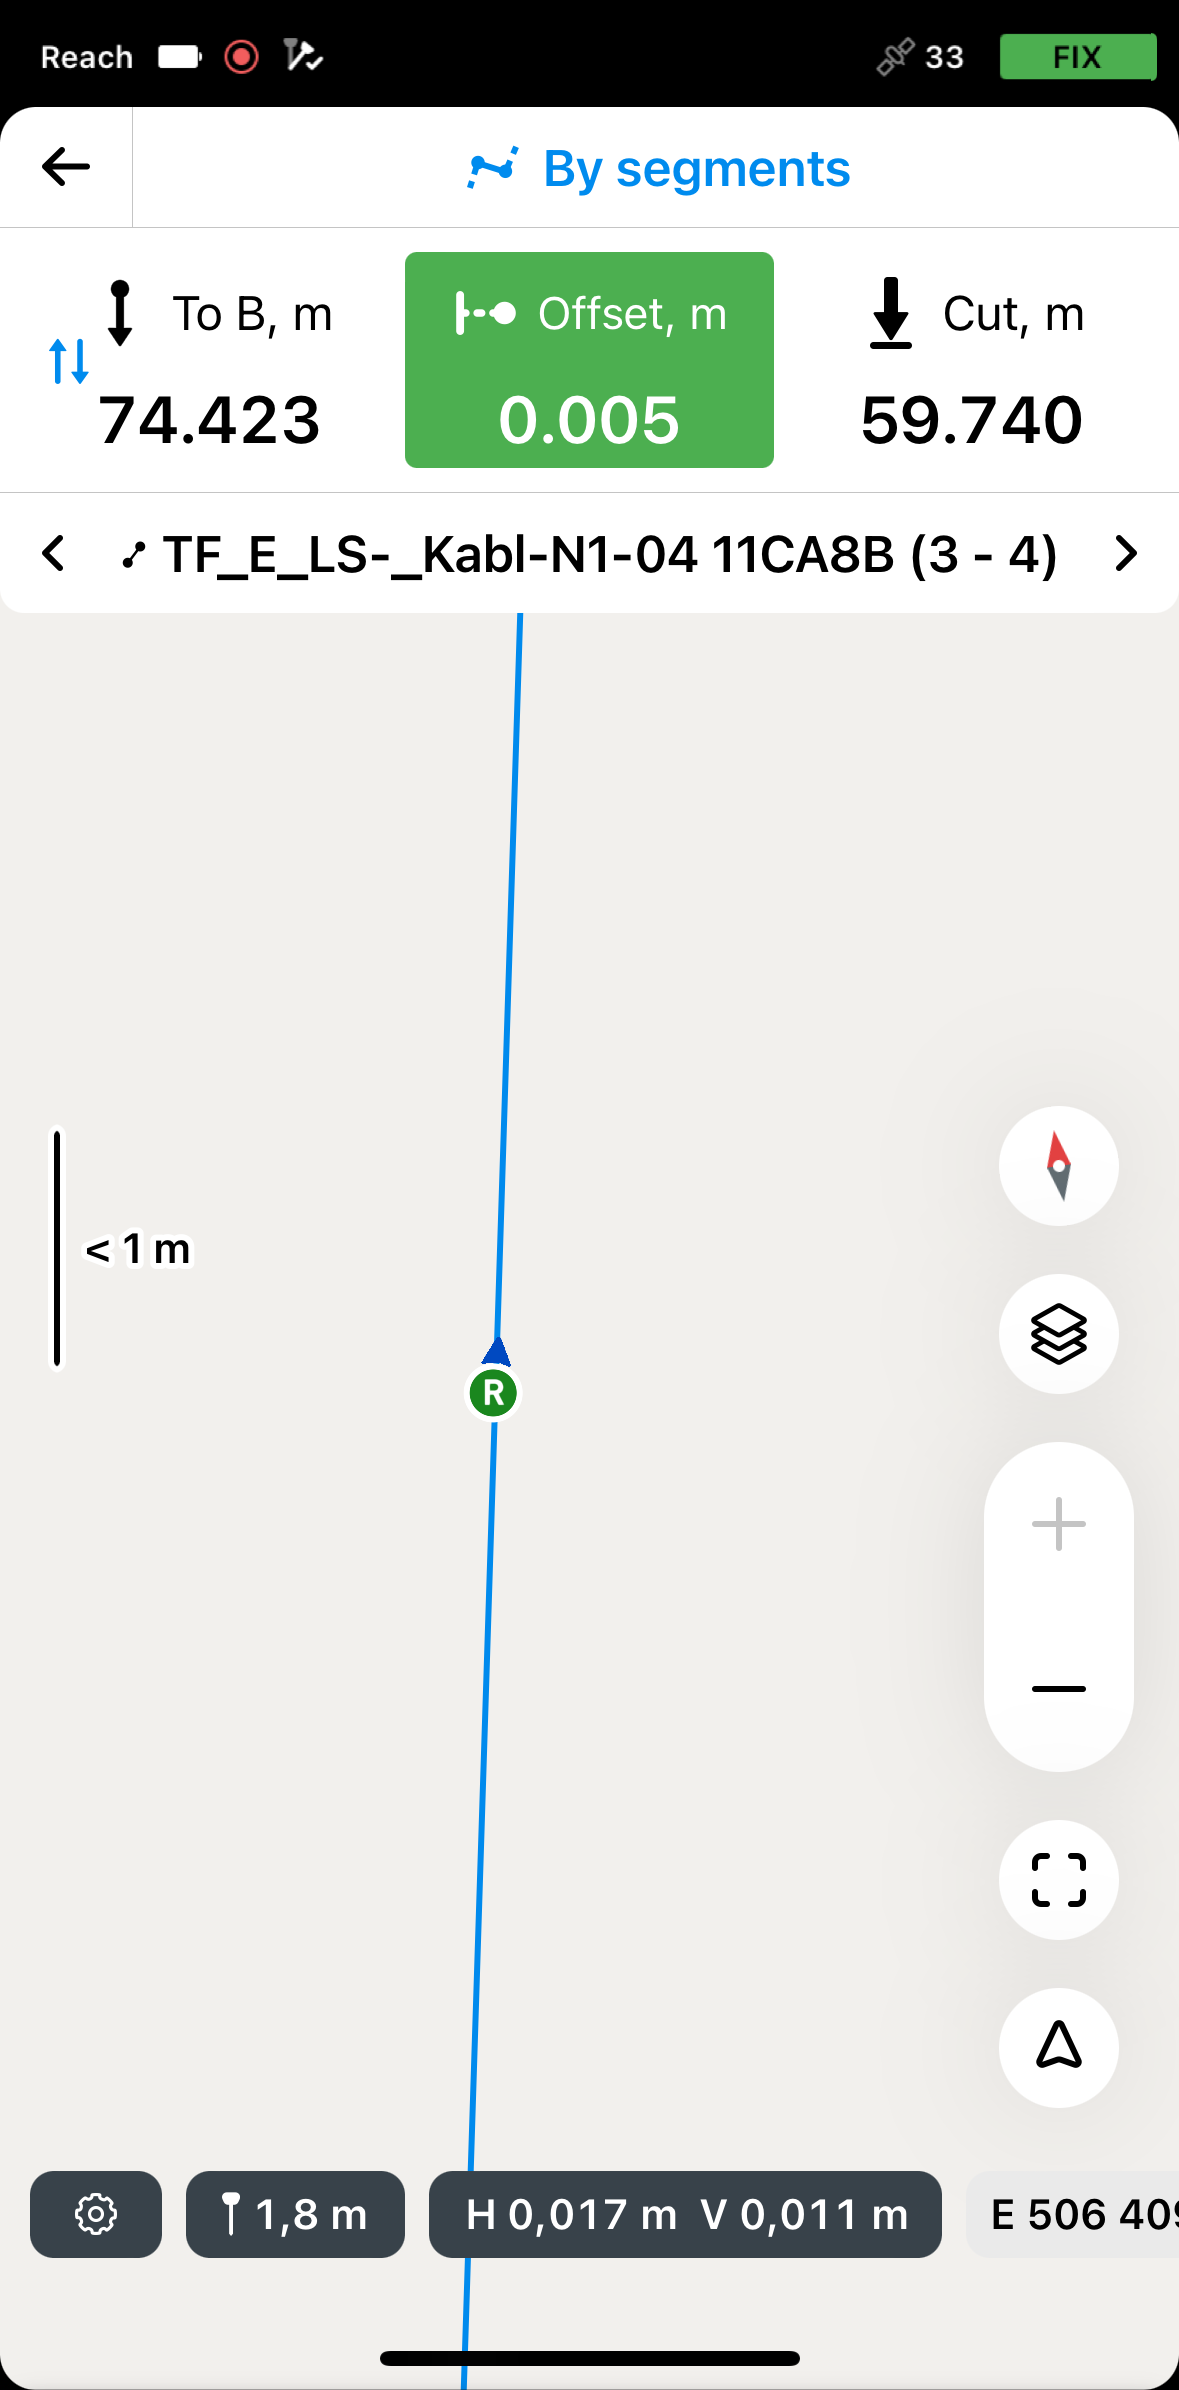
Move your Reach so that the Offset section turns green, showing that your Reach is less than 2.5 cm (0.08 ft) away from the line you are staking out.
 note
noteEnsure the pole isn't tilted if you use a Reach receiver model other than Reach RS3.
-
Watching the Offset section, check if the segment is set out according to the project.
tipYou can also stake out a segment with a chainage watching the To A or To B section.
-
Watching the Cut & Fill section, check the height value, if necessary.
-
Switch to another segment you want to stake out using the arrow buttons on the Stakeout plate.
-
To finish staking out the segments of a line or polygon, tap the back button on the Stakeout plate.
Once you've finished staking out the line or polygon segments, you can either tap another line or polygon on the map to start a new stakeout or tap the back button to exit the Line stakeout tool.
Map-based stakeout using By intervals & offsets mode
To apply intervals and offsets, your project must be in a local coordinate system. You also need to make sure your line is within the selected coordinate system boundaries.
To stake out the line with intervals and offsets using the By intervals & offsets mode, do as follows:
-
In Emlid Flow, open your project.
-
Choose a line on the map or from the list. The selected line will be highlighted in blue on the map.

-
Tap the Stake out button. The Along line mode is applied by default.
 note
noteEmlid Flow remembers the last mode used. If you’ve previously used the Line stakeout tool and a different mode is active, tap the top of the Stakeout plate or tap the survey settings to access the menu with all available modes, then select Along line.
-
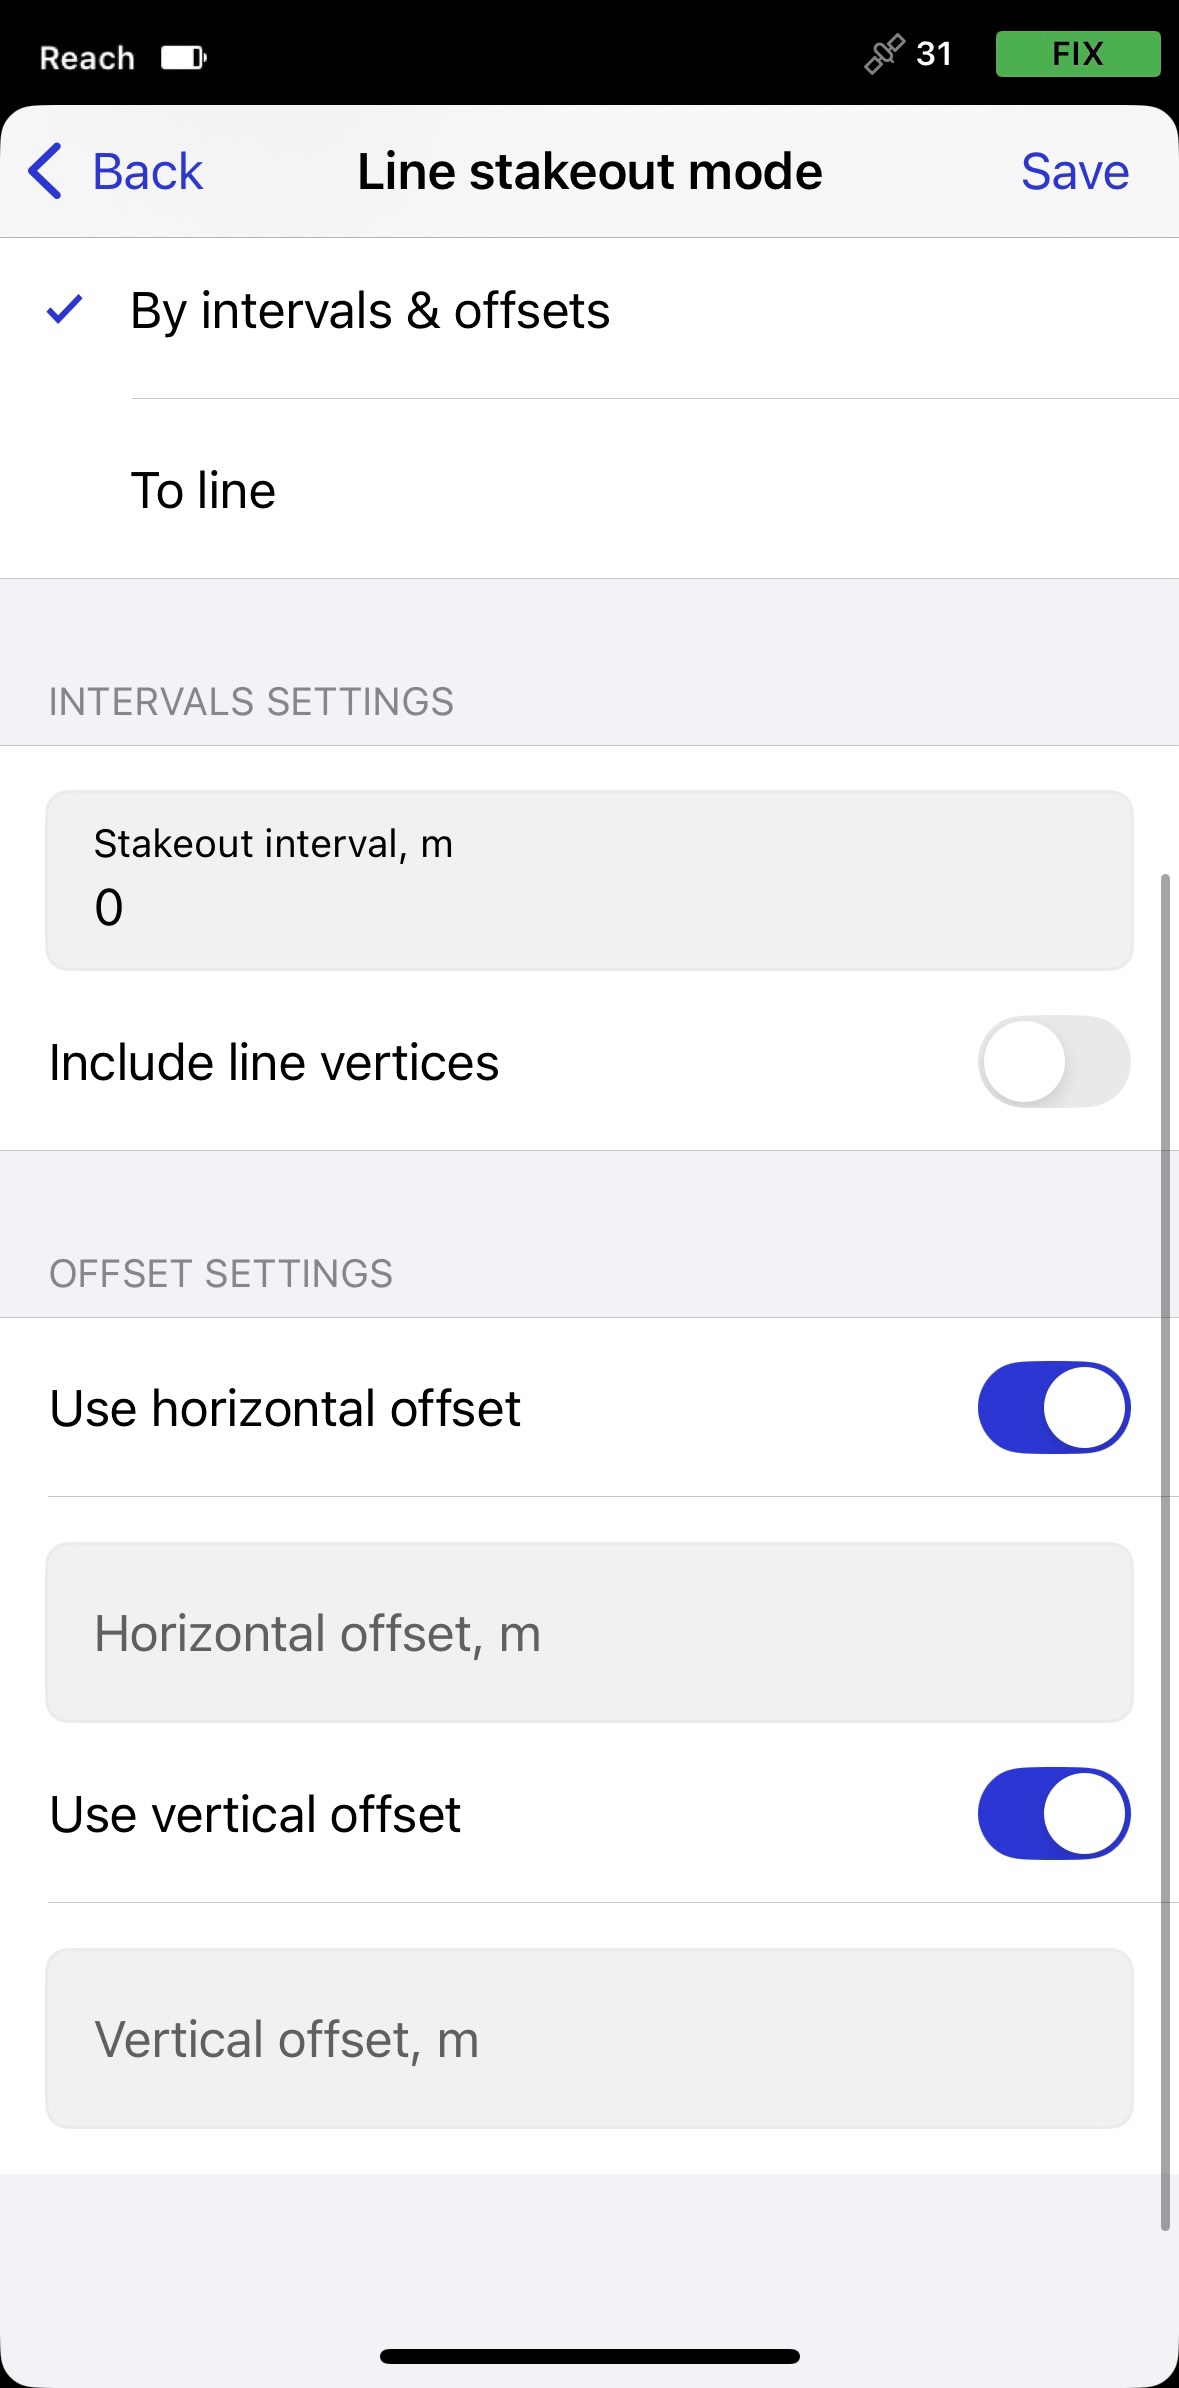
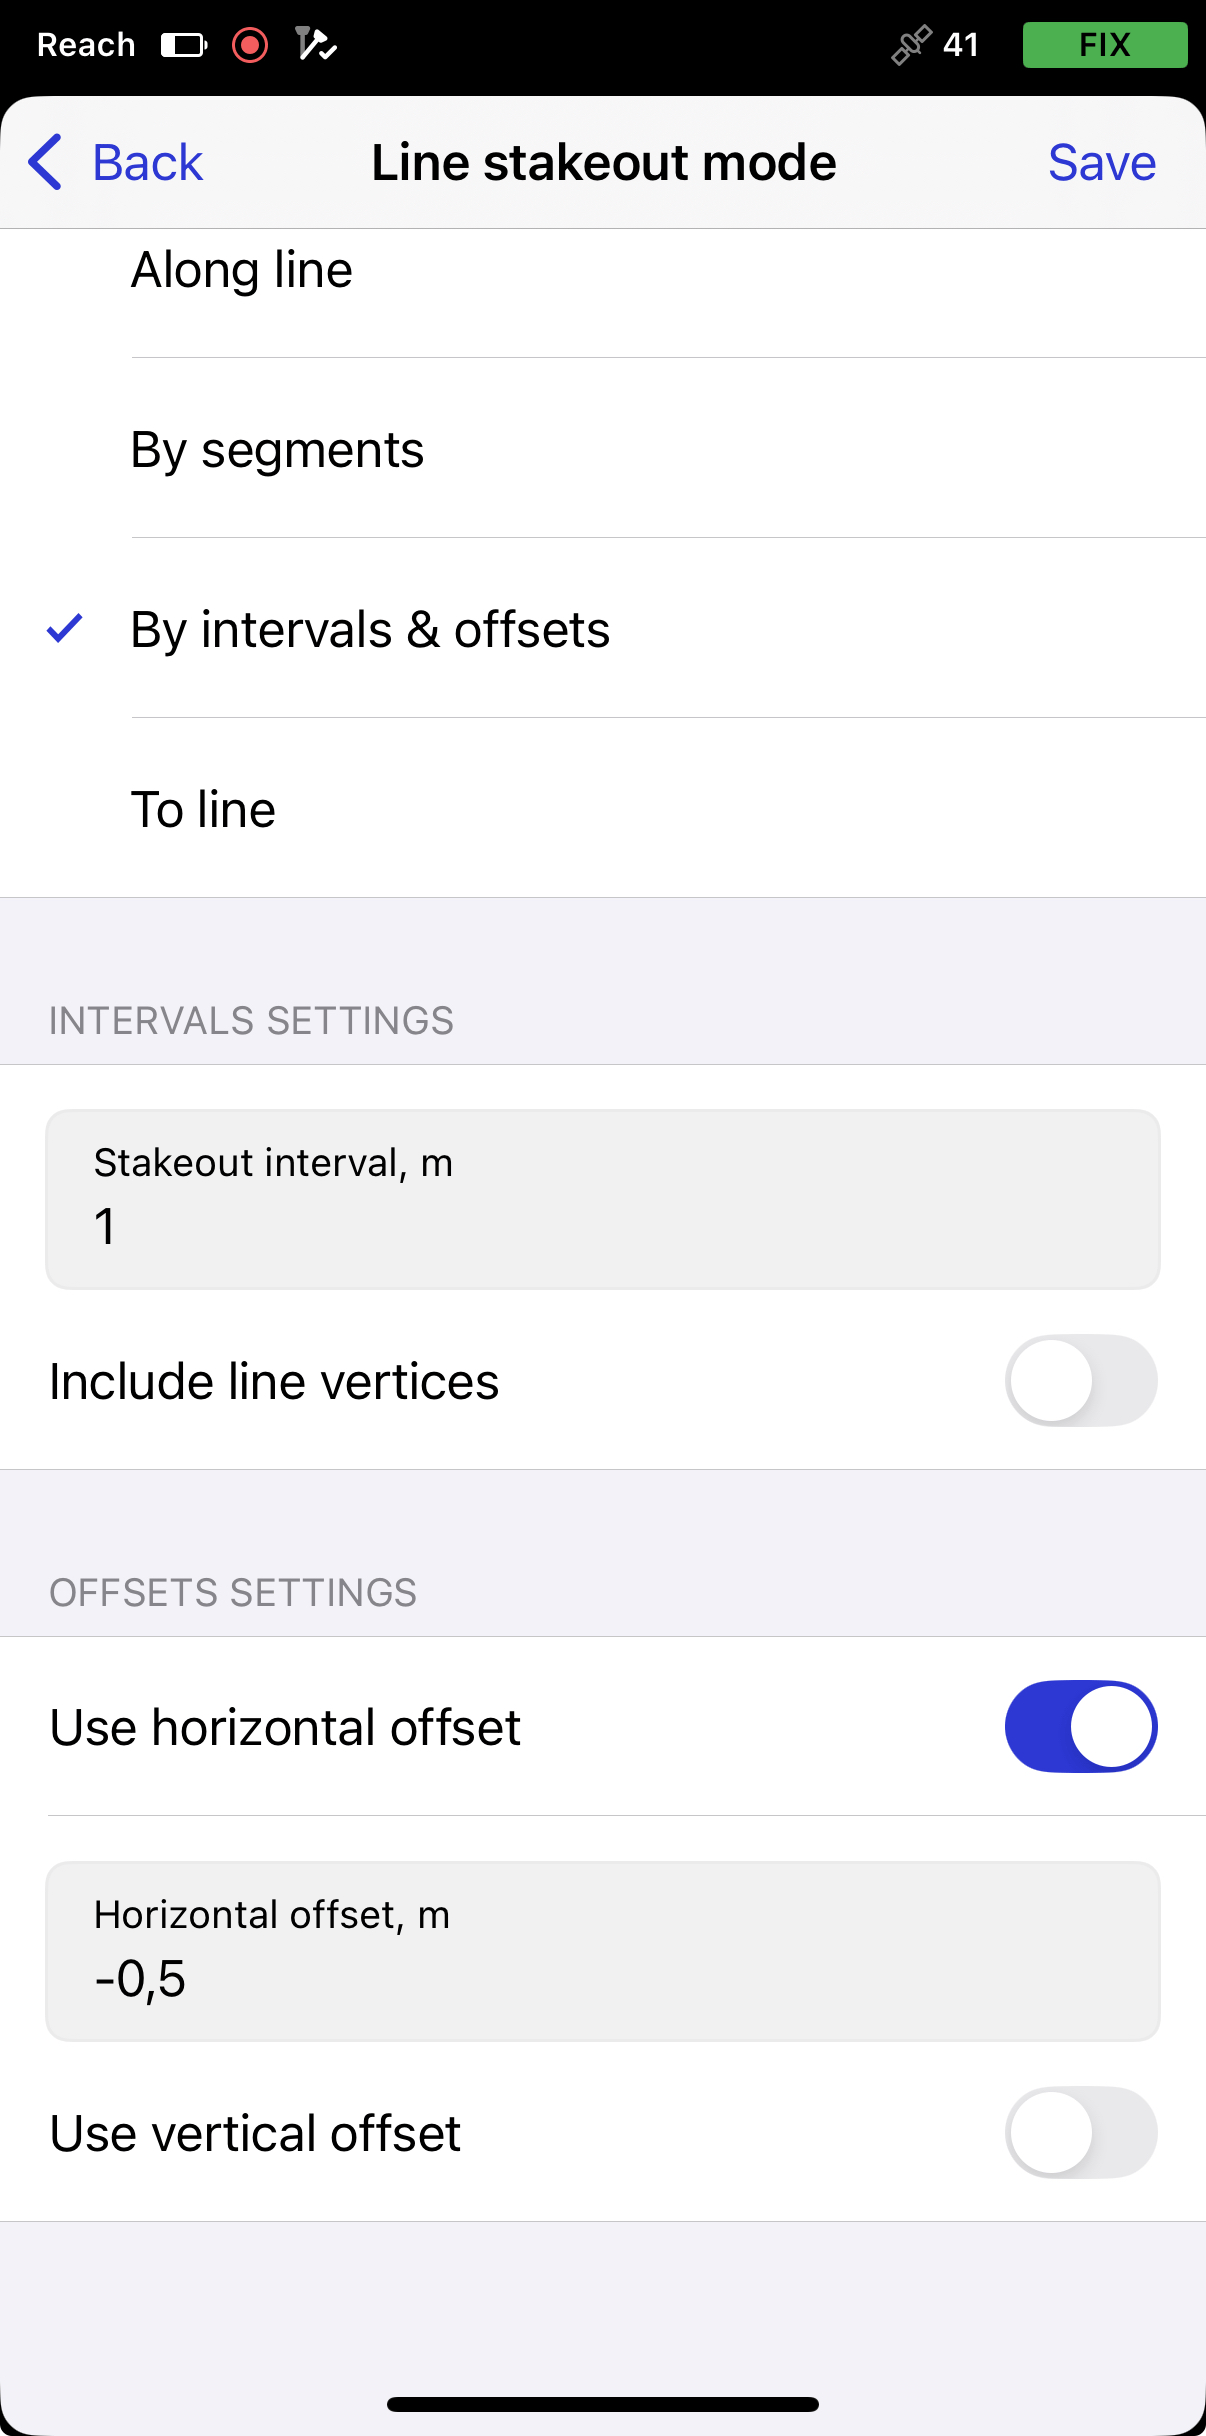
To access the modes, tap the Stakeout plate, select By intervals & offsets. After selecting the mode, the settings for intervals, horizontal offsets, and vertical offsets will appear.


-
Enable the necessary options and enter the values:
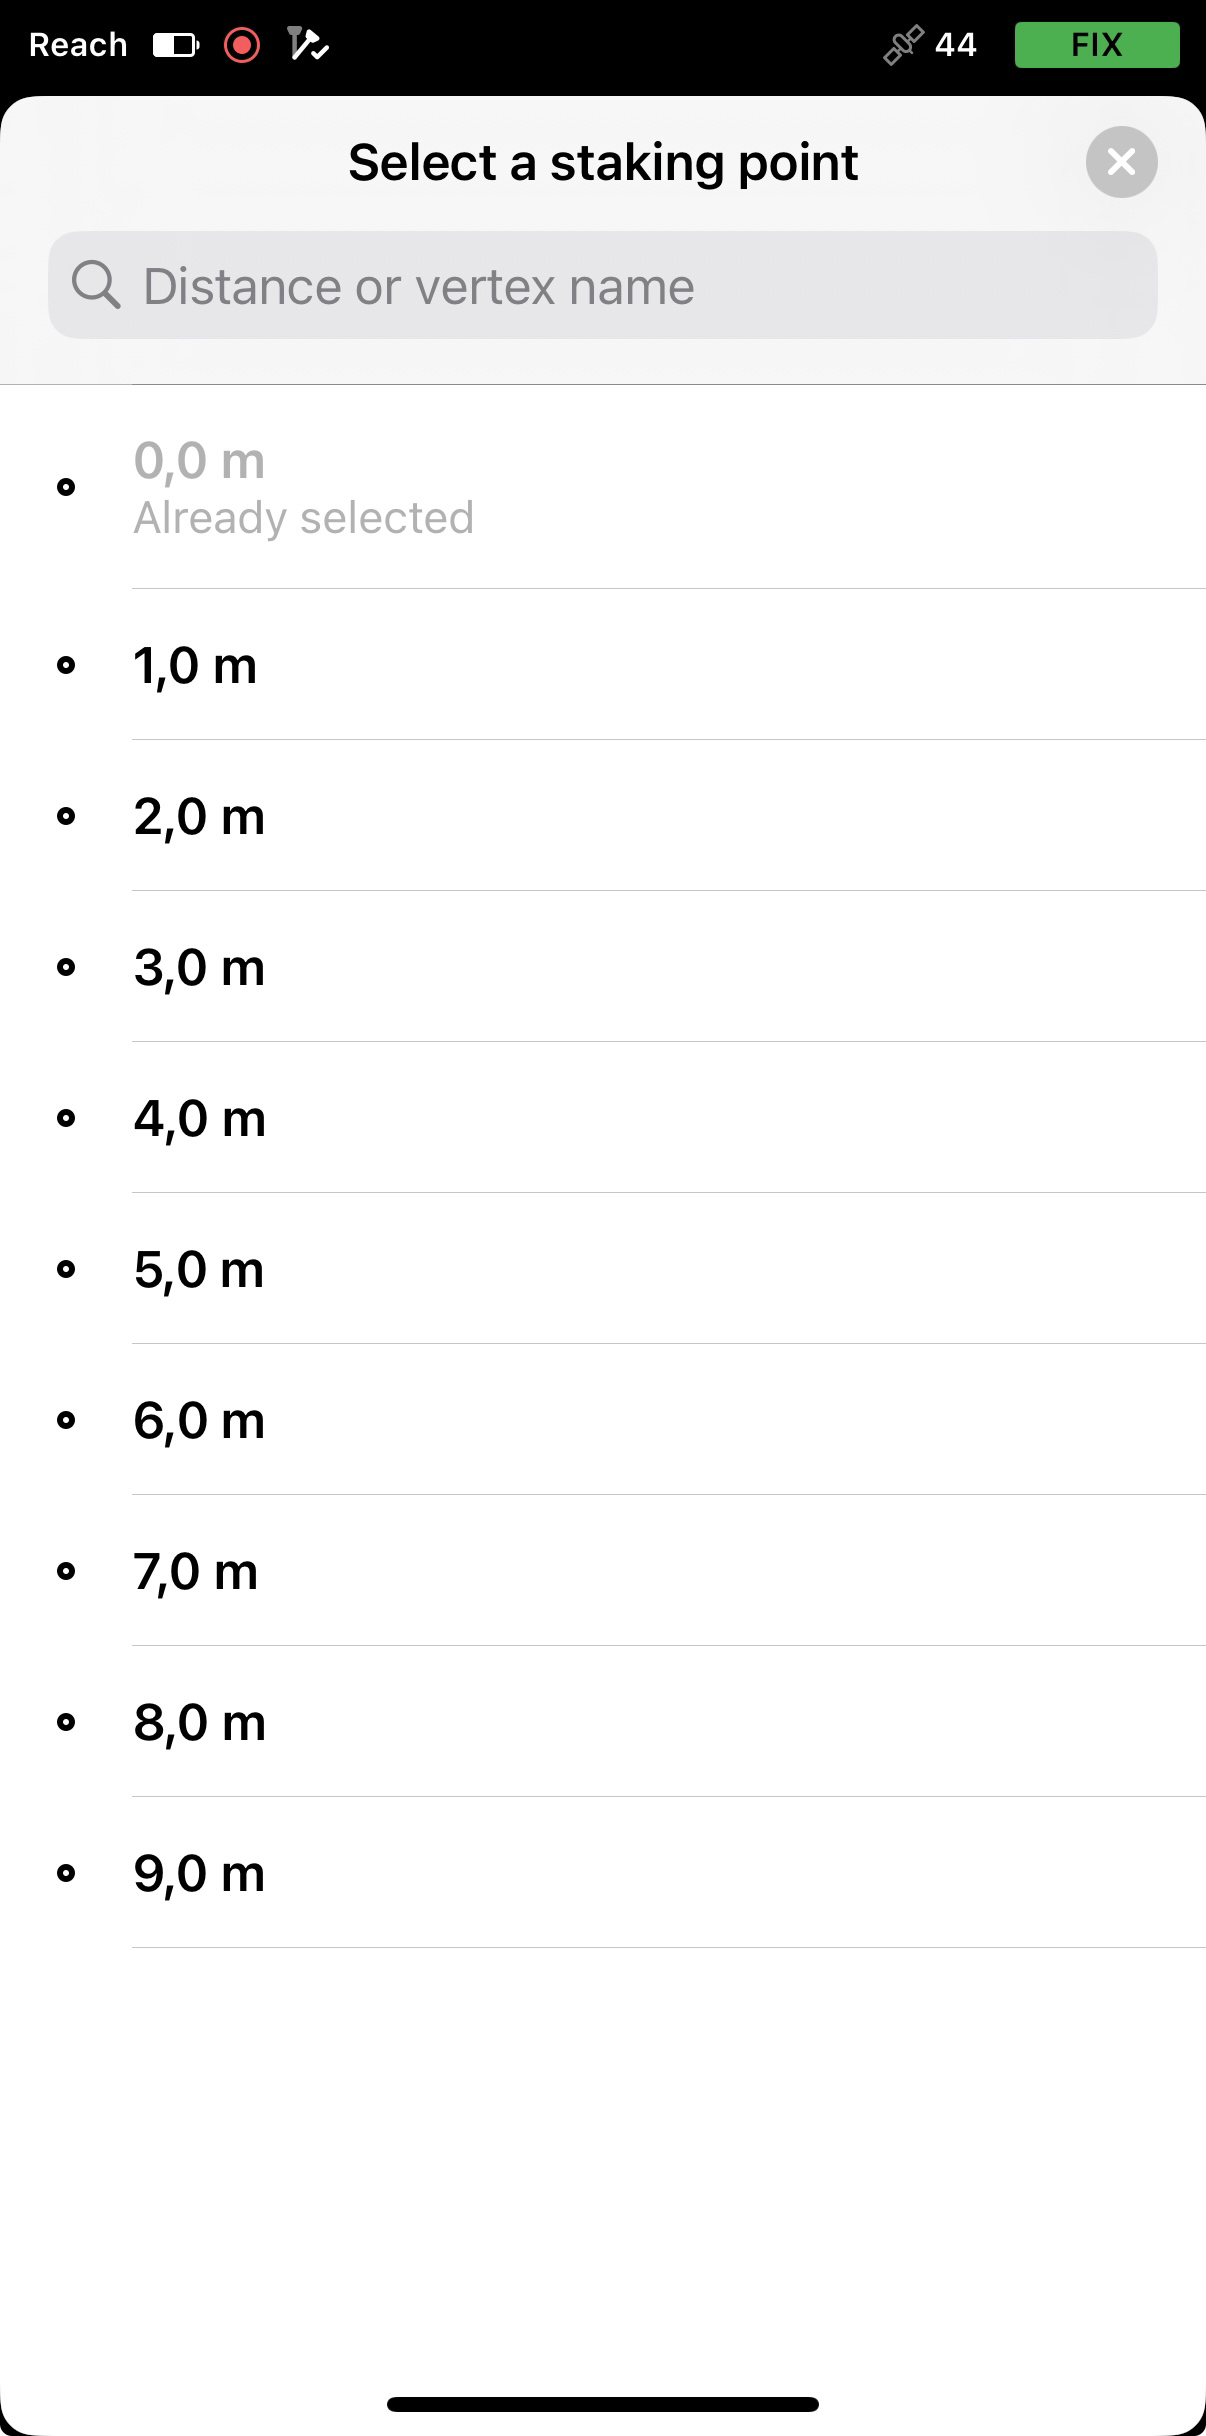
- When configuring intervals, the app will generate temporary interval points for stakeout which you can access using the selected line menu. You can also include line vertices.


-
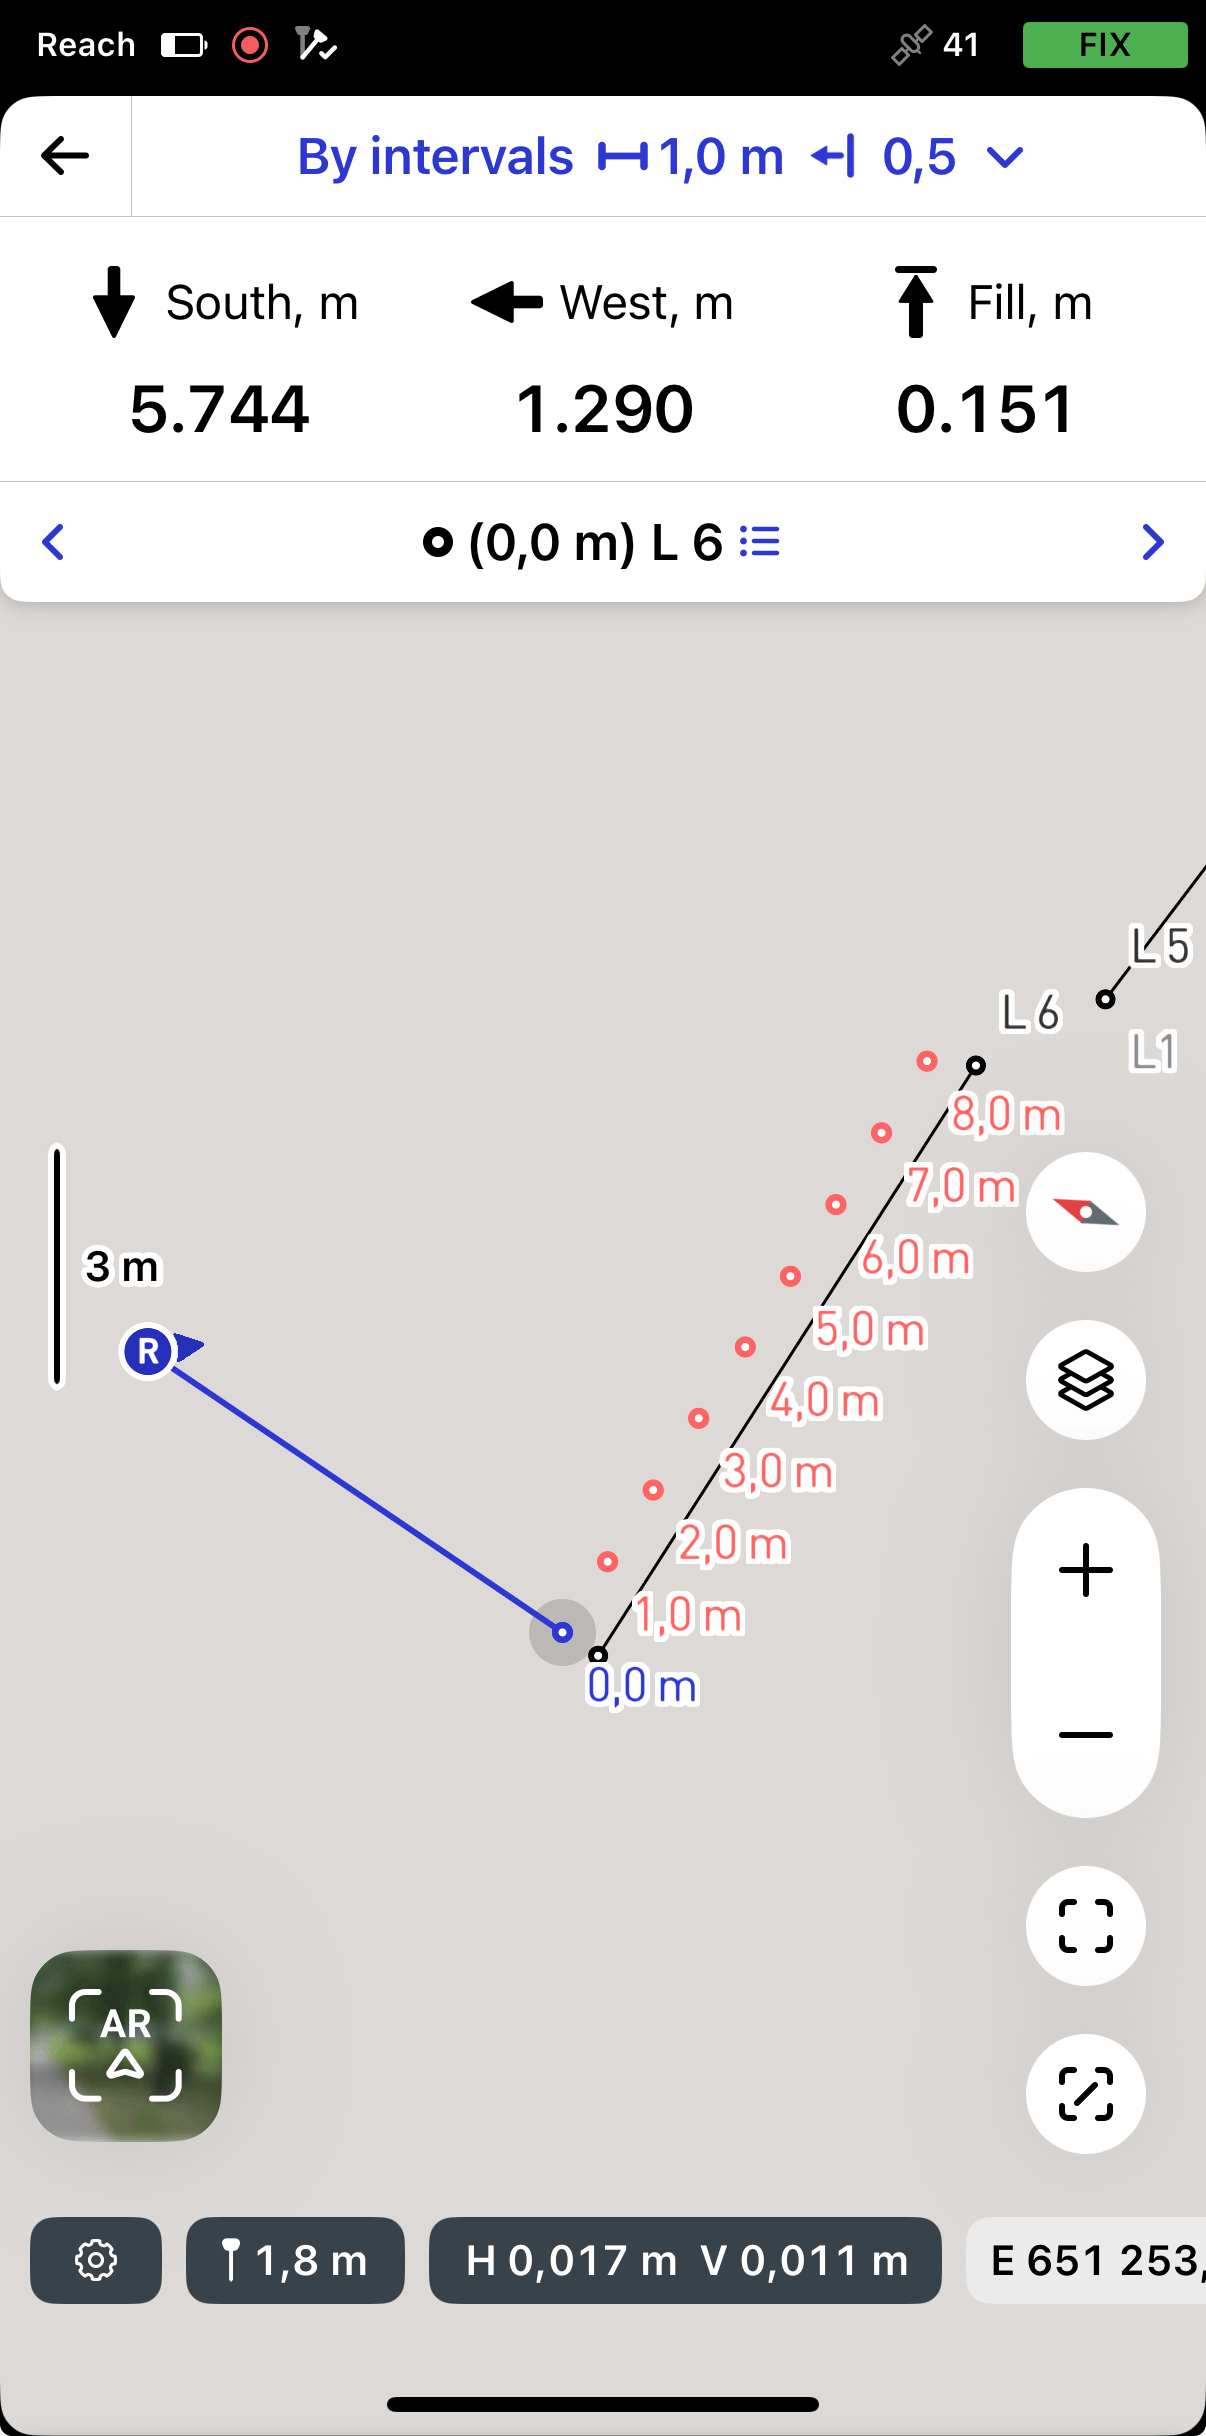
When configuring offsets, you can apply horizontal, vertical, or both types depending on your project requirements. For horizontal offsets, use positive values to shift right and negative values to shift left—the offset is applied perpendicular to the segment at the current point. For vertical offsets, use positive values to shift upward and negative values to shift downward.

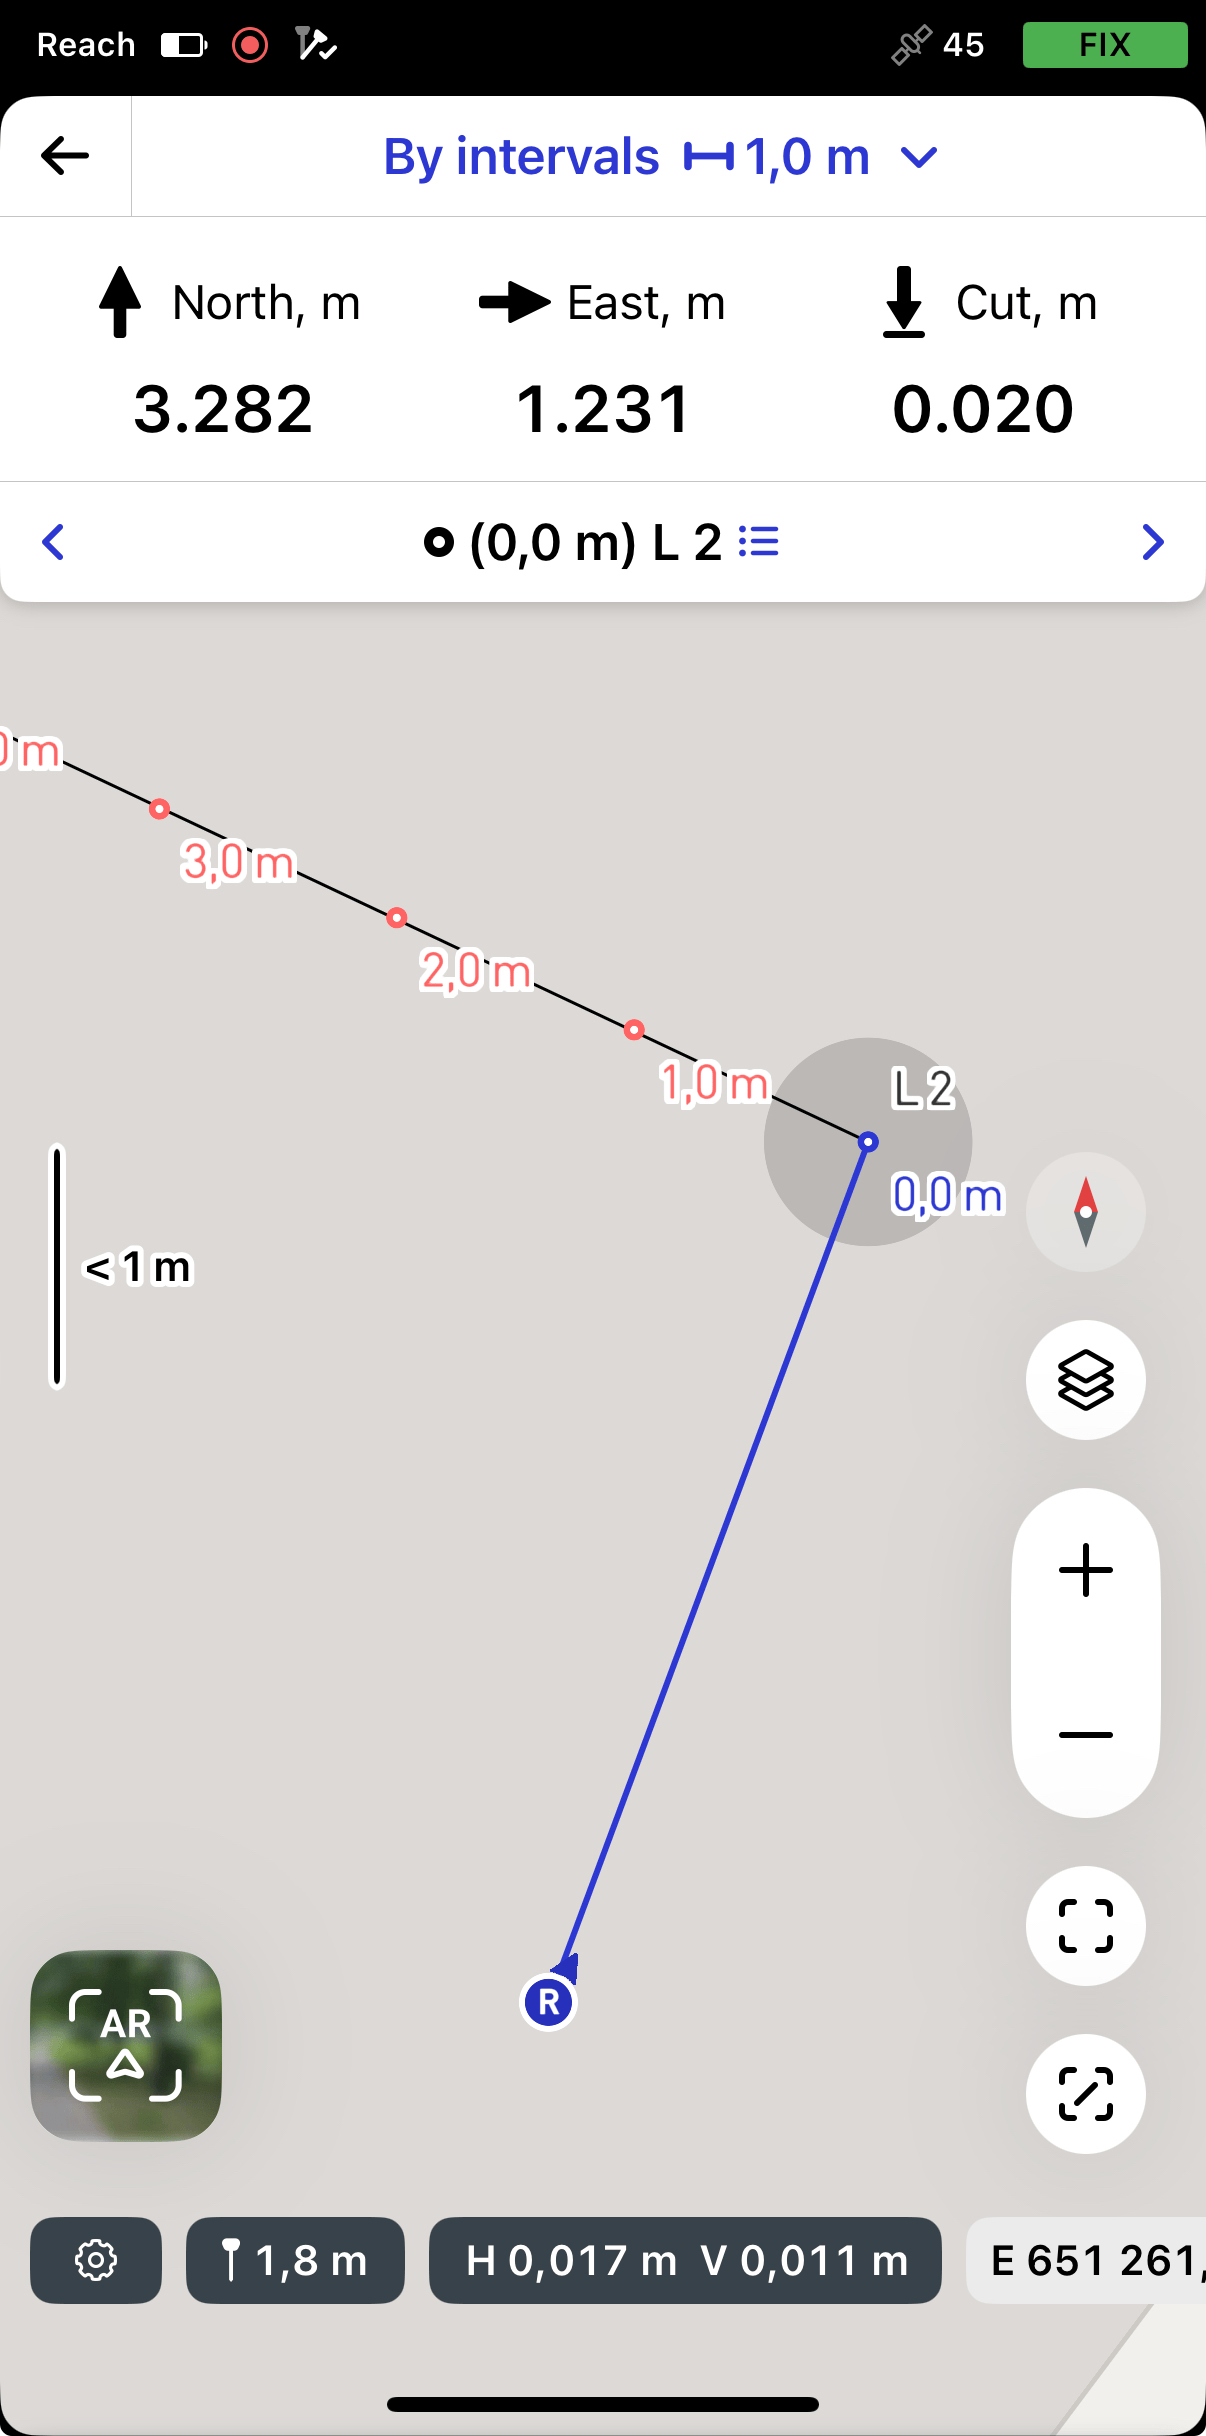
The specified values for both intervals and offsets will be displayed on the Stakeout plate.
-
After applying settings, move your Reach towards the stake point so that bull’s eye turns green, showing that your Reach is less than 2.5 cm (0.08 ft) away from the line you are staking out.
noteEnsure the pole isn't tilted if you use a Reach receiver model other than Reach RS3.
-
Watching the values on the Stakeout plate, check if the line is set out according to the project.
-
To finish staking out the line, tap the back button on the Stakeout plate.
Once you've finished staking out the line, you can either tap another line on the map to start a new stakeout or tap the back button to exit the Line stakeout tool.
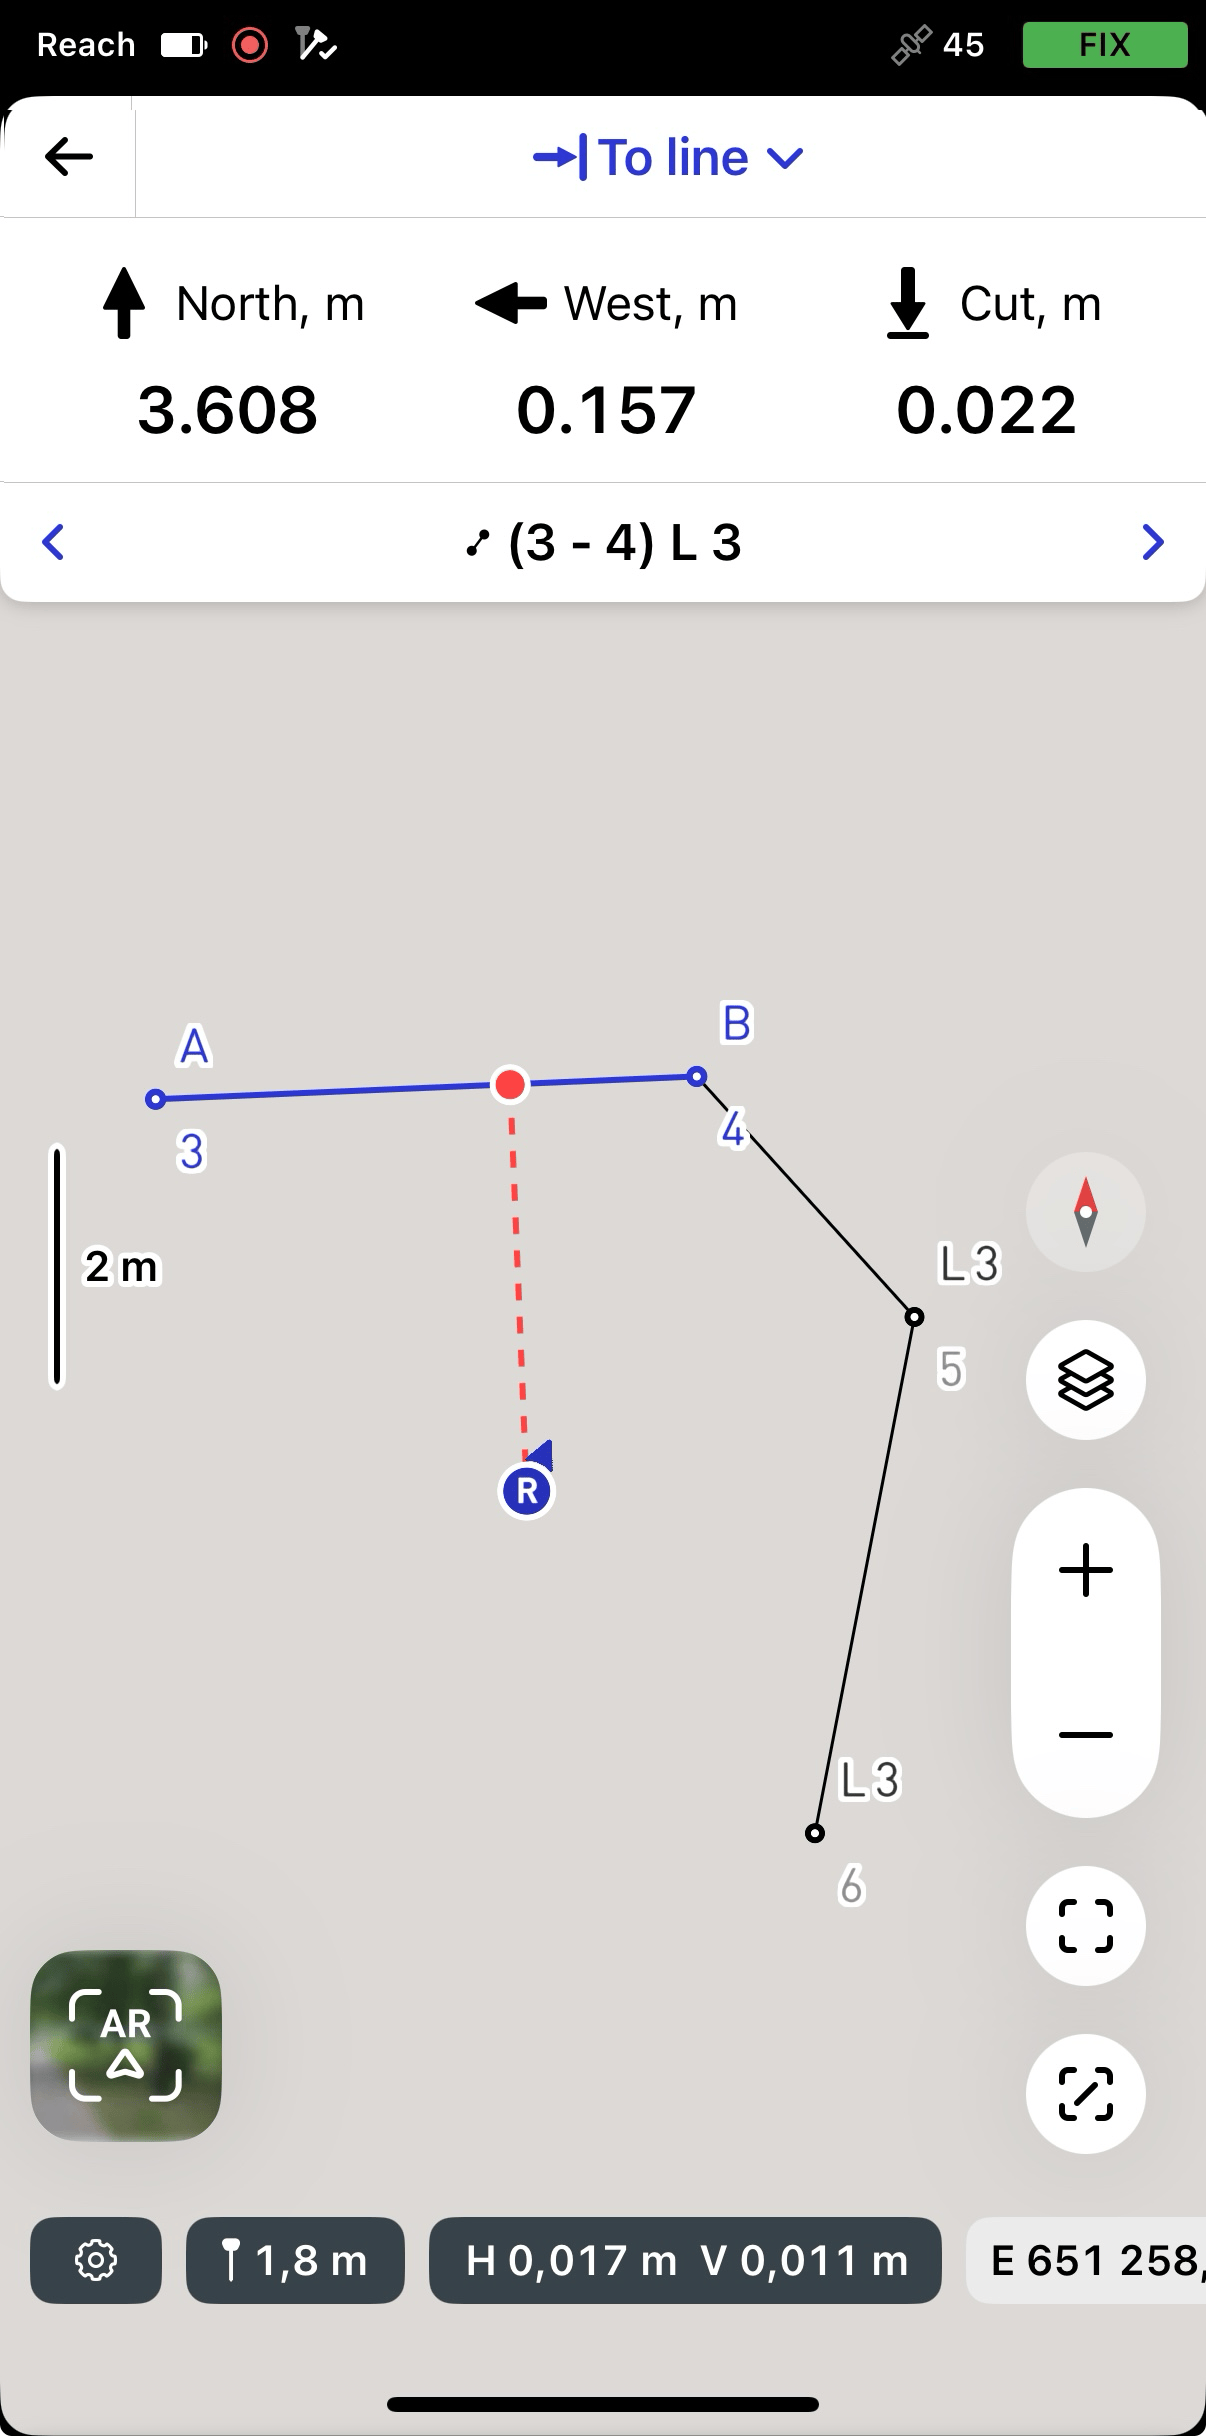
Map-based stakeout using To line mode
The To line mode is an auxiliary one and helps you navigate to the line’s first segment. You can navigate to your line using the following modes:
By direction
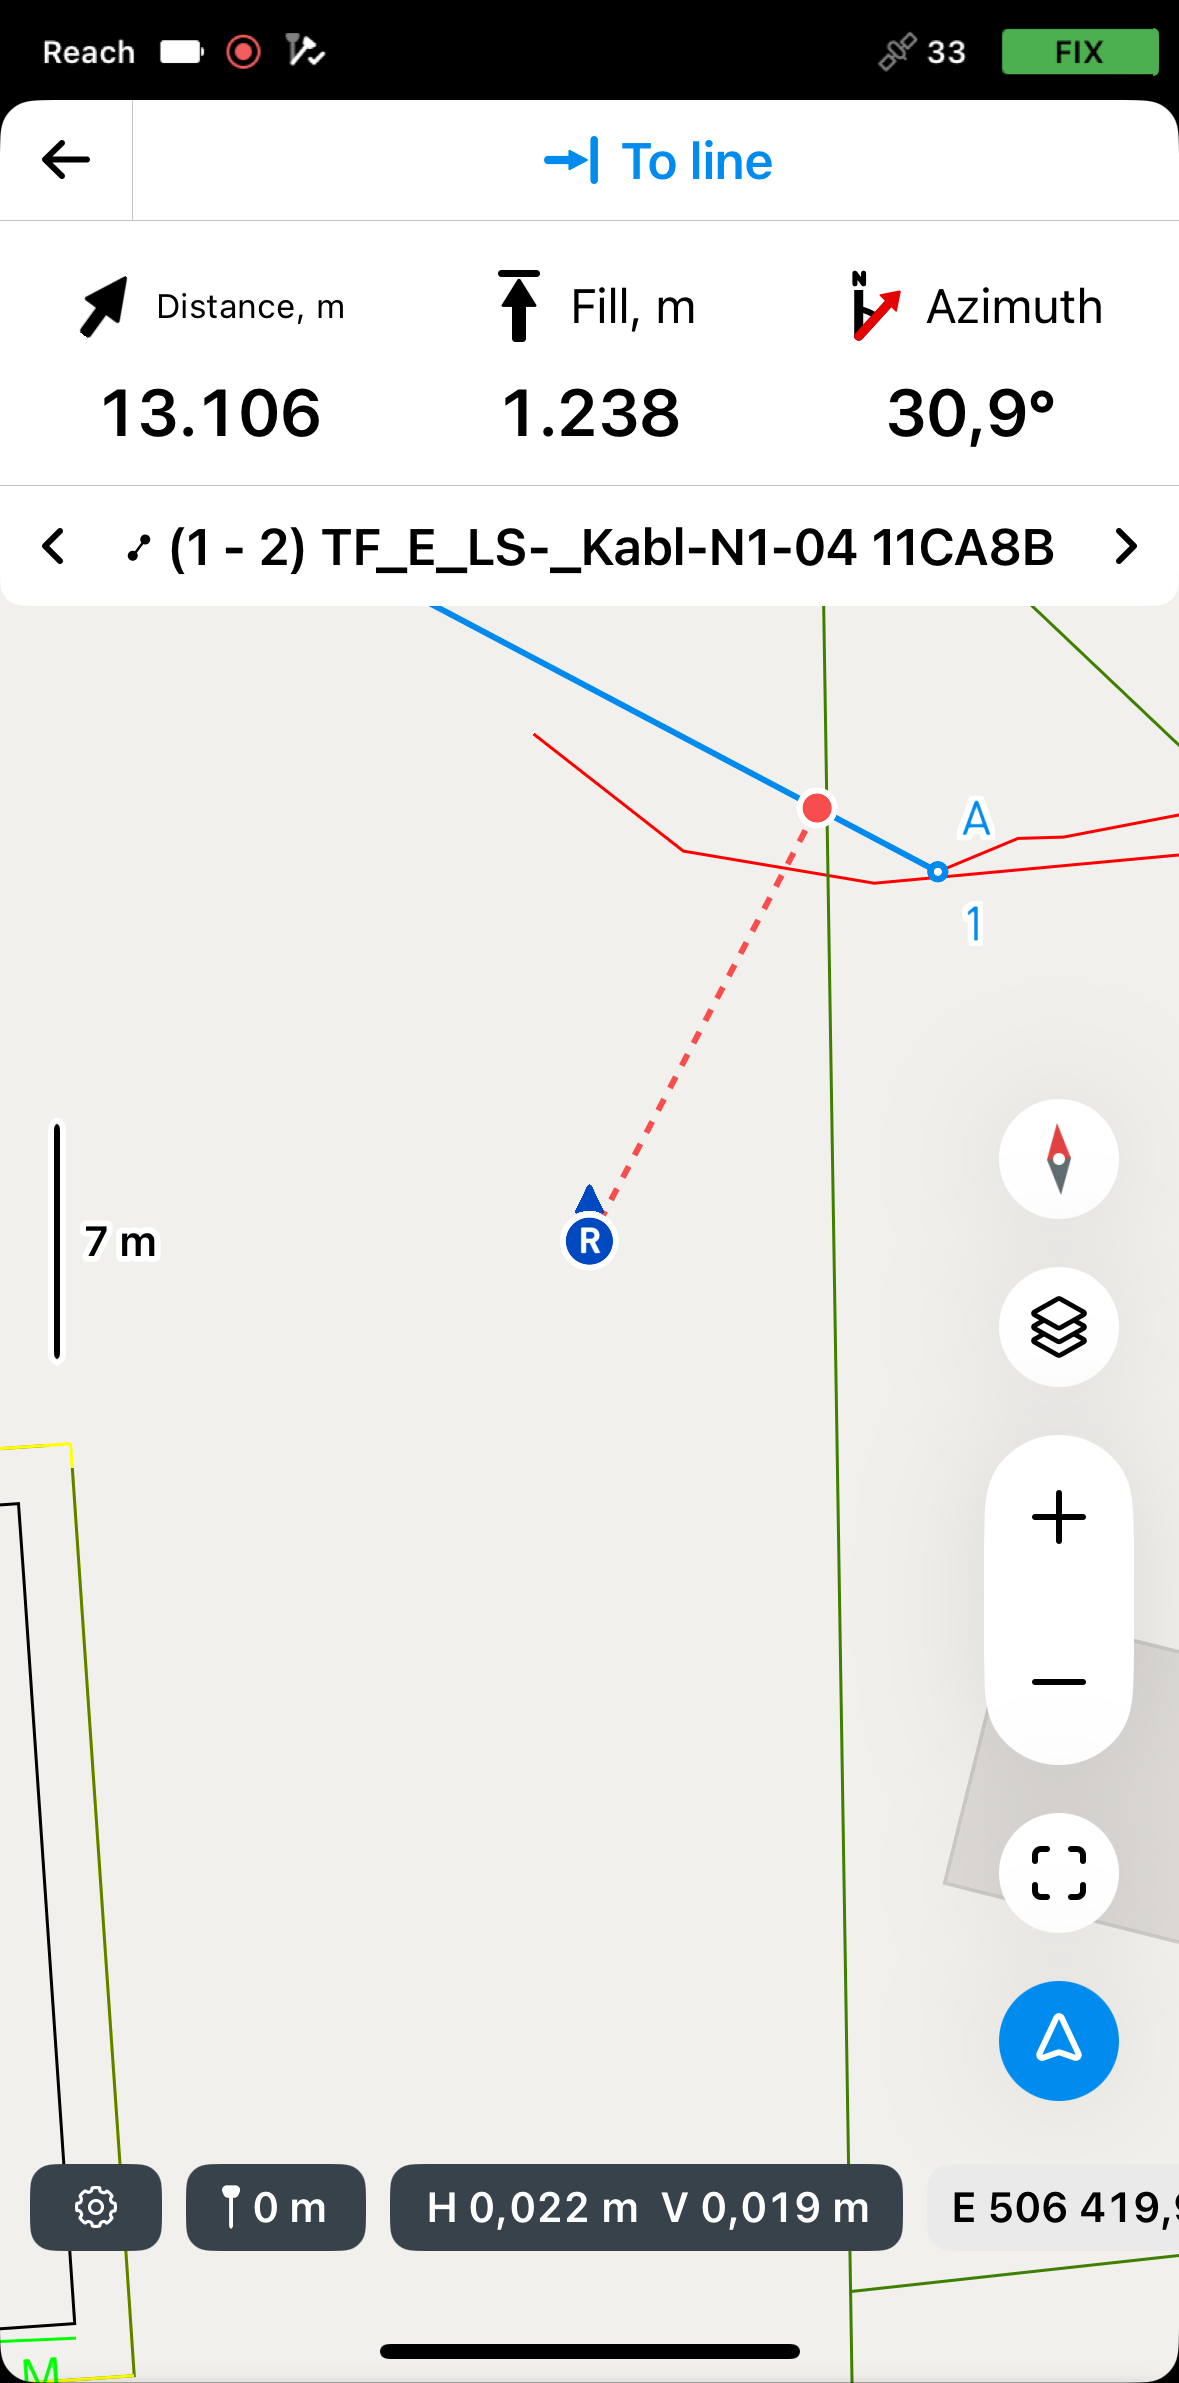
In this mode, the rover is always centered on the map, and the map rotates so that the heading is always forward. The stakeout plate shows distance and features azimuth, which shows the direction from the rover to the projected point on a line. This is the default mode and it is indicated by the arrow on the Mode button in the lower right corner of the screen.
If you’re using Reach receiver model other than Reach RS3, walk with it for a while to orient it.
By distance

In this mode, the rover is not centered on the map and the stakeout plate shows direction by separating it into North/South and East/West directions and corresponding distances from the rover to the target point on the line. This mode is indicated by the line in the square on the Mode button in the lower right corner of the screen.
To activate the required mode, do the following:
-
Tap the Mode button in the lower right corner of the screen. It will turn blue.
-
To switch to the required mode, tap the Mode button again.
noteMoving or zooming the map will deactivate the By direction mod. When moving the rover, the map will not move automatically.
To navigate to the line, do as follows:
-
In Emlid Flow, open your project.
-
Choose a line on the map or from the list. The selected line will be highlighted in blue on the map.
-
Tap the Stake out button. The Along line mode is applied by default.
 note
noteEmlid Flow remembers the last mode used. If you’ve previously used the Line stakeout tool and a different mode is active, tap the Stakeout plate to view all available modes.
-
To access the modes, tap the Stakeout plate, select To line, and tap Save.

-
Move your Reach so that the Distance section turns green, showing that your Reach is less than 2.5 cm (0.08 ft) away from the line you are staking out.
 note
noteEnsure the pole isn't tilted if you use a Reach receiver model other than Reach RS3.
Once you are on the line, switch to Along line or By segments mode to continue the stakeout process.
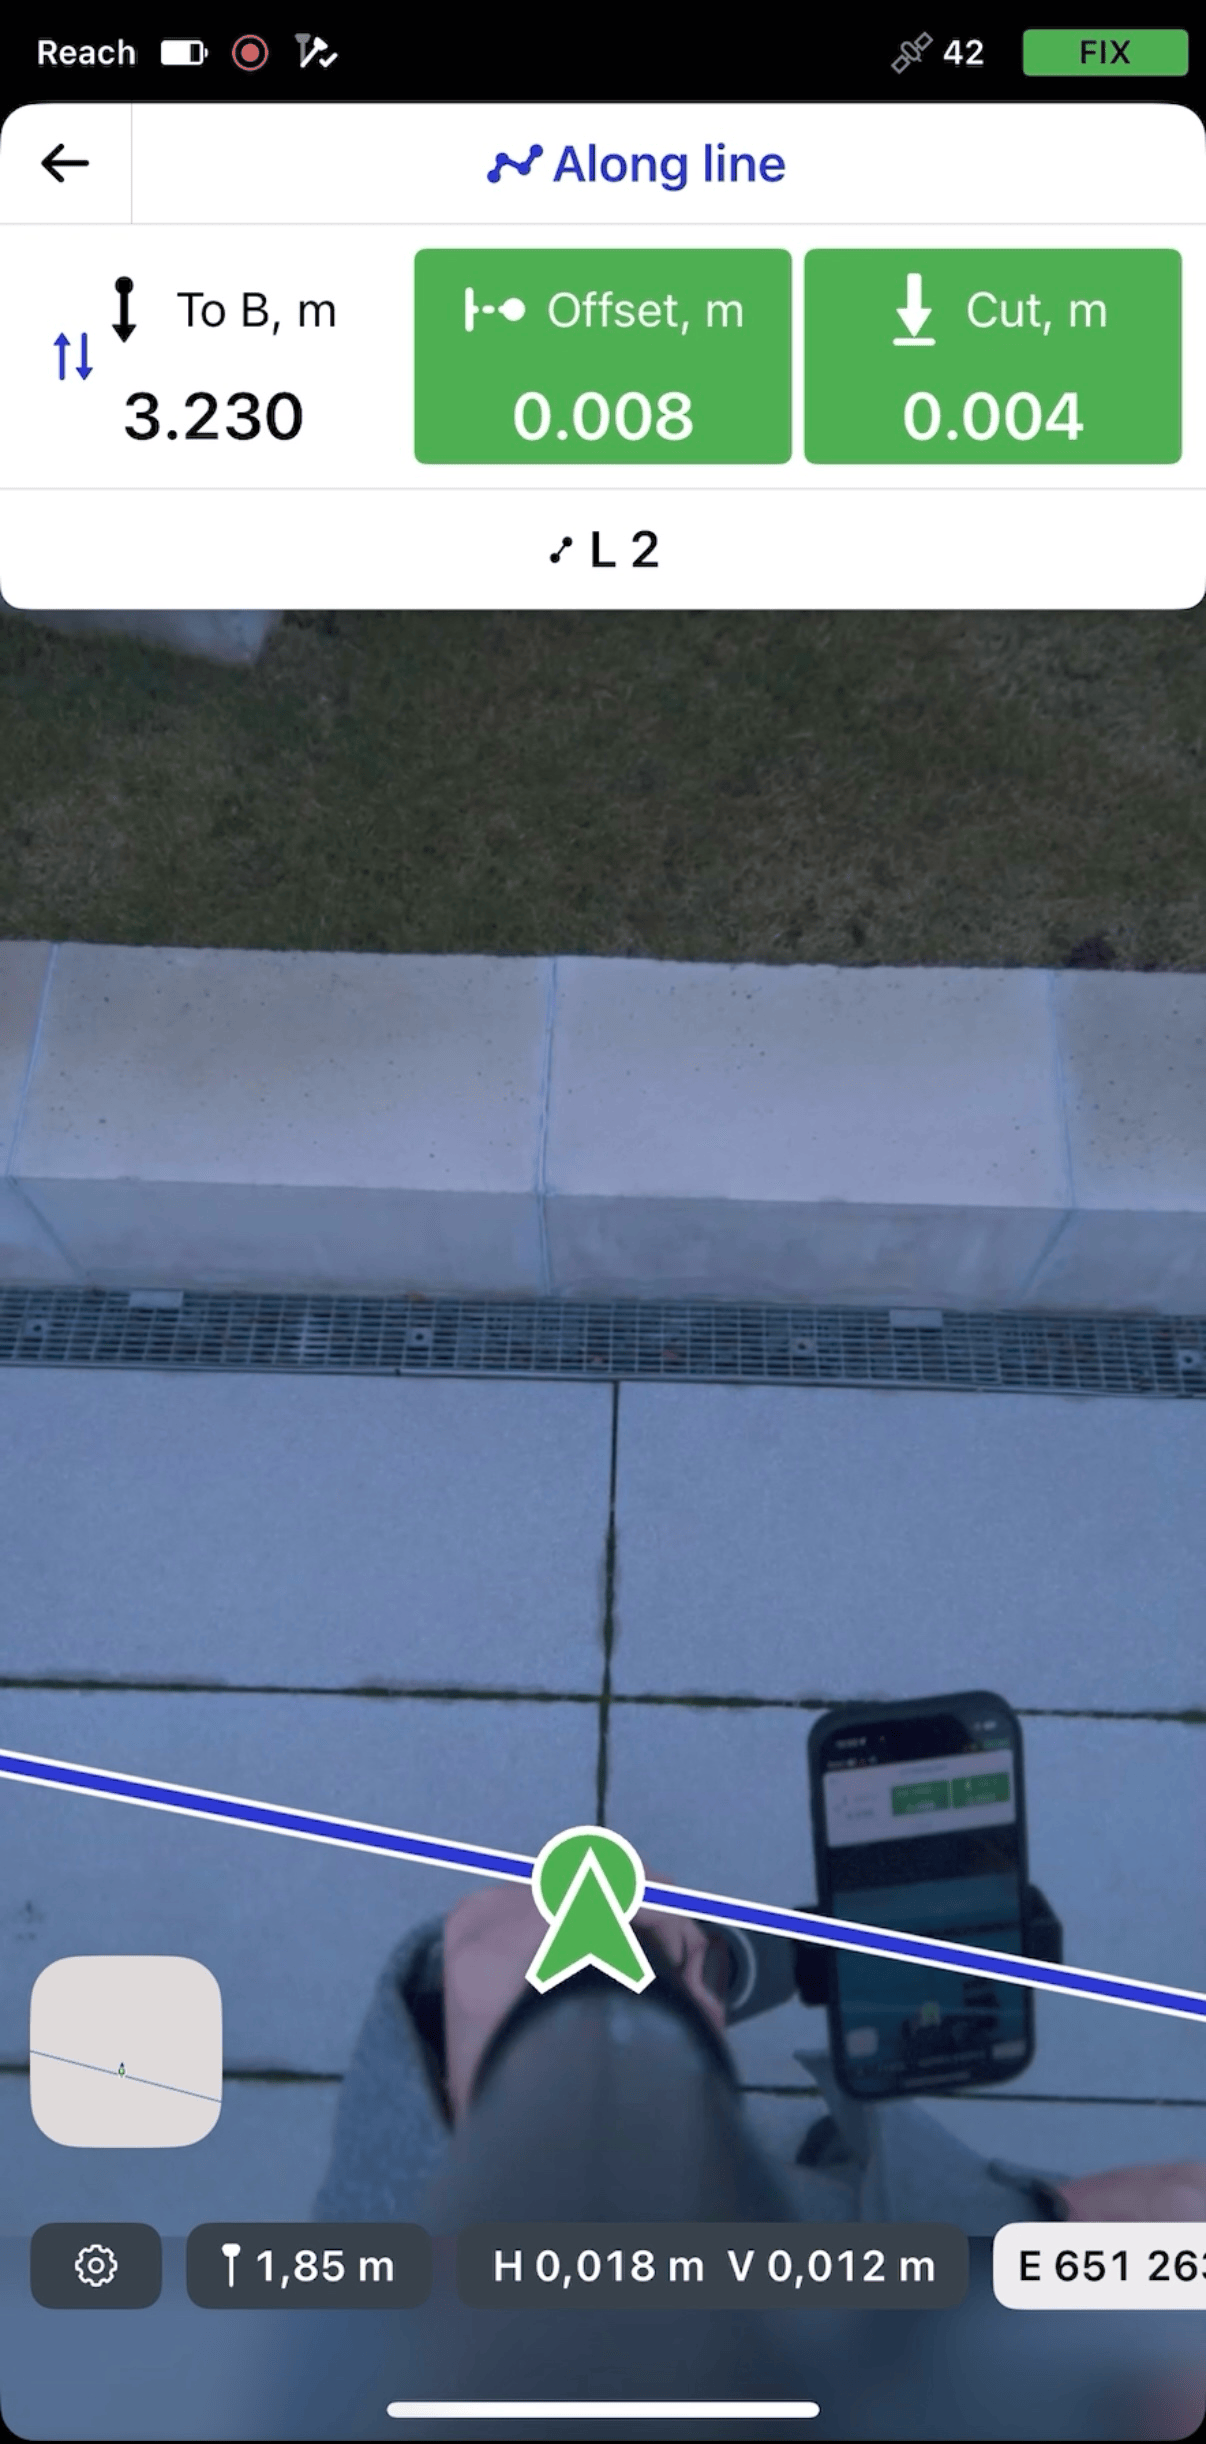
Staking out line with AR
Available on Reach RS4 Pro, the Augmented-reality (AR) Stakeout tool overlays the target line on the live camera view and provides real-time distance, direction, and approach cues. The tool is useful when surveying in cluttered or low-visibility areas where any other types of guidance are hard to follow.
Before using AR Stakeout, you need to enable tilt compensation on your Reach RS4 Pro. Learn more in the How to enable tilt compensation guide.
Currently, you can only work with the Along line and By intevals & offsets stakeout modes in the AR stakeout feature.
To stake out a line using the AR stakeout feature, follow the steps below:
If you receive corrections via NTRIP over BLE, make sure your mobile device has an active internet connection via mobile data or Wi-Fi. When using mobile data, check your mobile device settings to confirm that Emlid Flow is allowed to access it.
AR stakeout using Along line mode
To stake out a line using the Along line mode, follow the steps below:
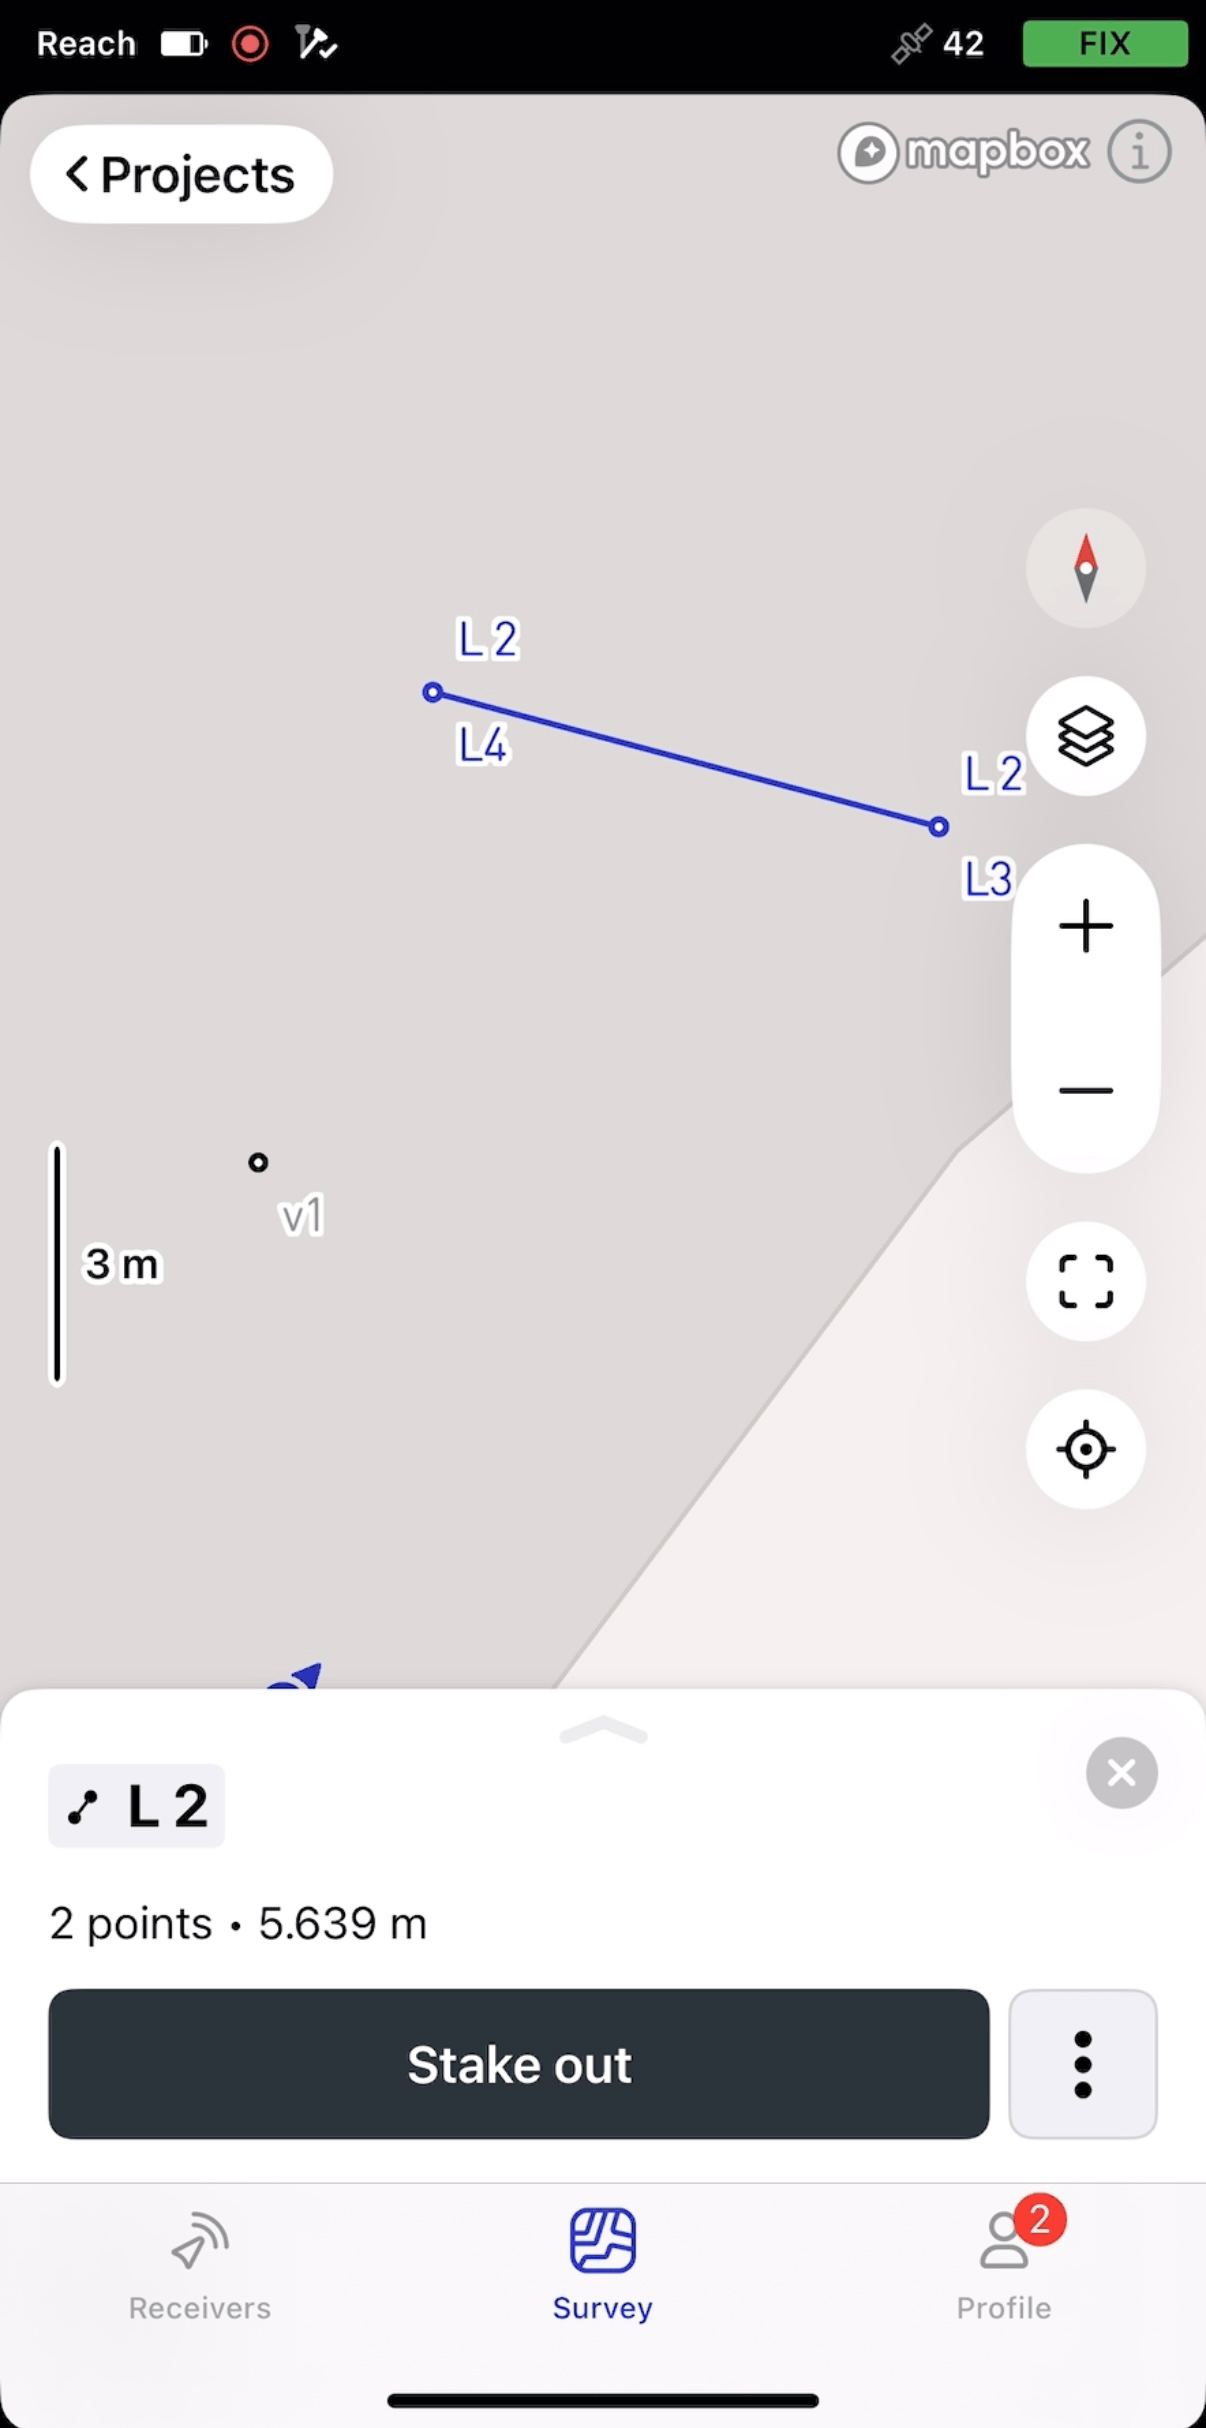
-
Open your project in Emlid Flow. Select the line you want to stake out on the map or from the object list. The selected line will be highlighted in blue on the map.
-
Tap Stake out. The Along line mode is applied by default. The line will get the A and B labels at the start and the end points.
noteEmlid Flow remembers the last mode used. If you’ve previously used the Line stakeout tool and a different mode is active, tap the top of the Stakeout plate or tap the survey settings to access the menu with all available modes, then select Along line.
-
Tap the AR Stakeout button.
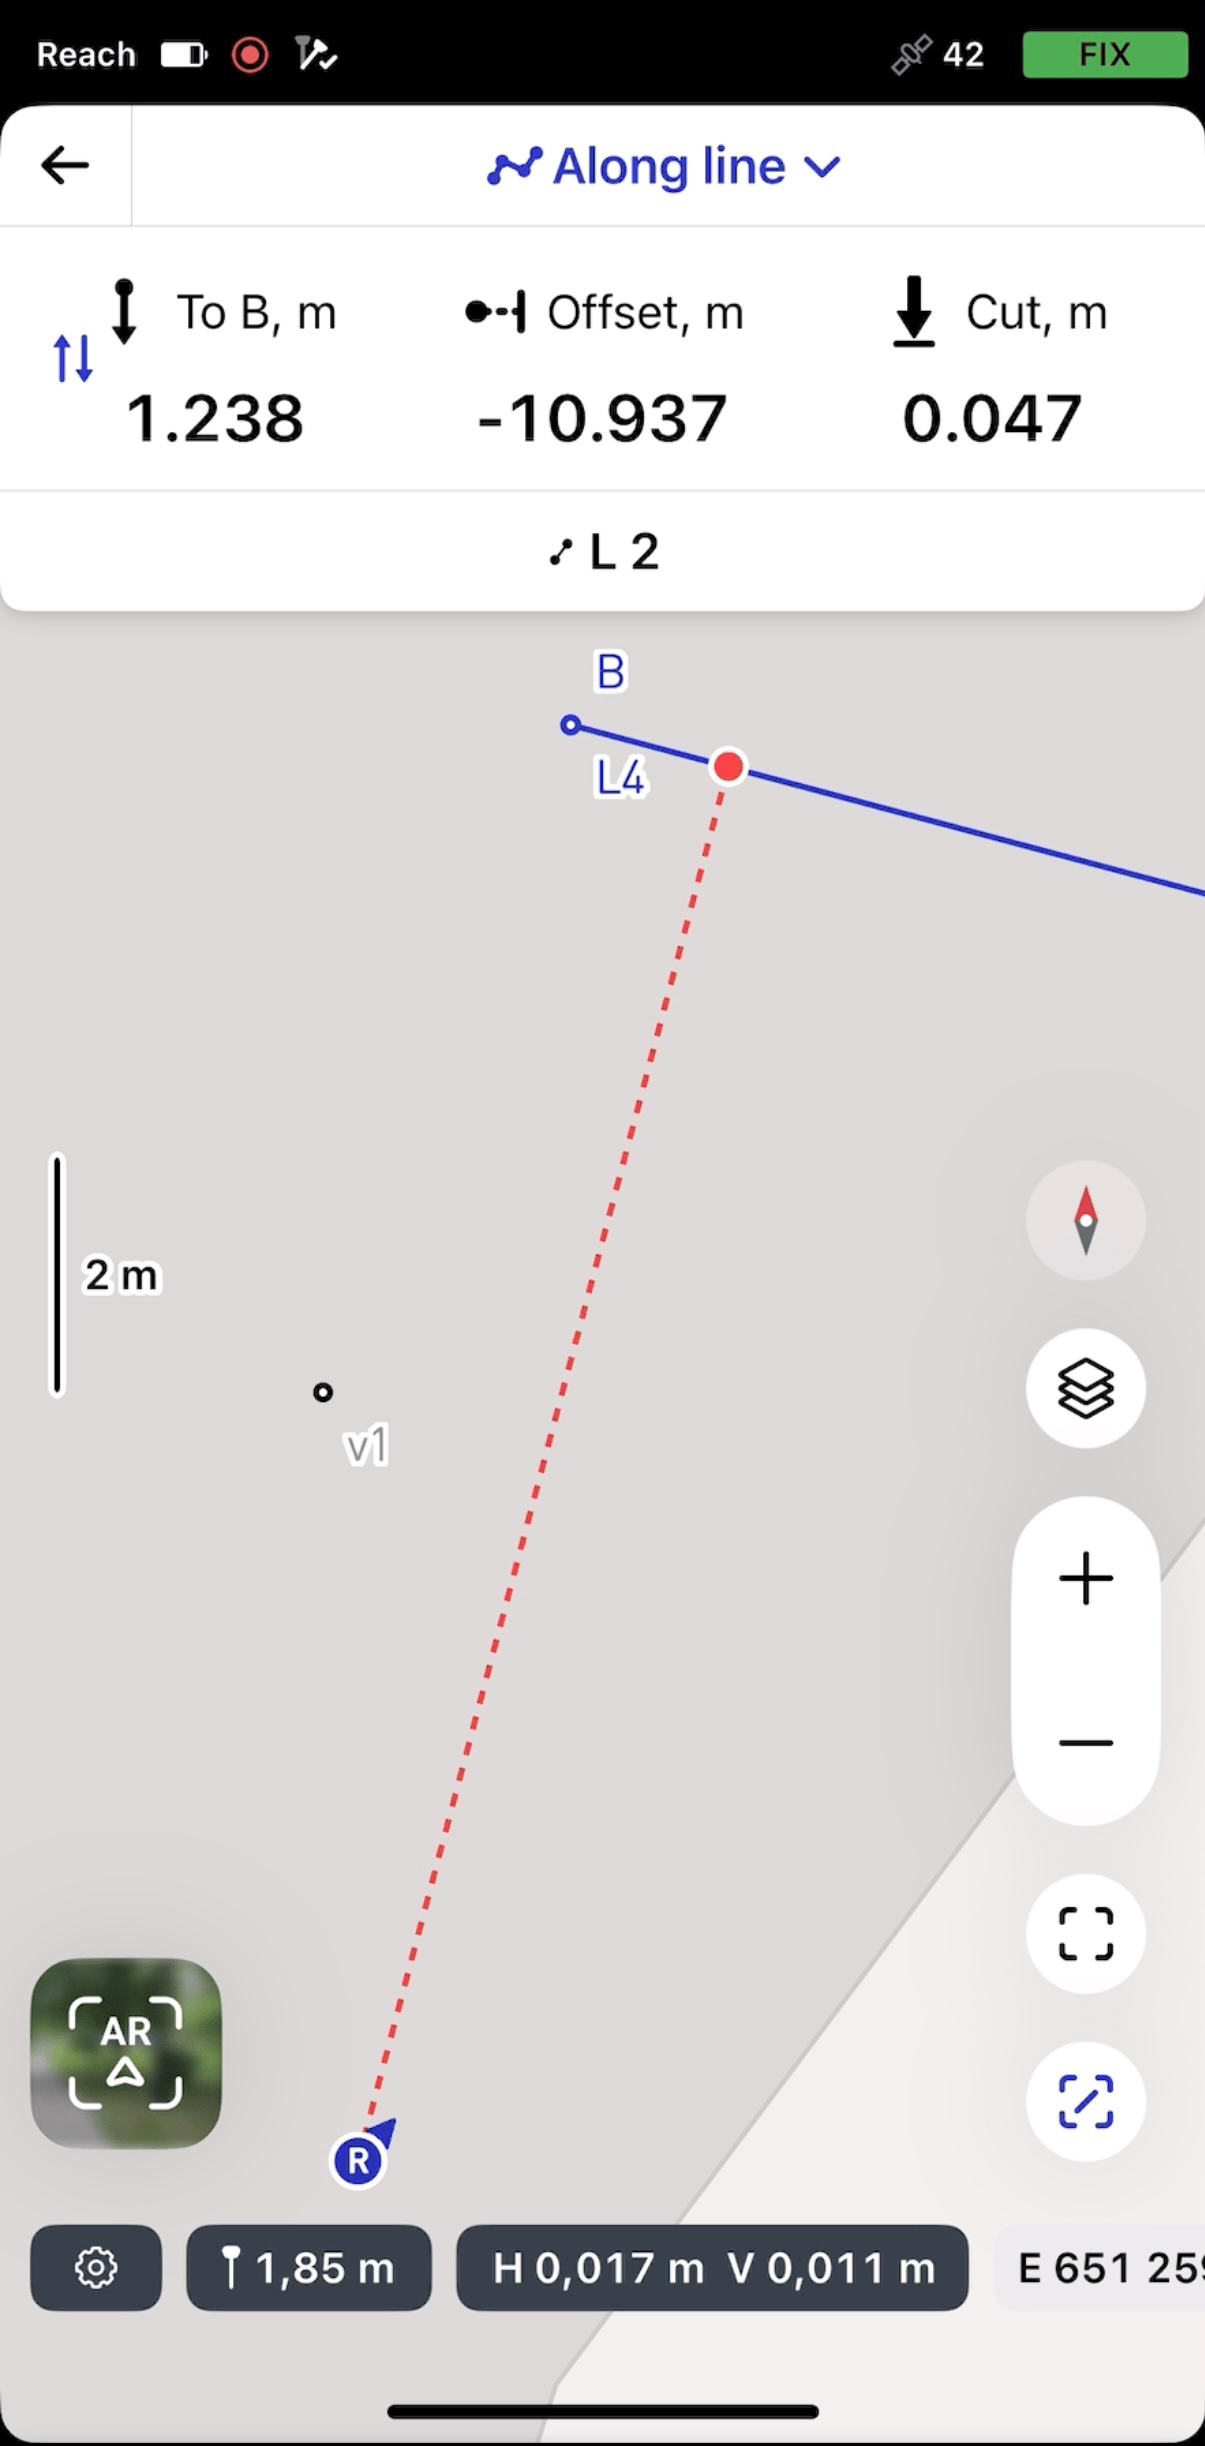
-
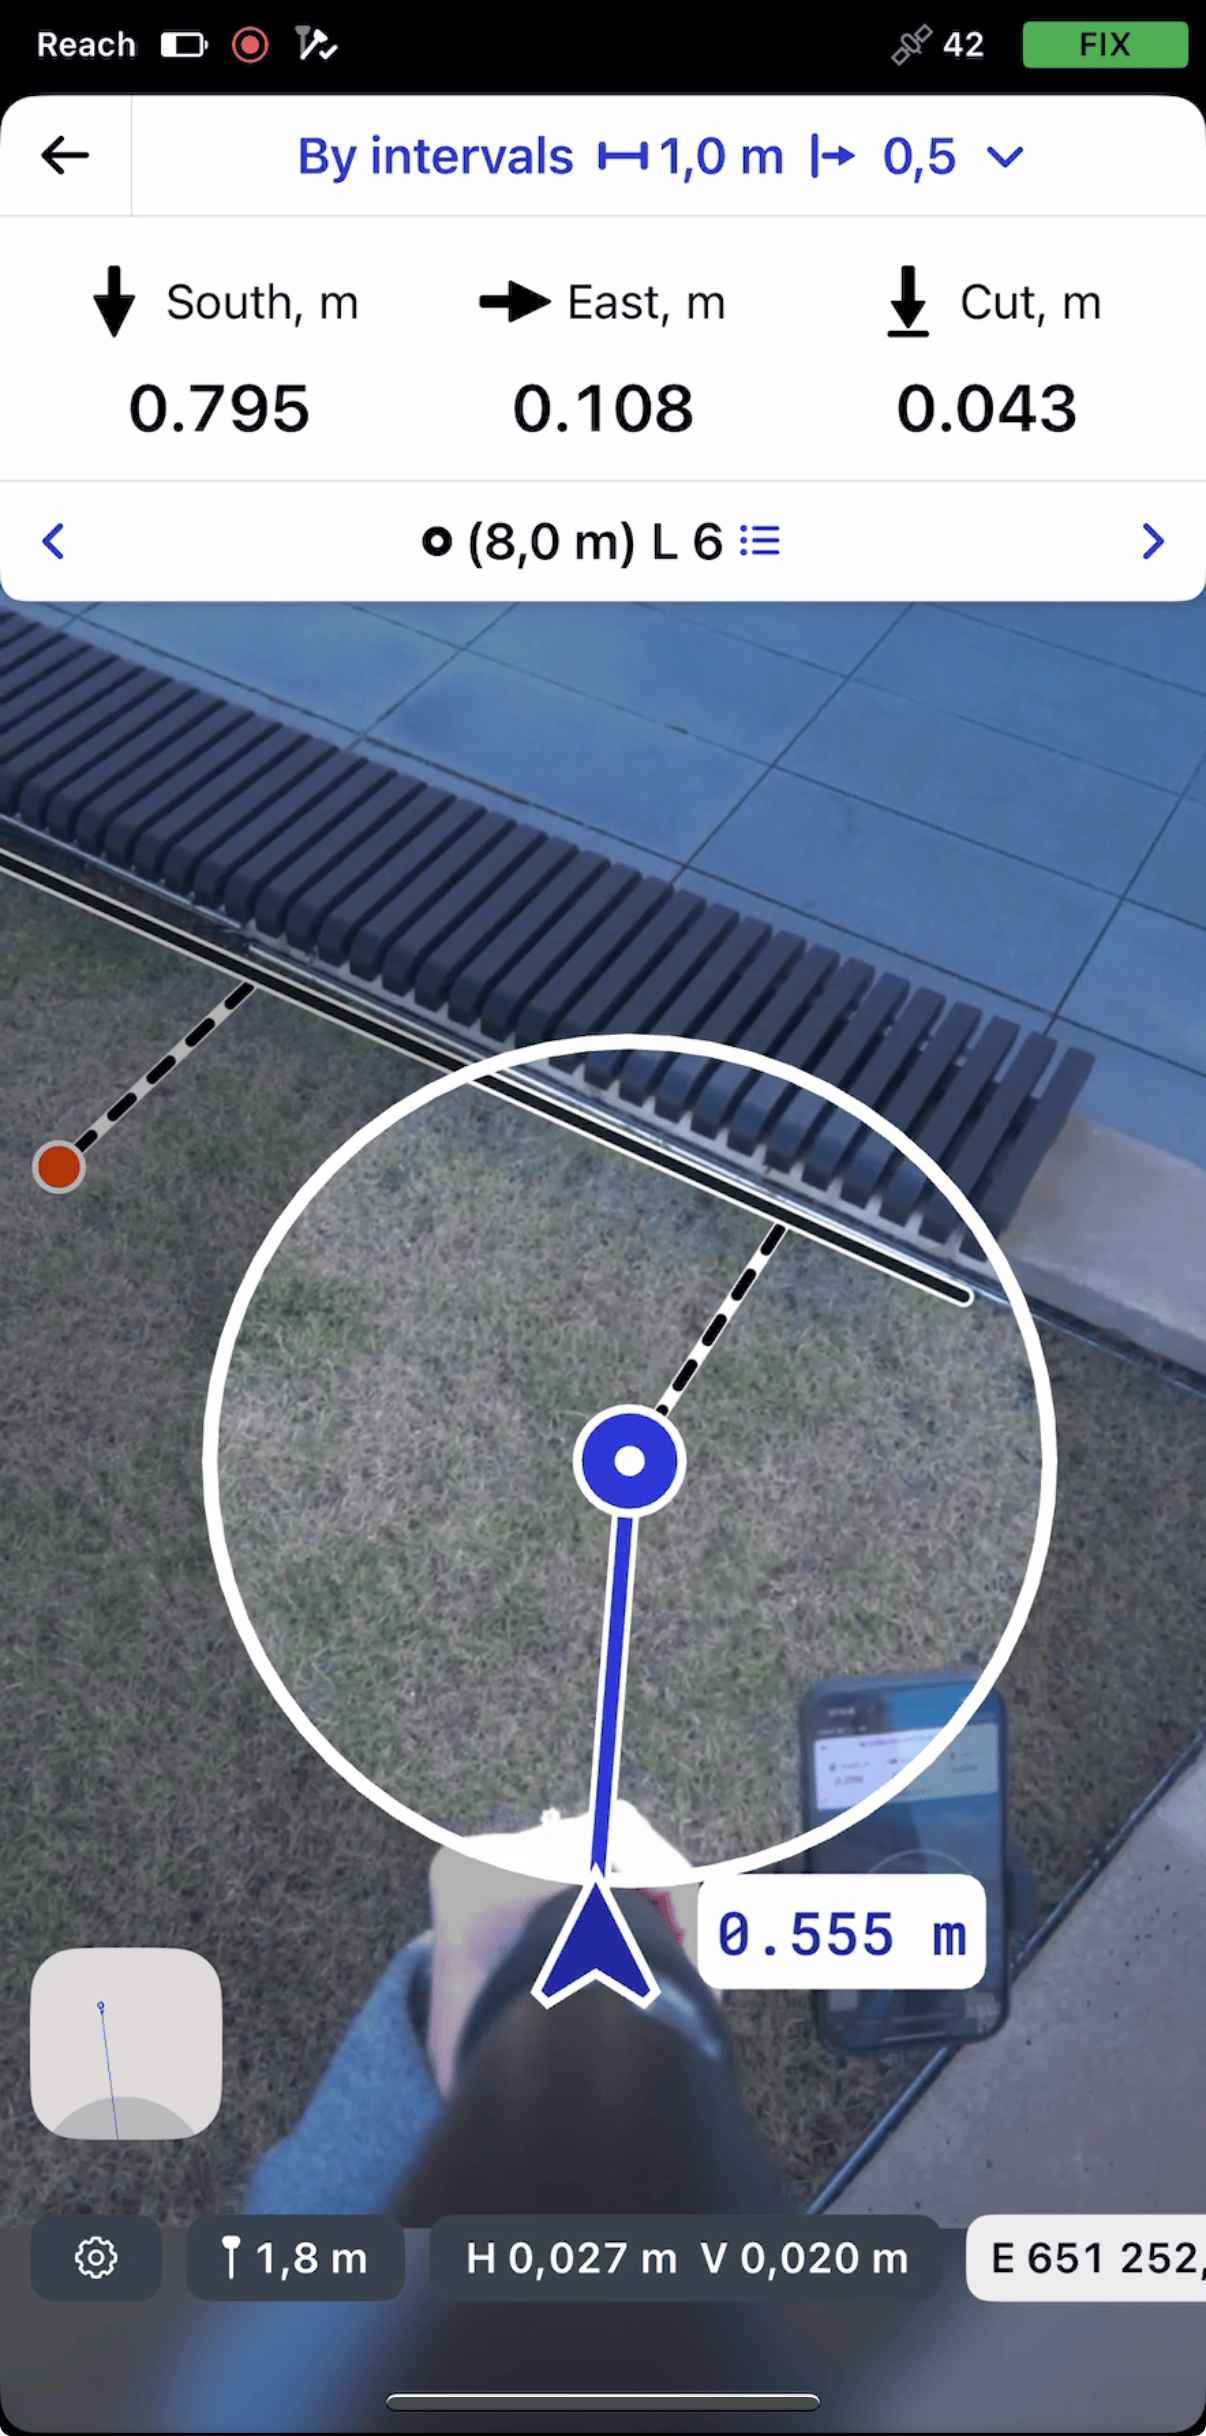
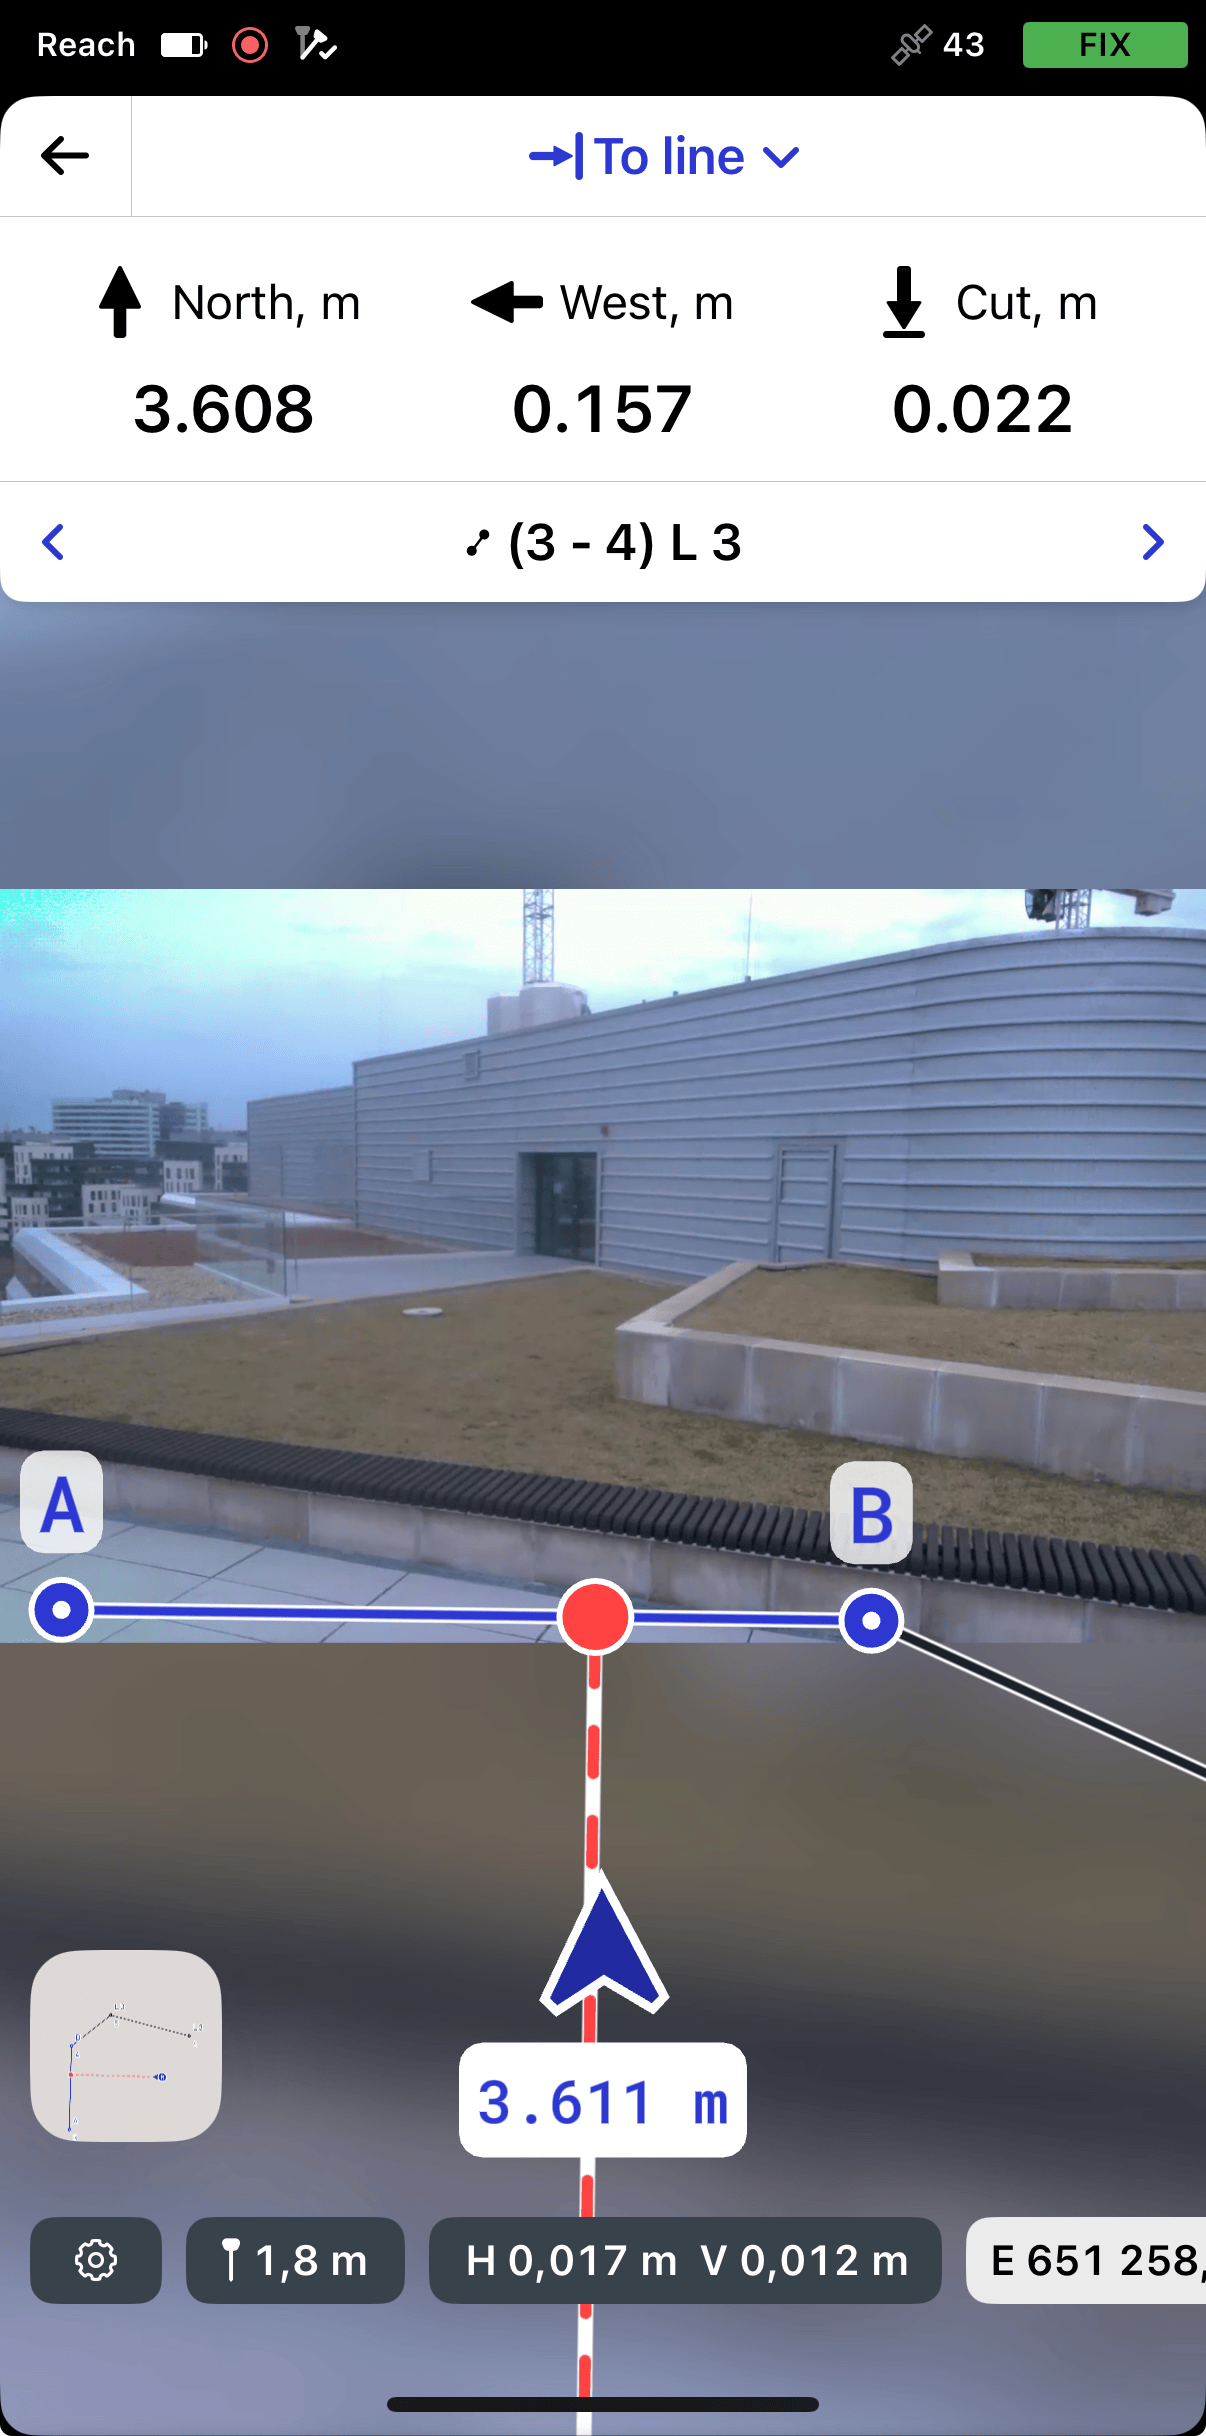
Watching the offset plate and the screen, move towards the line. As you move closer, the interface snaps to the bottom camera’s view, centering the target for precise placement.
noteThe blue arrow will also help you to find the right direction when the front camera is in use.
-
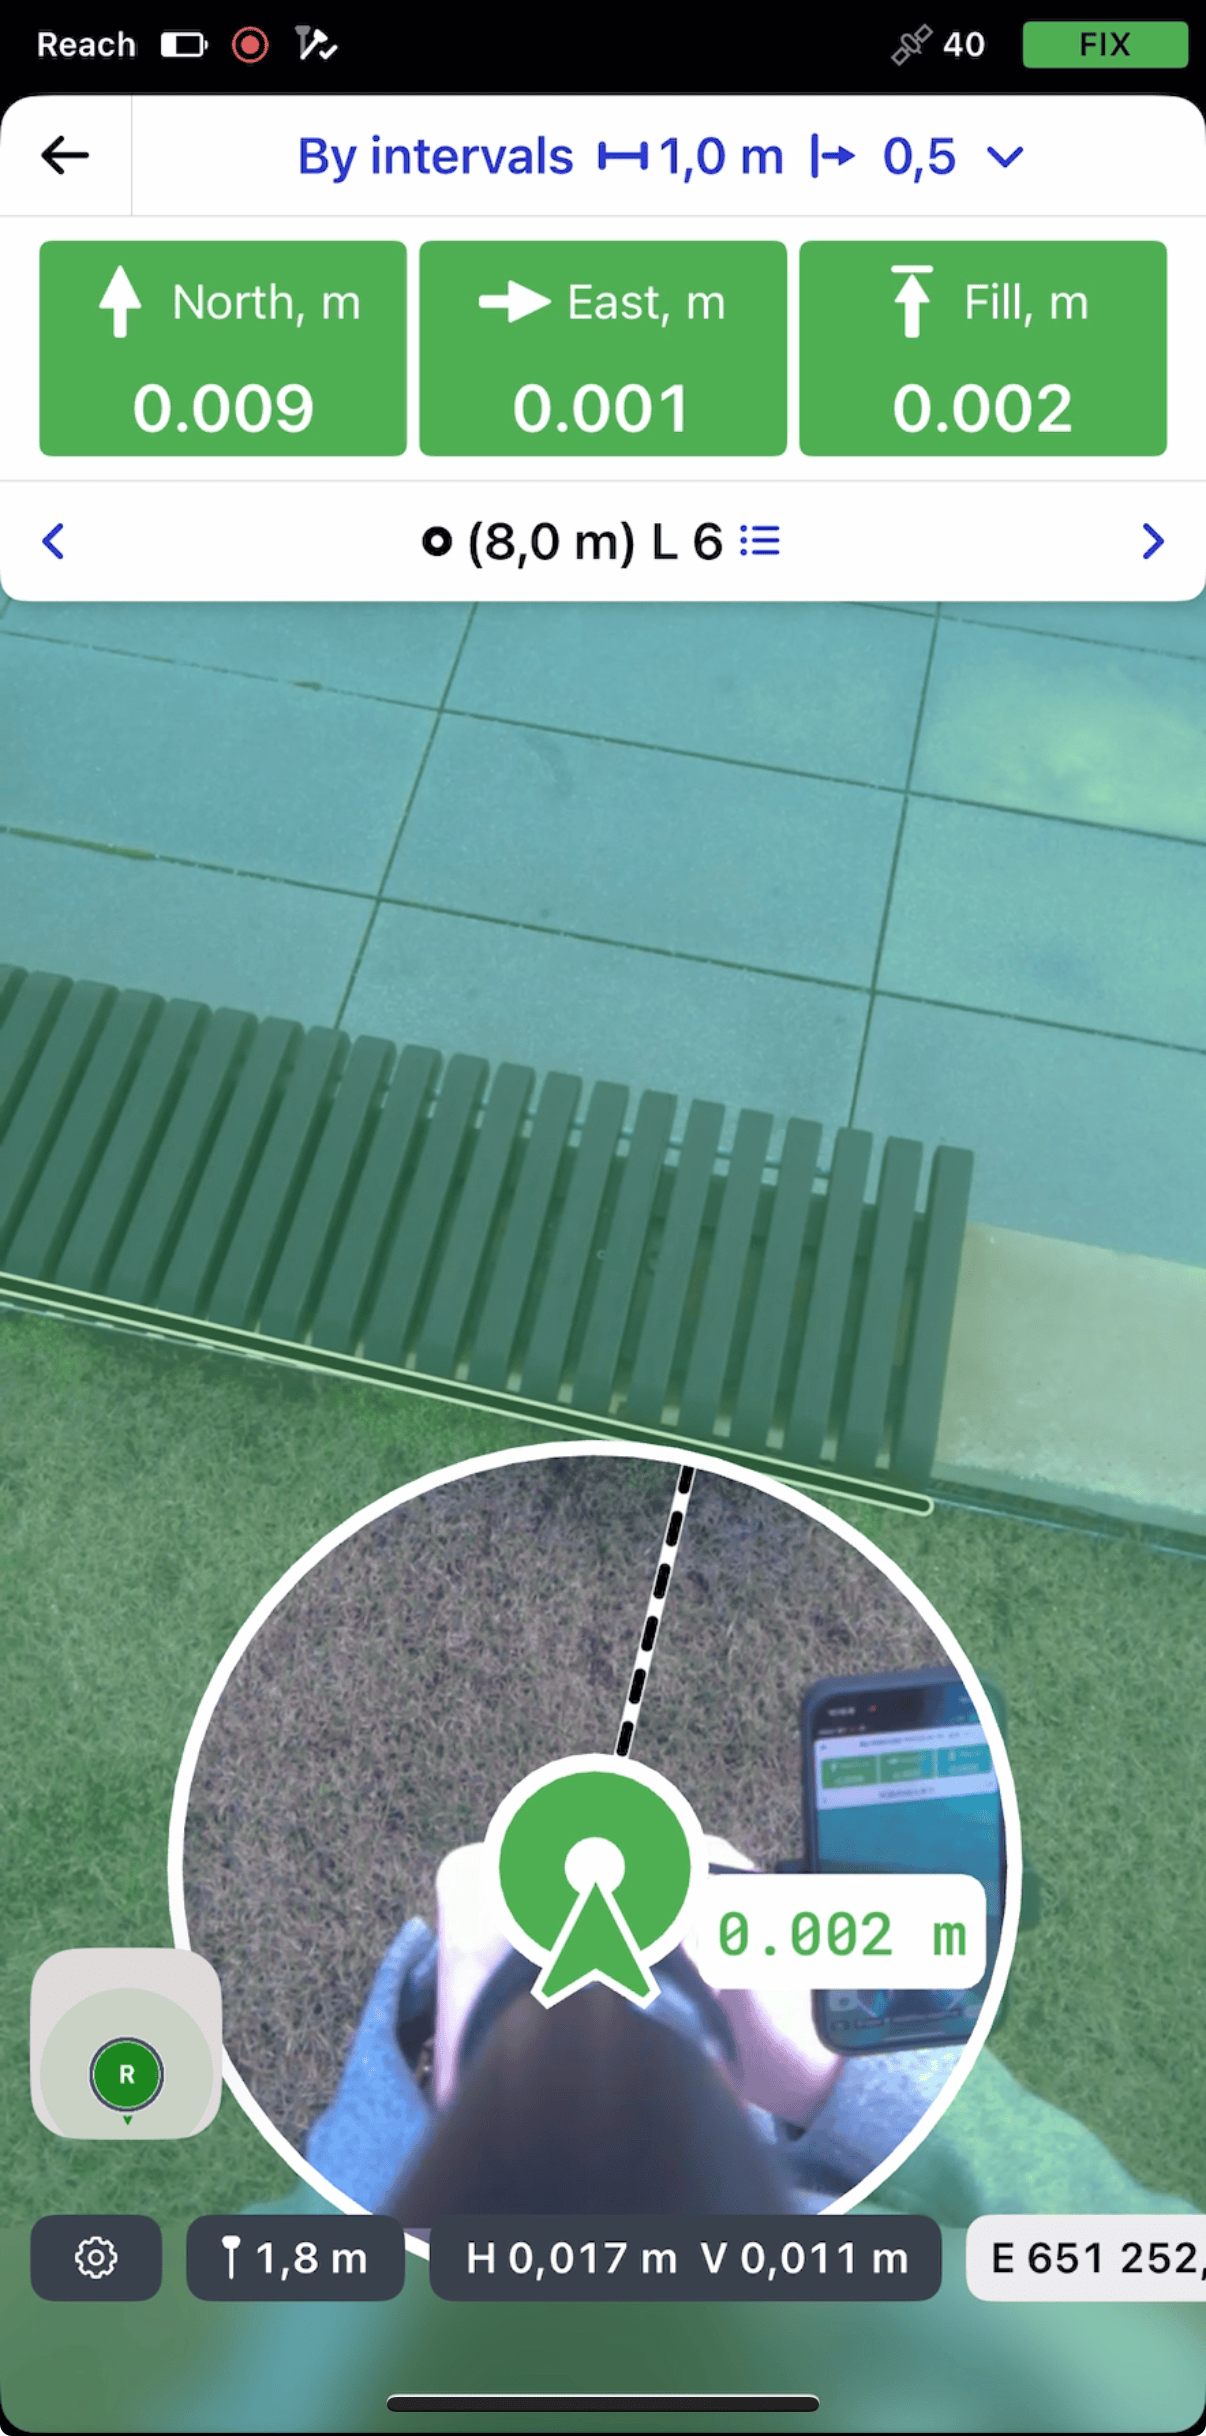
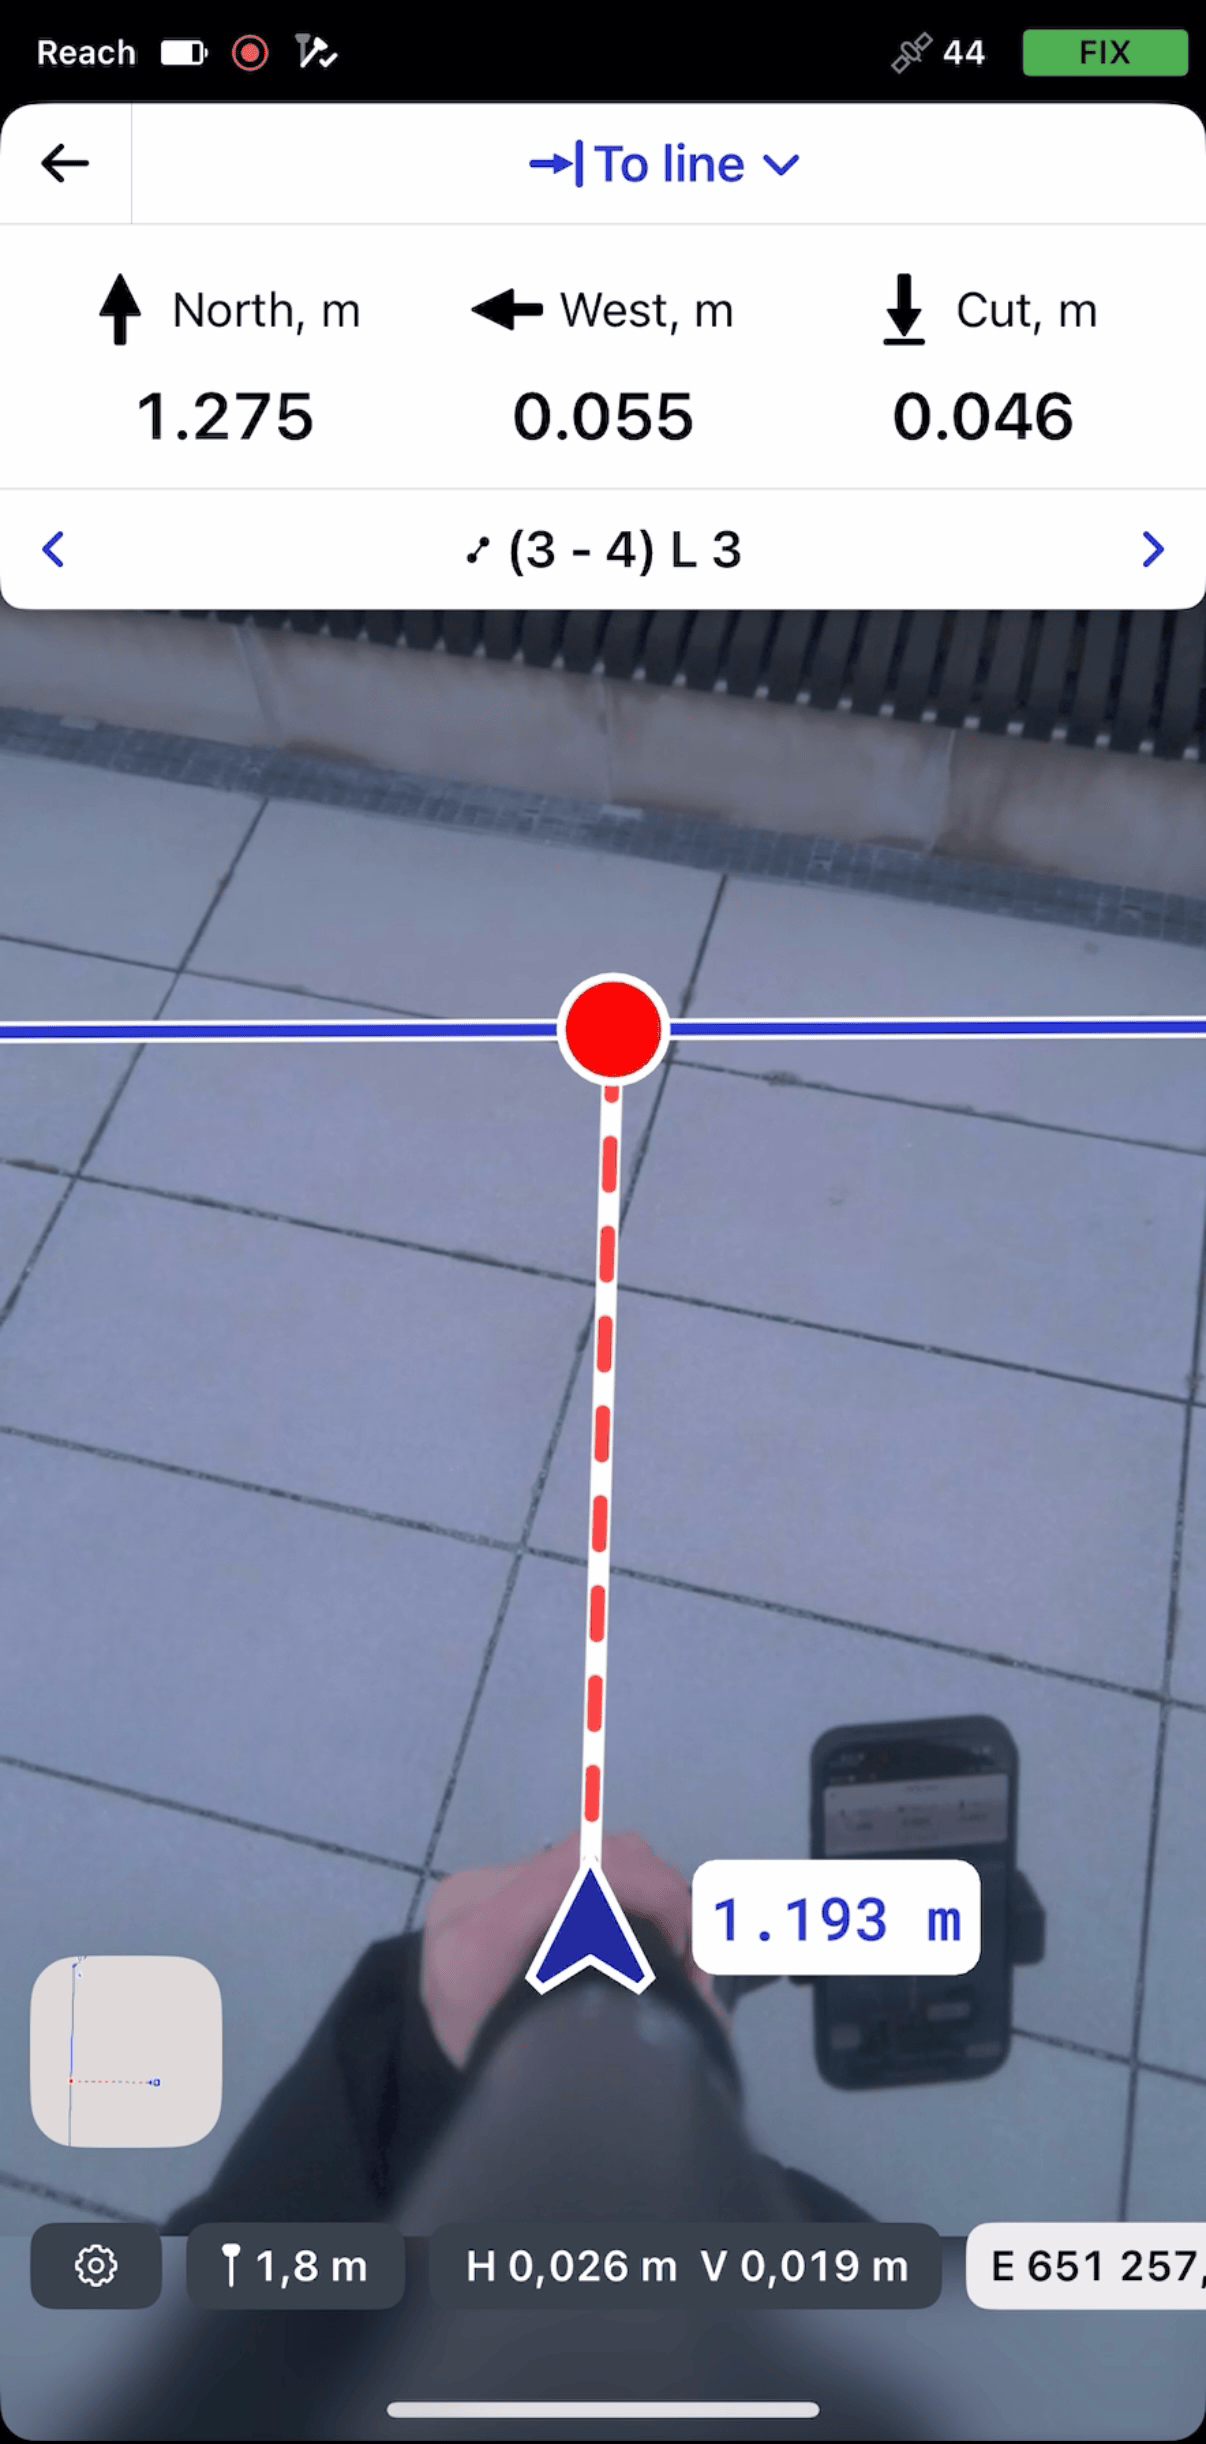
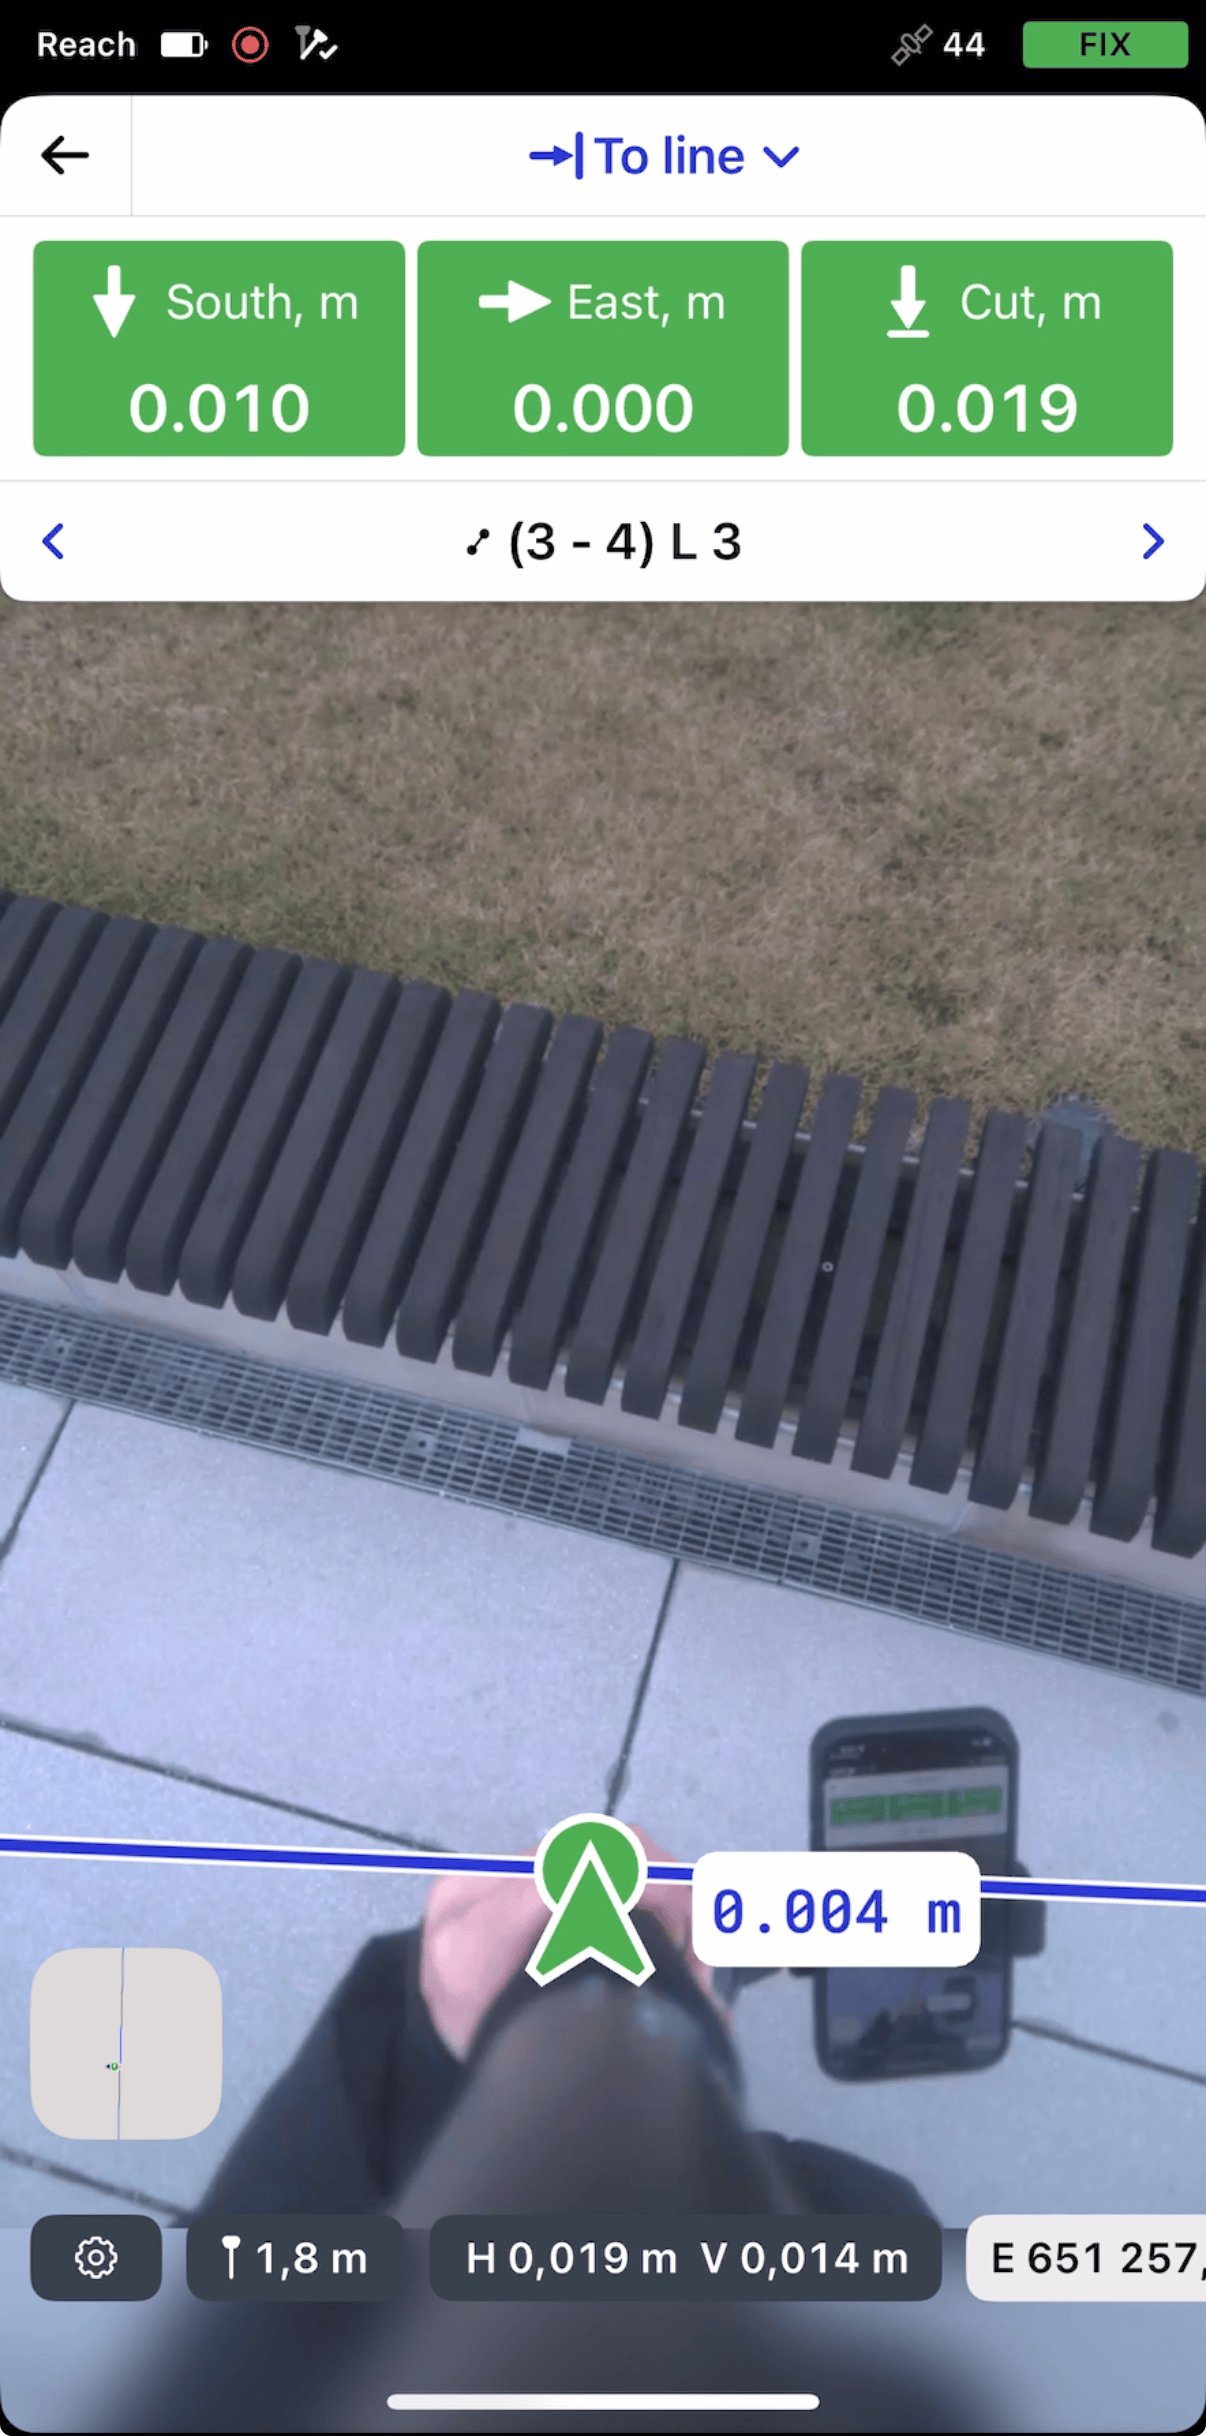
Move your Reach so that the navigation sections turn green, showing that your Reach is less than 2.5 cm (0.08 ft) away from the line you are staking out.
-
Watching the Offset section, check if the line is set out according to the project.
-
Watching the Cut & Fill section, check the height value, if necessary.
-
To finish staking out the line, tap the back button on the Stakeout plate.
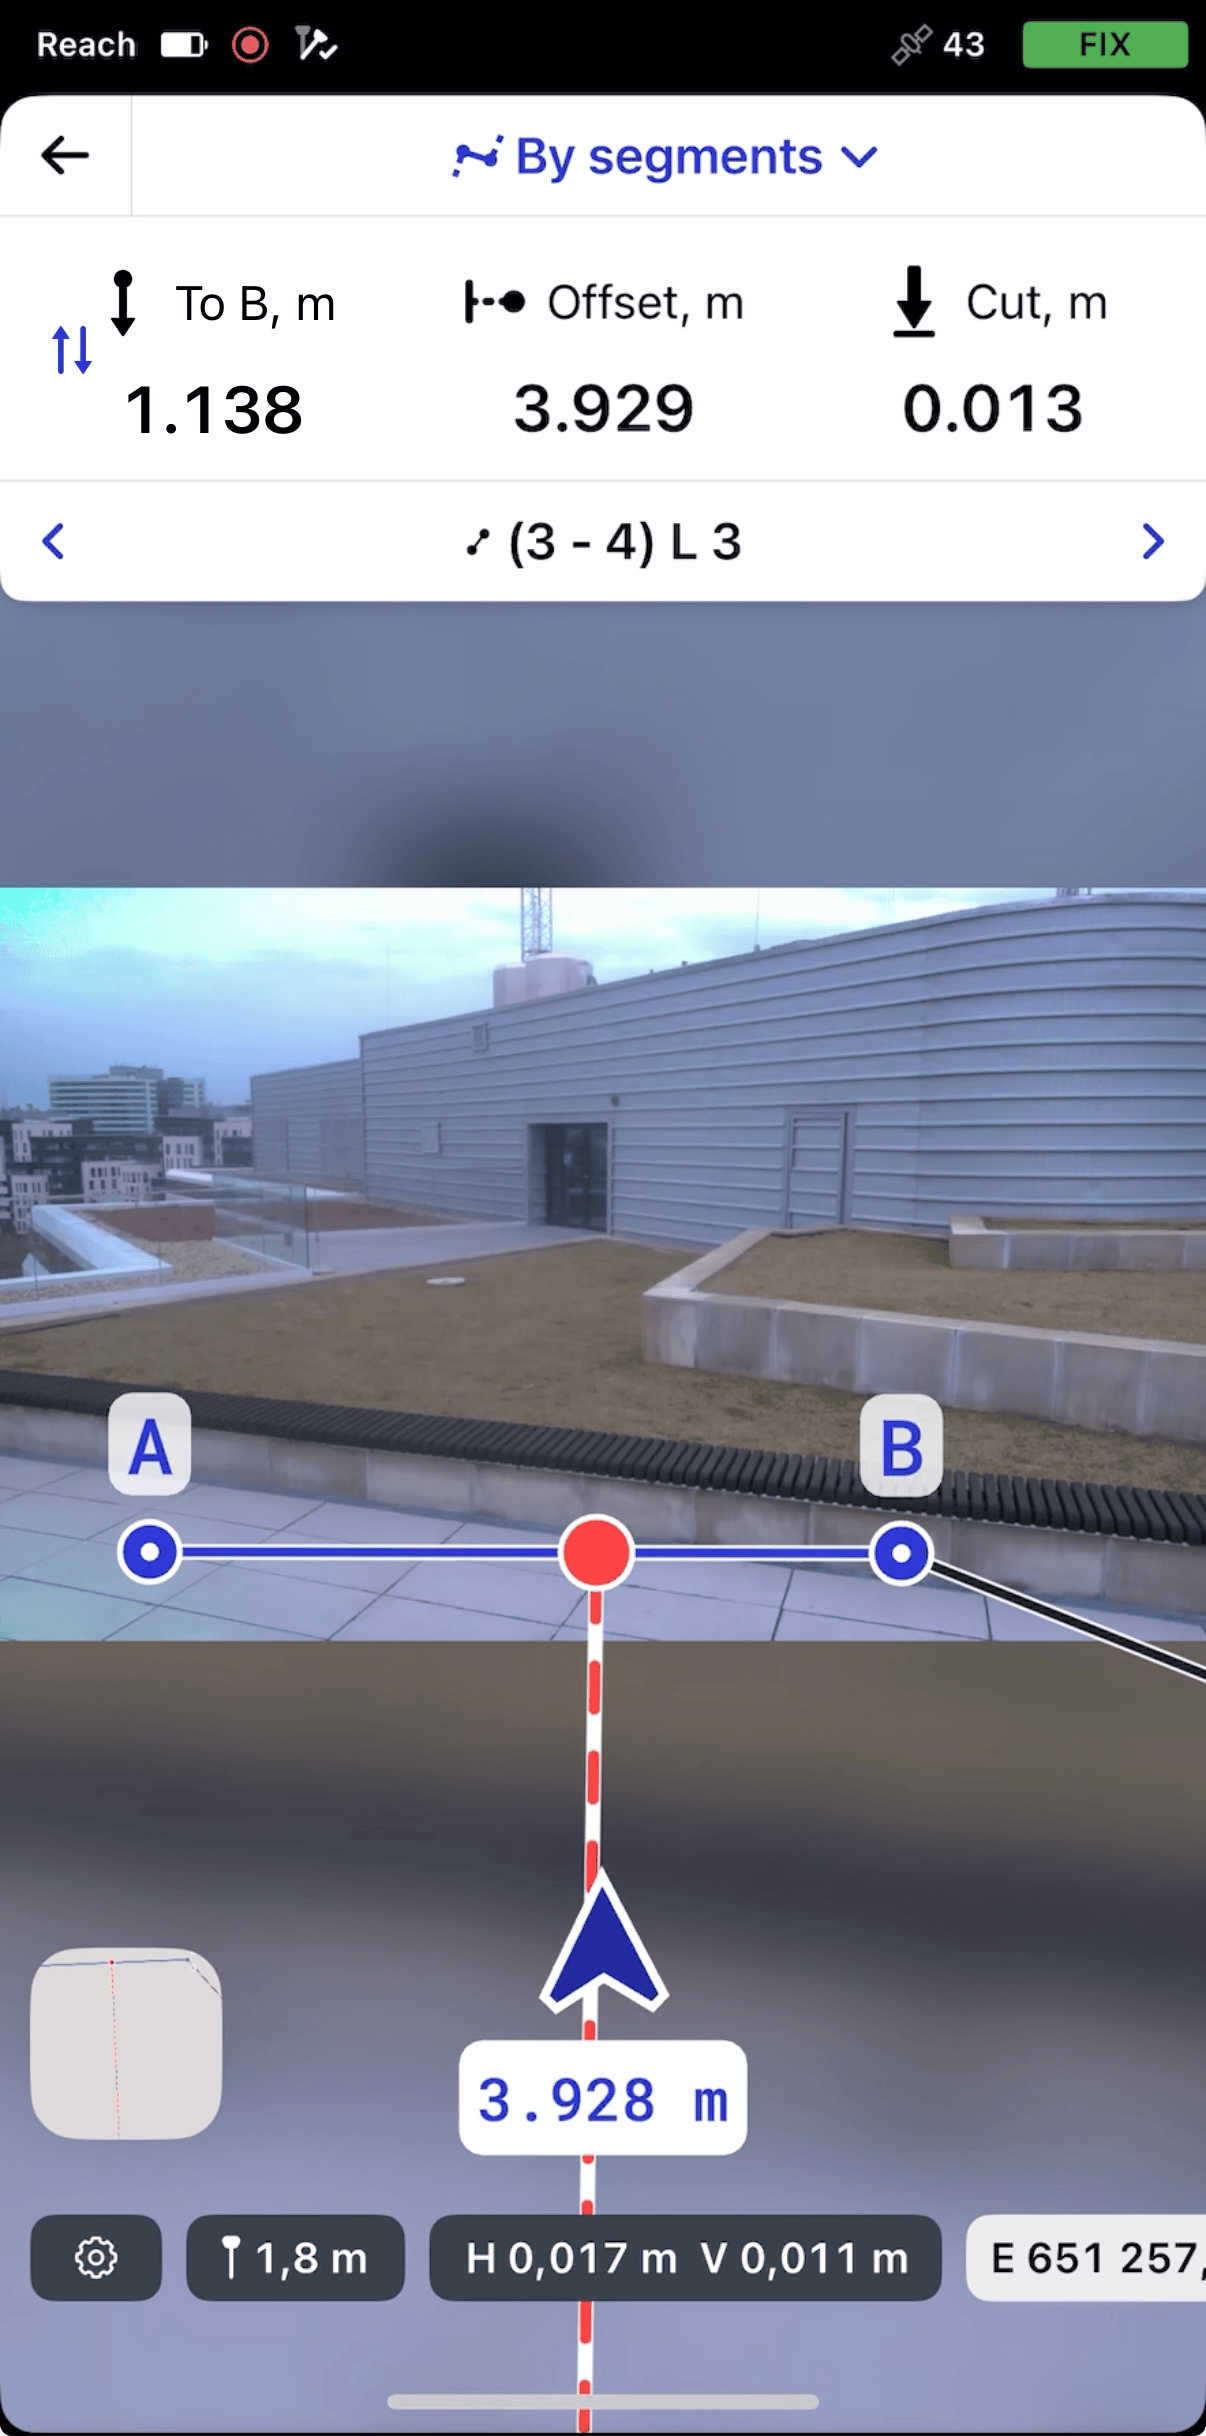
AR stakeout using By segments mode
To stake out segments of a line or polygon using the By segments mode, follow the steps below:
-
Open your project in Emlid Flow. Select the line you want to stake out on the map or from the object list. The selected line will be highlighted in blue on the map.
-
Tap the Stake out button. The Along line mode is applied by default. The segment will get the A and B labels at the start and the end points.
noteEmlid Flow remembers the last mode used. If you’ve previously used the Line stakeout tool and a different mode is active, tap the stakeout plate to view all available modes.
tipEmlid Flow indicates the direction of the offset using positive and negative values. The stakeout plate displays a negative offset when the rover is on the left side of the line. If the rover is on the right, the offset value will be positive. Additionally, the offset icon flips based on the rover’s position to visually represent the direction.
-
To access the modes, tap the stakeout plate, select By segments, and tap Save.
By default, the stakeout process begins from the nearest segment. To stake out a specific segment, use the arrows on the Stakeout plate to navigate to it.
-
Tap the AR Stakeout button.
-
You can choose the end of the line from which the stakeout will begin by tapping the To B section.
-
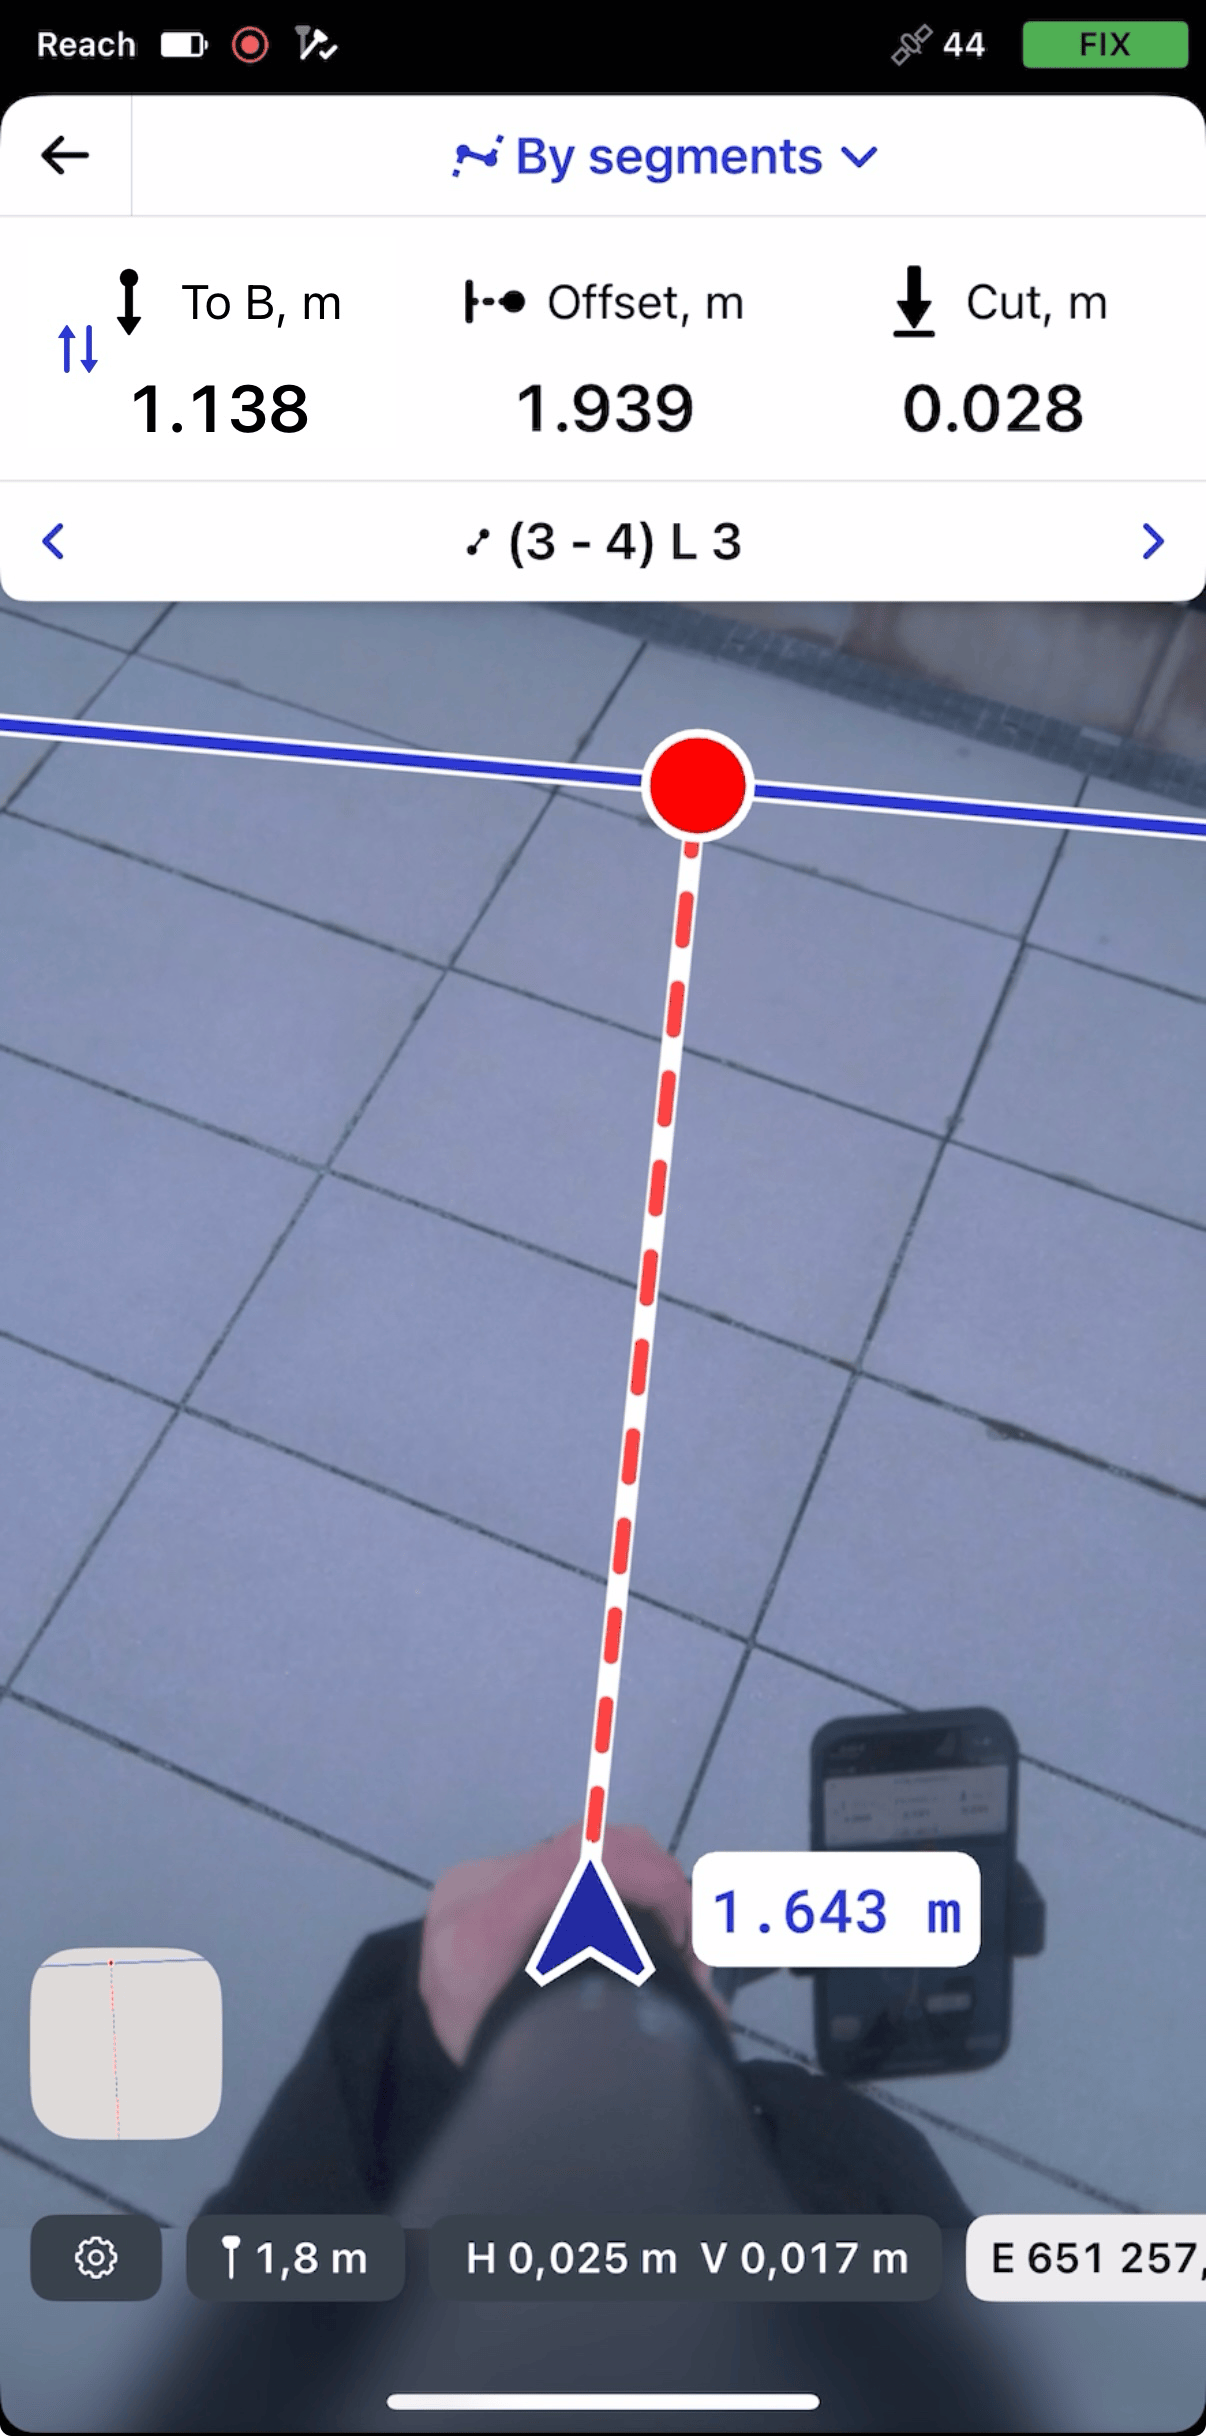
Watching the offset plate and the screen, move towards the line. As you move closer, the interface snaps to the bottom camera’s view, centering the target for precise placement.
noteThe blue arrow will also help you to find the right direction when the front camera is in use, and the chip below it shows the distance to the target object. As you move closer, the chip moves to the right side of the arrow.
-
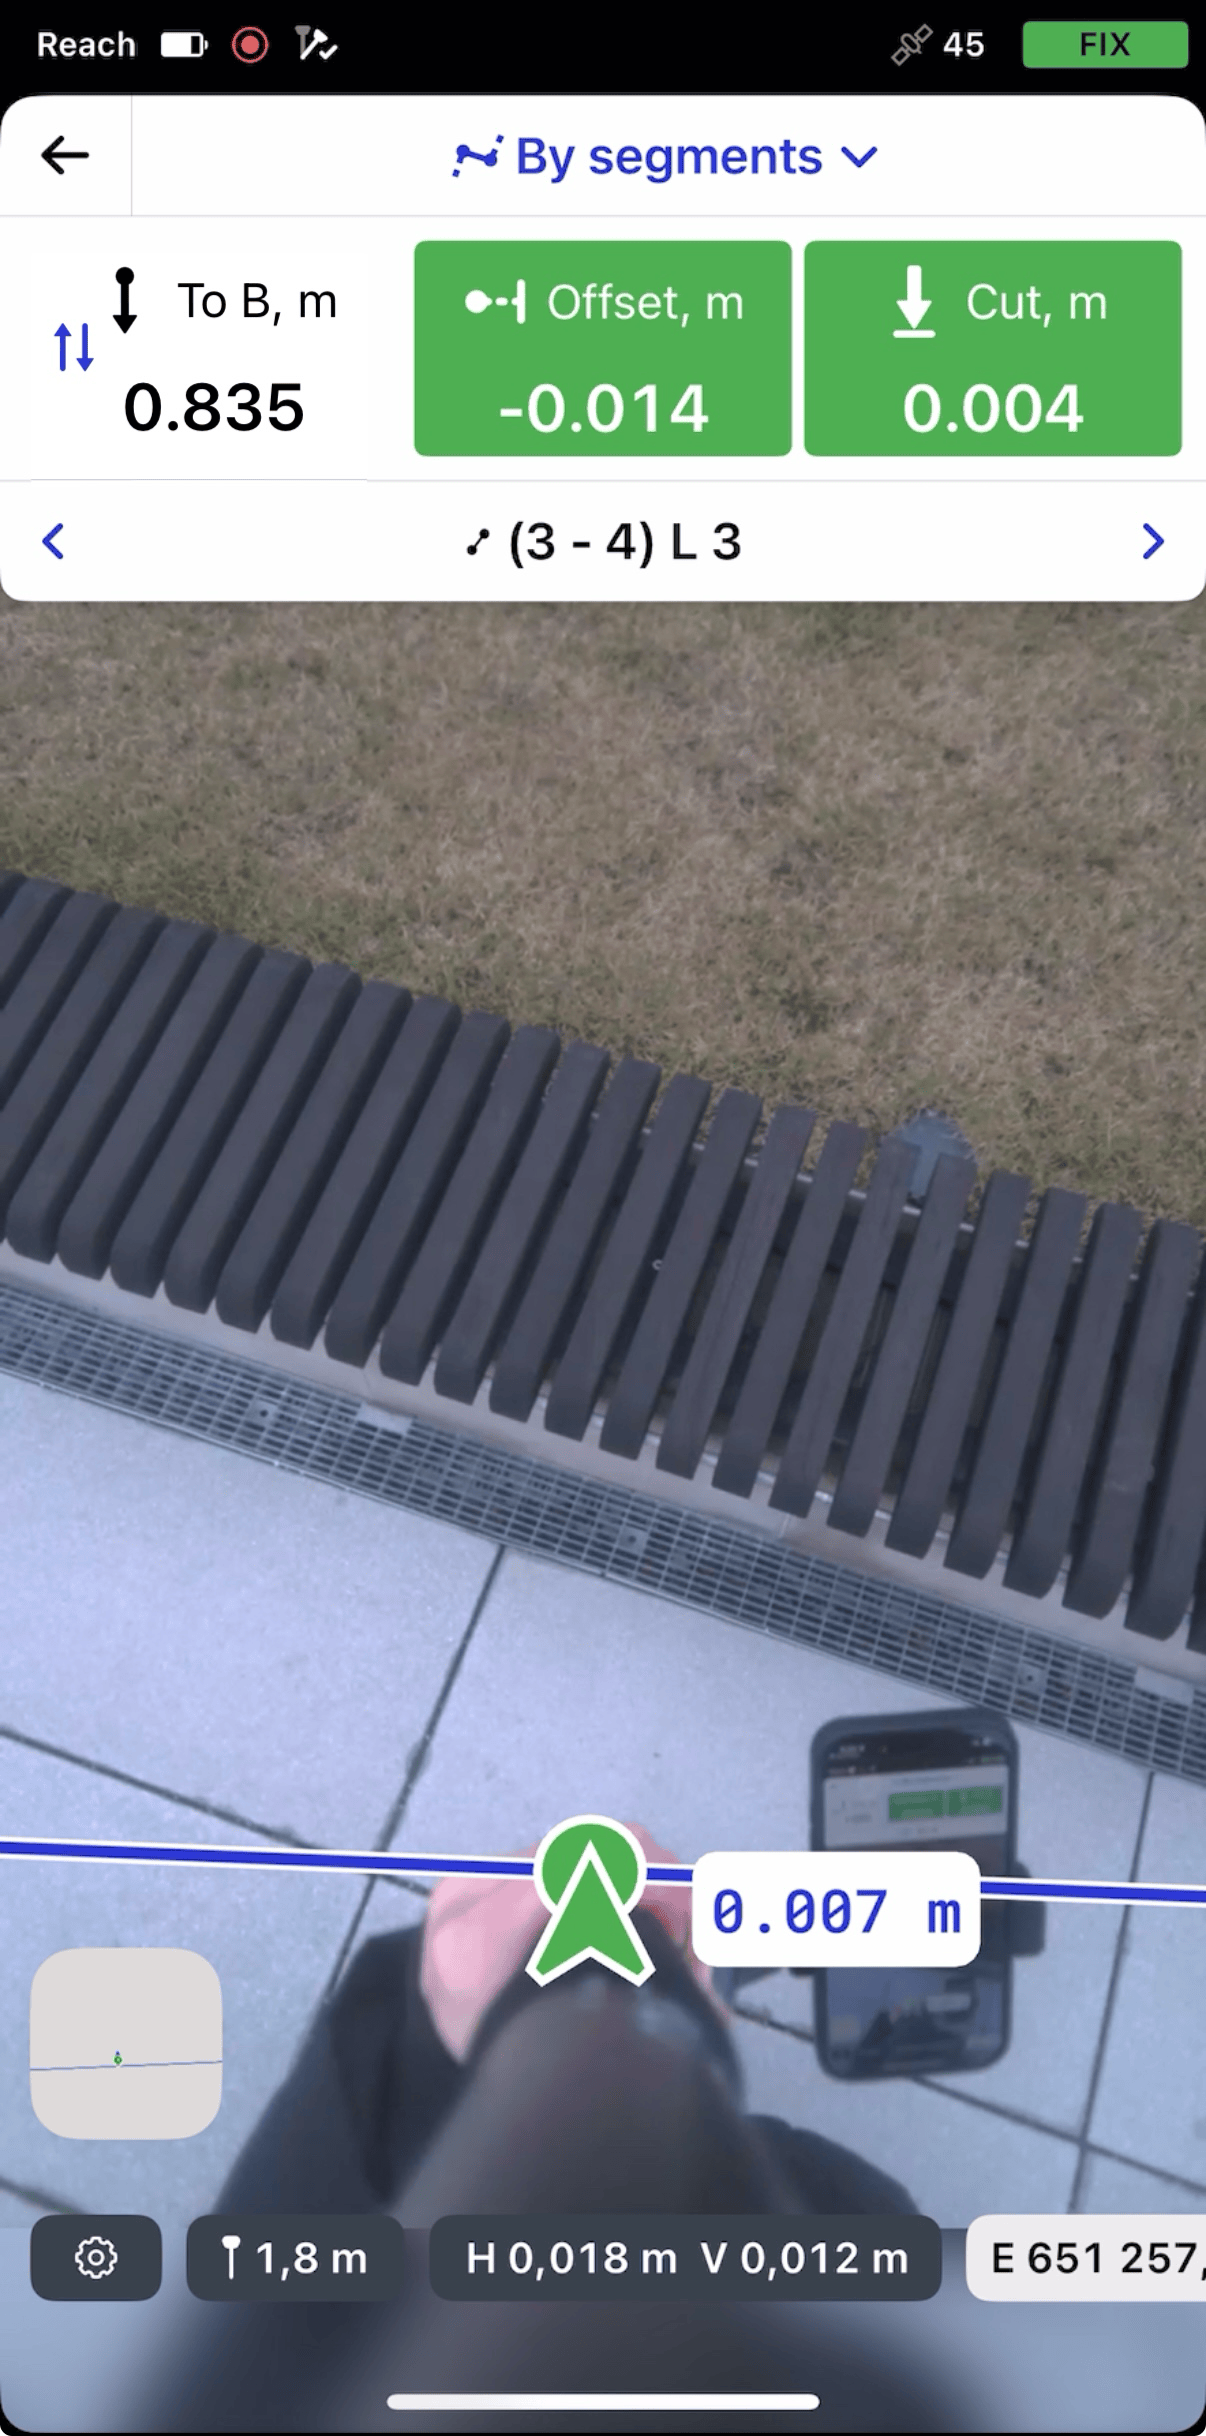
Move your Reach so that the navigation section turns green, showing that your Reach is less than 2.5 cm (0.08 ft) away from the line you are staking out.
-
Watching the Offset section, check if the segment is set out according to the project.
tipYou can also stake out a segment with a chainage, watching the To A or To B section.
-
Watch the Cut & Fill section and check the height value if necessary.
-
Switch to another segment you want to stake out using the arrow buttons on the Stakeout plate.
-
To finish staking out the segments of a line or polygon, tap the back button on the Stakeout plate.
Once you've finished staking out the line or polygon segments, you can either tap another line or polygon on the map to start a new stakeout or tap the back button to exit the Line stakeout tool.
AR stakeout using By intervals & offsets mode
To apply intervals and offsets, your project must be in a local coordinate system. You also need to make sure your line is within the selected coordinate system boundaries.
To stake out the line with intervals and offsets using the By intervals & offsets mode, do as follows:
-
In Emlid Flow, open your project.
-
Choose a line on the map or from the list. The selected line will be highlighted in blue on the map.

-
Tap the Stake out button. The Along line mode is applied by default.
noteEmlid Flow remembers the last mode used. If you’ve previously used the Line stakeout tool and a different mode is active, tap the stakeout plate to view all available modes.
-
To access the modes, tap the Stakeout plate, select By intervals & offsets. After selecting the mode, the settings for intervals, horizontal offsets, and vertical offsets will appear.
-
Enable the necessary options and enter the values:
- When configuring intervals, the app will generate temporary interval points for stakeout, which you can access using the selected line menu. You can also include line vertices.
- When configuring offsets, you can apply horizontal, vertical, or both types depending on your project requirements. For horizontal offsets, use positive values to shift right and negative values to shift left—the offset is applied perpendicular to the segment at the current point. For vertical offsets, use positive values to shift upward and negative values to shift downward.
The specified values for both intervals and offsets will be displayed on the Stakeout plate.
-
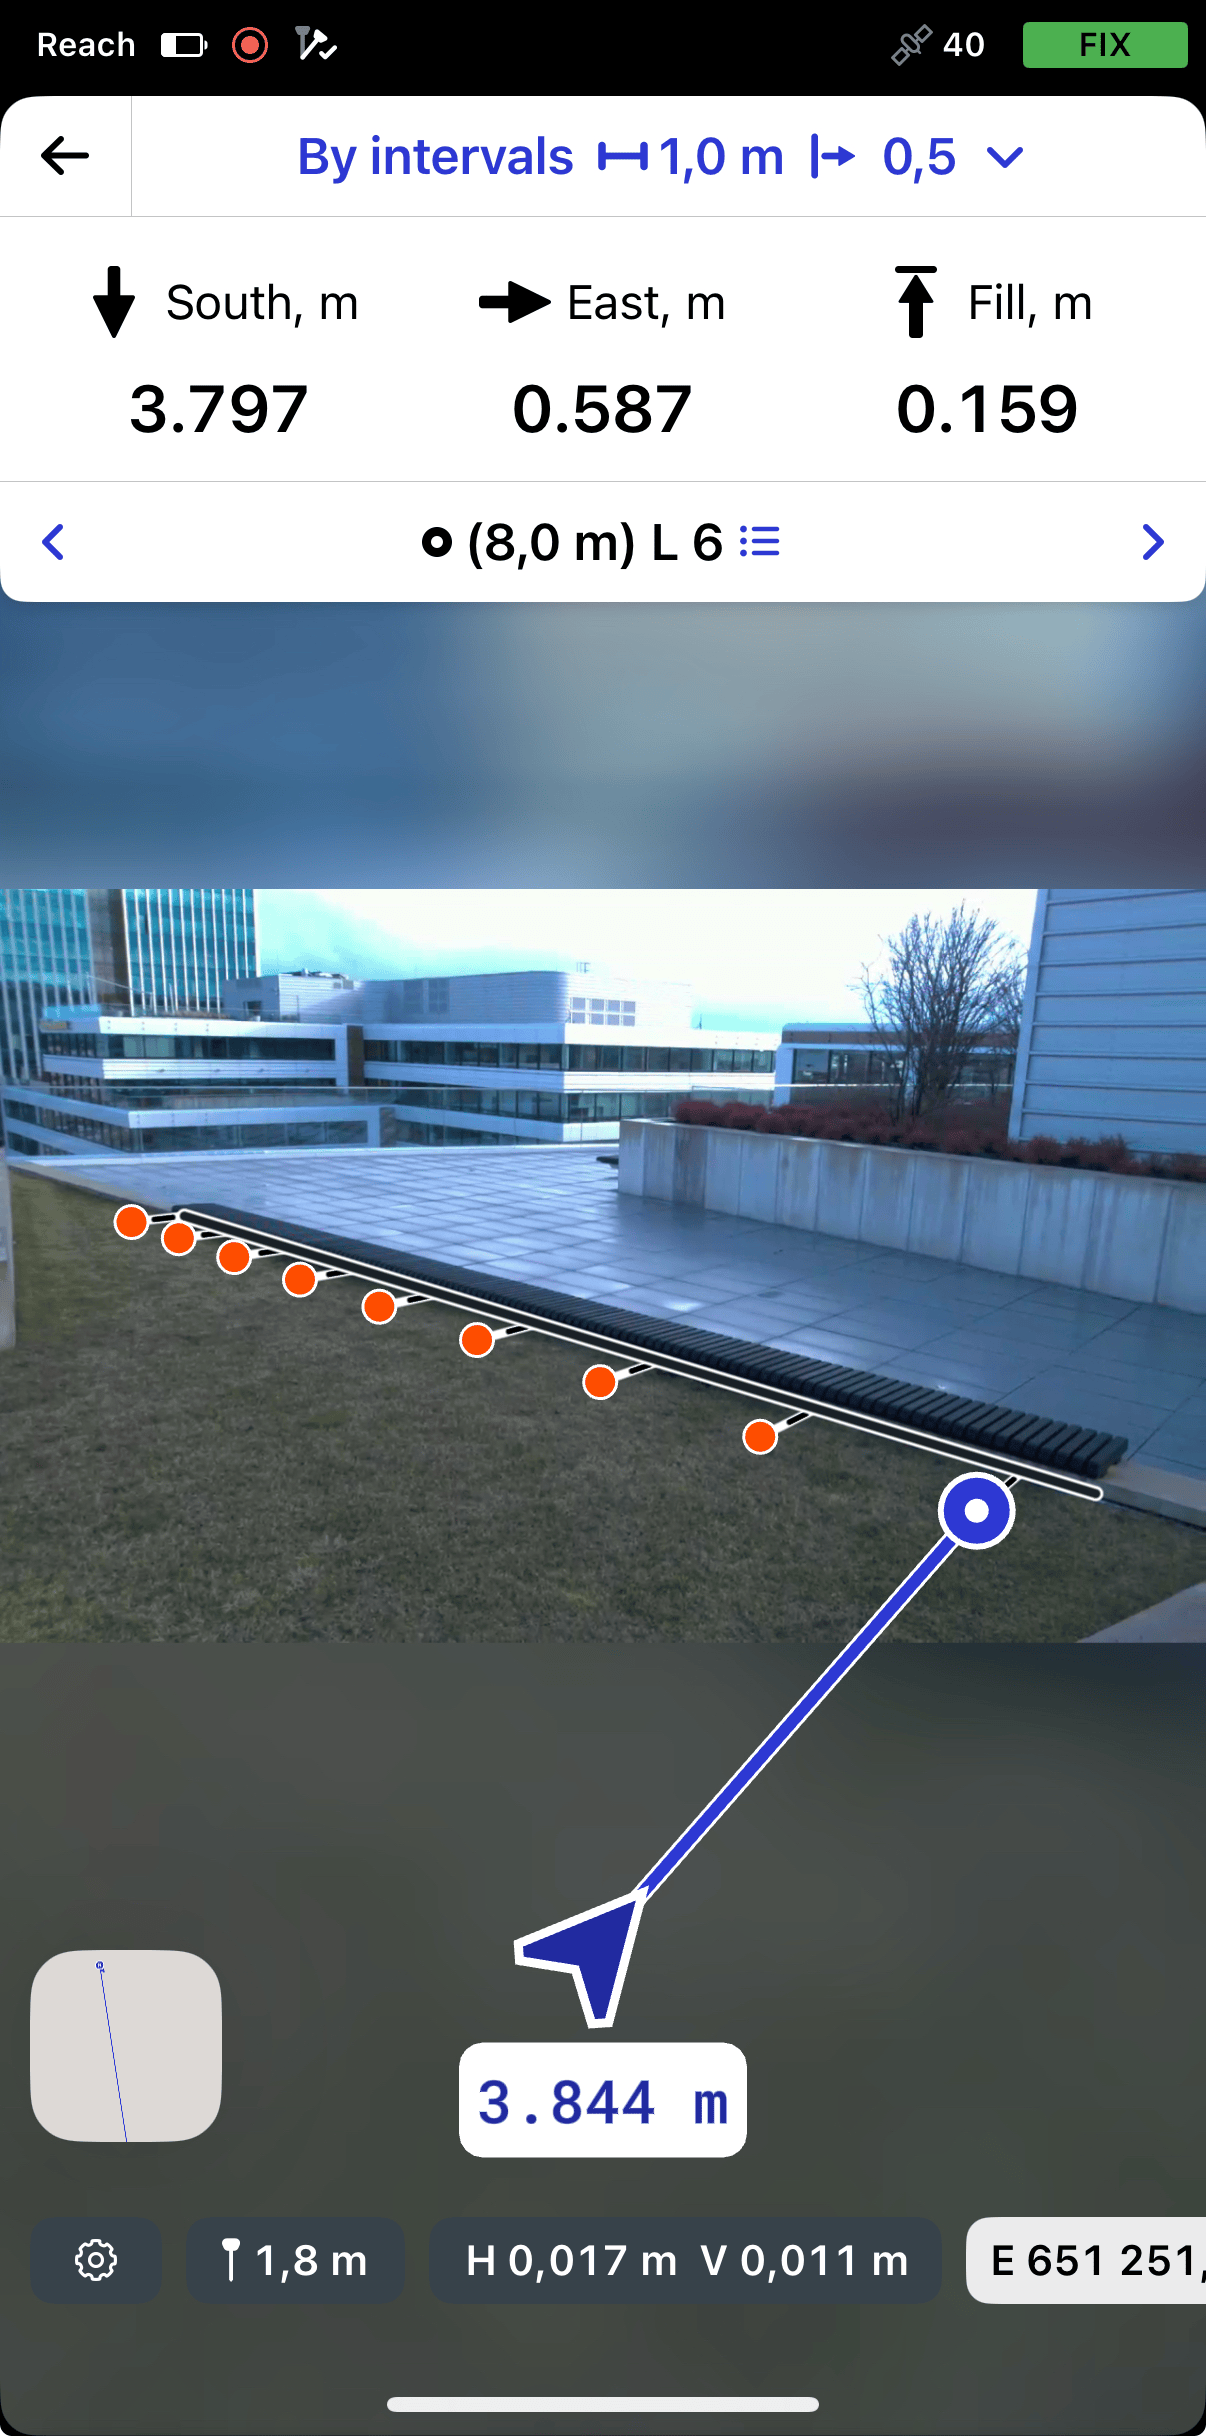
After applying settings, tap AR stakeout.
-
Watching the offset plate and the screen, move towards the line. As you move closer, the interface snaps to the bottom camera’s view, centering the target for precise placement.
noteThe blue arrow will also help you to find the right direction when the front camera is in use, and the chip below it shows the distance to the target object. As you move closer, the chip moves to the right side of the arrow.
-
Move your Reach towards the stake point so that the bull’s eye turns green, showing that your Reach is less than 2.5 cm (0.08 ft) away from the point you are staking out.
-
Watching the values on the Stakeout plate, check if the interval point of the line is set out according to the project.
-
To finish staking out the line, tap the back button on the Stakeout plate.
Once you've finished staking out the line, you can either tap another line on the map to start a new stakeout or tap the back button to exit the Line stakeout tool.
AR stakeout using To line mode
The To line mode is auxiliary and helps you navigate to the line’s first segment.
To navigate to the line, do as follows:
-
Open your project in Emlid Flow. Select the line you want to stake out on the map or from the object list. The selected line will be highlighted in blue on the map.
-
Tap the Stake out button. The Along line mode is applied by default.

noteEmlid Flow remembers the last mode used. If you’ve previously used the Line stakeout tool and a different mode is active, tap the Stakeout plate to view all available modes.
-
To access the modes, tap the Stakeout plate, select To line, and tap Save.
-
Tap the AR Stakeout button.
-
Watching the offset plate and the screen, move towards the line. As you move closer, the interface snaps to the bottom camera’s view, centering the target for precise placement.
noteThe blue arrow will also help you to find the right direction when the front camera is in use, and the chip below it shows the distance to the target object. As you move closer, the chip moves to the right side of the arrow.
-
Move your Reach so that the navigation section turns green, showing that your Reach is less than 2.5 cm (0.08 ft) away from the line you are staking out.
Once you've finished staking out the line, you can either tap another line on the map to start a new stakeout or tap the back button to exit the Line stakeout tool.