Integración con Microsurvey FieldGenius para dispositivos Android
En este tutorial se explica cómo integrar el Reach RS3 con MicroSurvey FieldGenius en dispositivos Android a través de Bluetooth.
Resumen
Para utilizar FieldGenius, su dispositivo Android debe tener instalada la versión 6.0 (Marshmallow) o posterior.
Reach RS3 es compatible con la integración con MicroSurvey FieldGenius para recolectores de datos móviles a través de Bluetooth. Para integrar el Reach RS3 con MicroSurvey FieldGenius, siga los pasos que se indican a continuación:
Flujo de trabajo
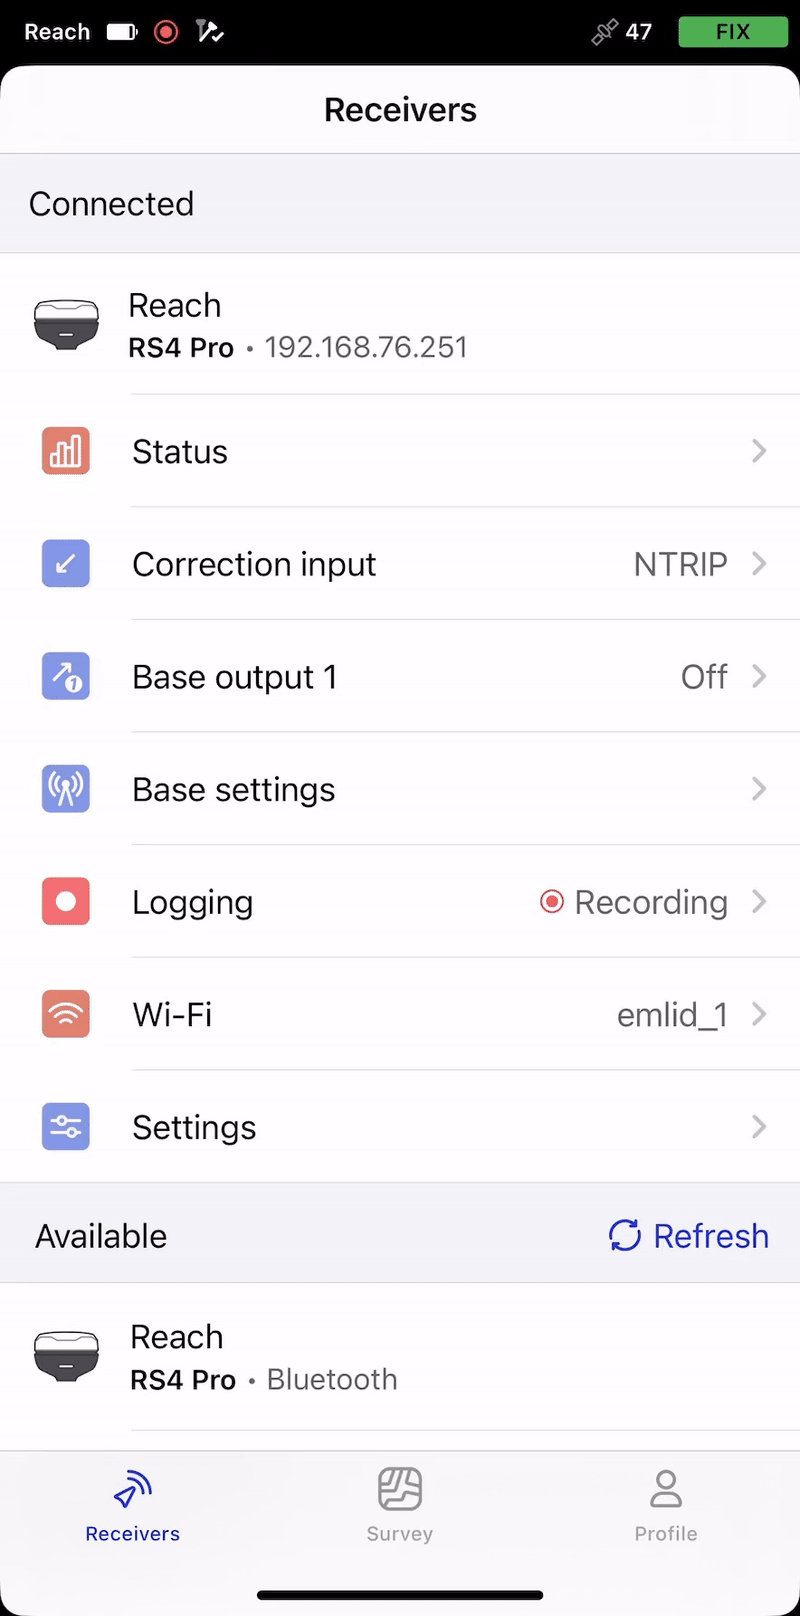
Acceder a Reach con Emlid Flow
Puede conectarse a su Reach de dos formas:
- Utilizando la opción de conexión BLE. Este es el método de conexión recomendado. Es especialmente útil cuando se trabaja con correcciones de un proveedor NTRIP. En esta configuración, el receptor utiliza la conexión a Internet de su dispositivo móvil, por lo que solo tiene que seleccionar la opción NTRIP sobre BLE al configurar la entrada de correcciones del receptor.
- Utilizando la opción de conexión Wi-Fi. En este caso, su dispositivo y Reach deben estar en la misma red Wi-Fi.
Para conectarse a su Reach, siga los pasos que se indican a continuación:
- Bluetooth connection
- Hotspot connection
-
Active Bluetooth en su smartphone o tableta.
-
Abra Emlid Flow. Cuando se le solicite, pulse Configure access (Configurar acceso) y permita los permisos de ubicación. Esto es necesario para el funcionamiento completo del receptor.
Reach da prioridad a la conexión actual cuando se utiliza BLE, independientemente del tipo:
- Si Reach está conectado mediante Bluetooth Classic a un software de terceros, desconéctelo antes de utilizar BLE en Emlid Flow.
- Si hay otro dispositivo conectado a Reach, desconéctelo antes de volver a conectarlo mediante BLE en Emlid Flow.
Una vez concedidos los permisos, su receptor aparecerá en la lista. La aplicación se conectará a él automáticamente.
Para obtener más información sobre la conexión a su dispositivo Reach, consulte la guía Conexión a Reach. El método recomendado es la conexión Bluetooth.
-
Vaya a Configuración de Wi-Fi en su dispositivo.
-
Conéctese al punto de acceso del Reach. Aparece como reach:XX:XX.
-
Introduzca la contraseña emlidreach.
-
Abra Emlid Flow y conéctese a su Reach.
Configurar la entrada de correcciones en Emlid Flow
Para obtener una solución fija, el Reach RS3 debe recibir correcciones. Puede configurar las correcciones de dos maneras:
-
A través de FieldGenius, reenviando la transmisión de correcciones a Reach RS3 por Bluetooth.
-
Directamente en Emlid Flow, configurando la fuente de corrección en la aplicación. Para ello, consulte las siguientes guías:
-
Cómo configurar RTK por radio LoRa
cautionSi desea utilizar las correcciones de un proveedor de correcciones en red, configure la conexión NTRIP directamente en FieldGenius. Reach RS3 no admite el uso de correcciones NTRIP configuradas en Emlid Flow cuando está integrado con FieldGenius.
Si opta por utilizar FieldGenius como fuente de corrección, configure Emlid Flow de la siguiente manera:
-
En Emlid Flow, vaya a la pestaña Correction input (Entrada de correcciones).
-
Pulse Advanced methods (Métodos avanzados).
-
Seleccione Bluetooth.

Cuando haya seleccionado un método, continúe con la configuración de la integración siguiendo las instrucciones correspondientes que se indican en las secciones siguientes.
Configurar la conexión Bluetooth en Emlid Flow
Active la Bluetooth discoverability (Capacidad de descubrimiento del Bluetooth) en Emlid Flow para que el dispositivo sea visible en los dispositivos cercanos. Para ello, siga los pasos que se indican a continuación:
-
Vaya a Settings (Configuración) en Emlid Flow y pulse Bluetooth.
-
Pulse Capacidad de descubrimiento y active la opción Capacidad de descubrimiento. Pulse Guardar para aplicar los cambios.
Activar la compensación de inclinación
Reach RS3 es compatible con la compensación de inclinación basada en IMU, lo que le permite recopilar y replantear puntos aunque el poste topográfico esté inclinado. El software calcula el ángulo de inclinación y la distancia para determinar la posición de la punta del poste en el suelo. Para activar la compensación de inclinación, siga la guía Cómo activar la compensación de inclinación.
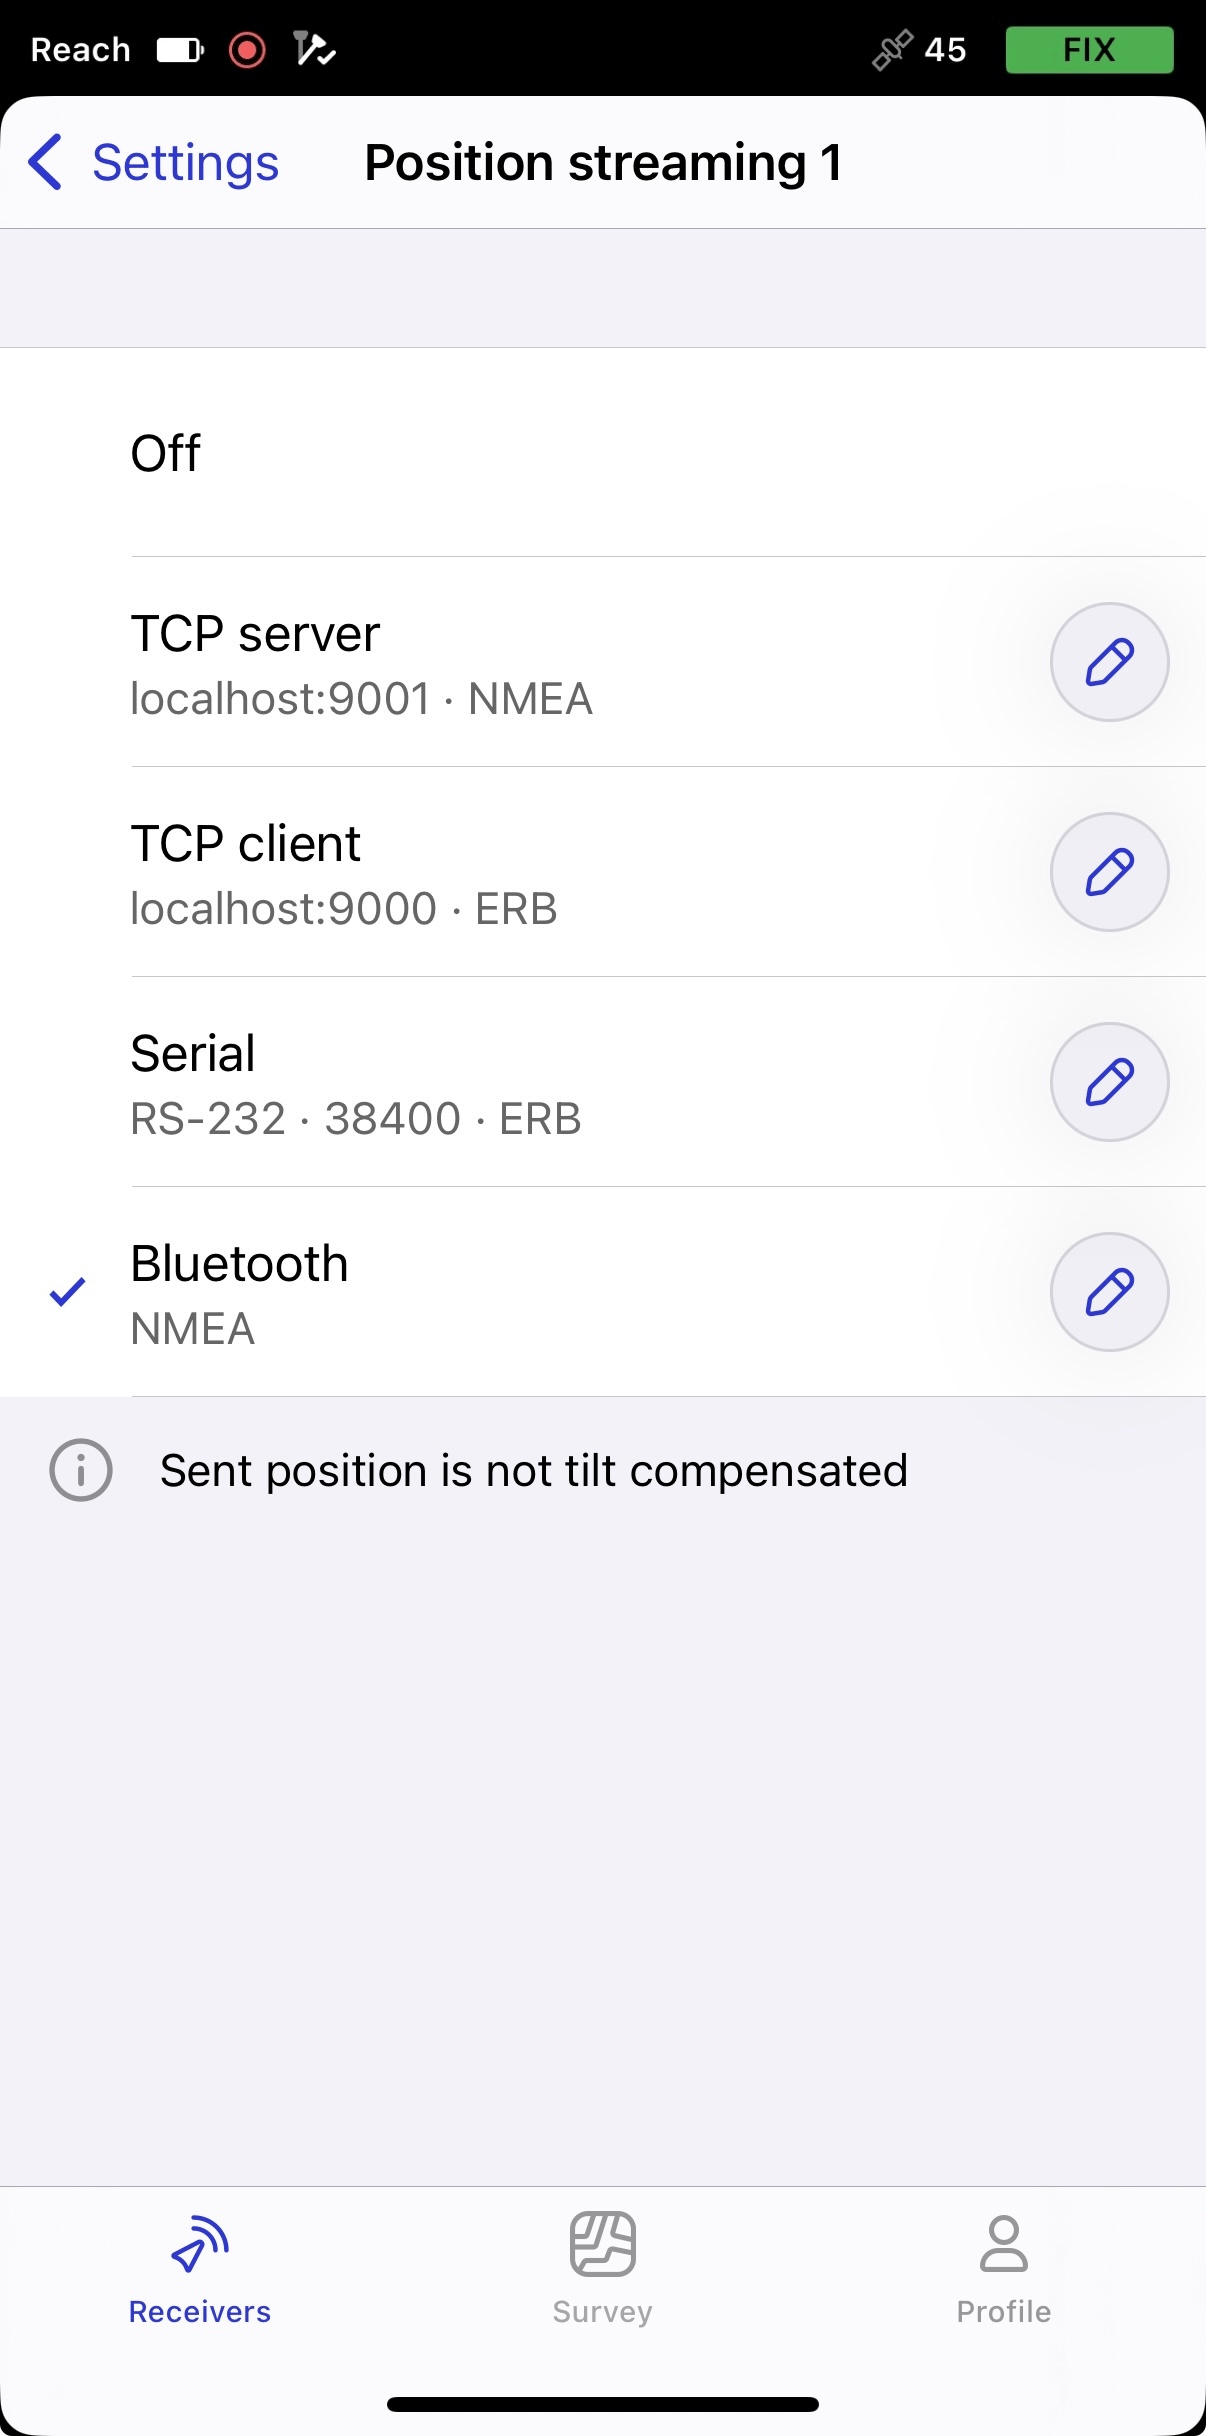
Configurar el flujo NMEA en Emlid Flow
Para enviar datos de posición a aplicaciones externas, configure la transmisión de posición en formato NMEA como se indica a continuación:
-
En Emlid Flow, vaya a Settings (Configuración).
-
Pulse Posición streaming 1 (Transmisión de posición) y seleccione Bluetooth.
-
Para configurar la transmisión de posición, pulse el botón Editar en la celda Bluetooth.
noteCuando se conecte a su Reach mediante Bluetooth, Emlid Flow le pedirá que se conecte al punto de acceso de Reach para acceder a los ajustes de configuración de la transmisión.
-
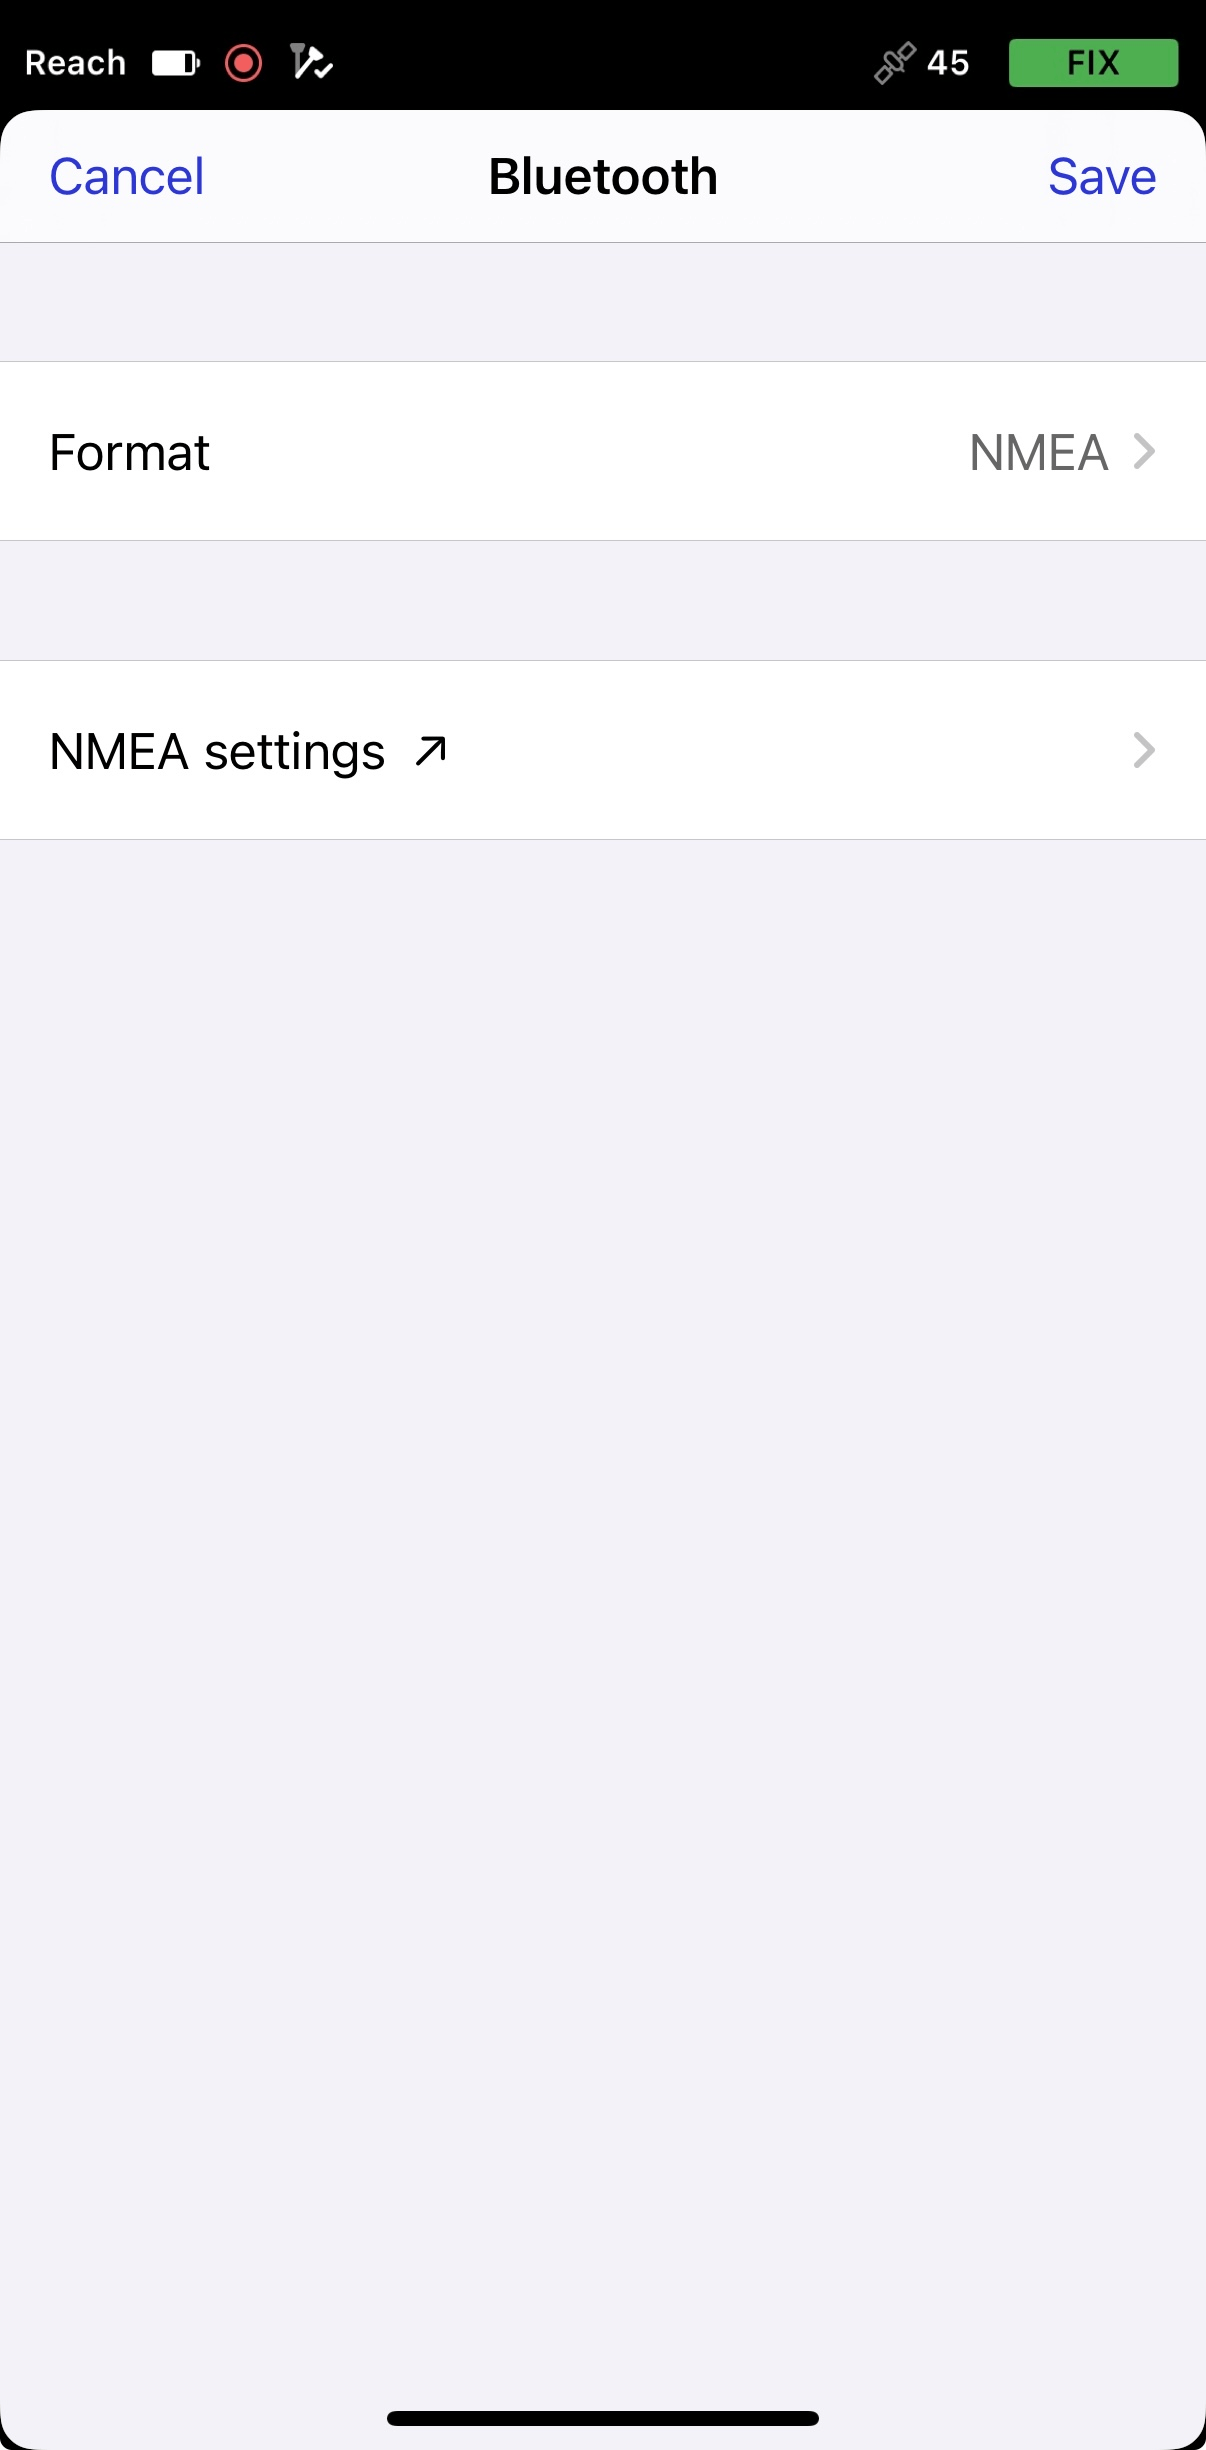
Pulse Formato y elija NMEA.
-
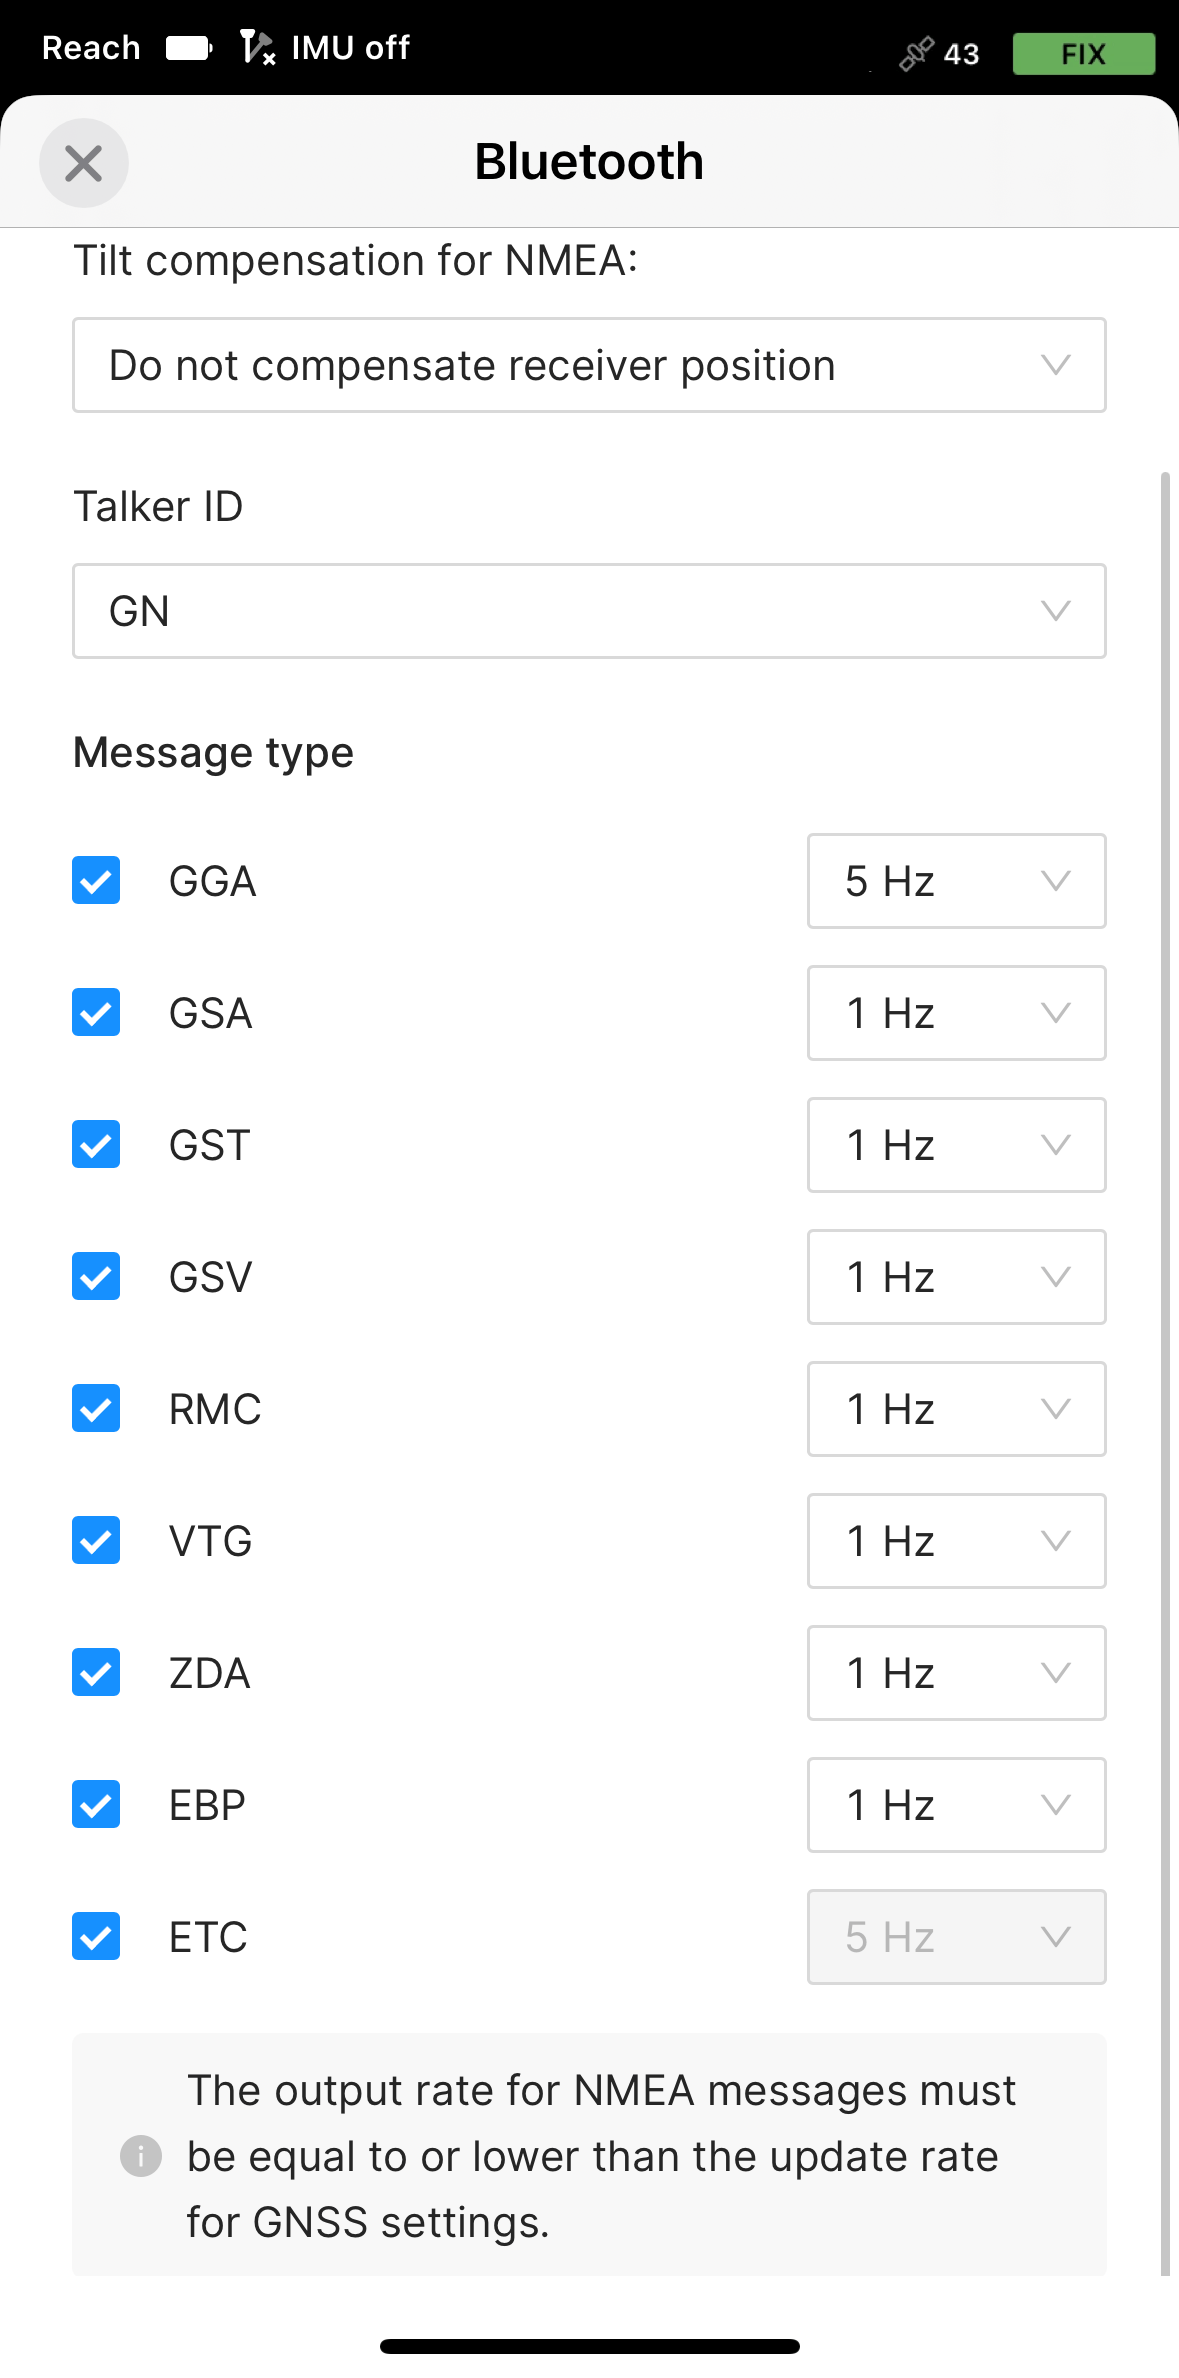
FieldGenius es compatible con los mensajes ETC para Reach RS3 y aplica automáticamente la compensación necesaria. Para evitar la doble compensación, seleccione Do not compensate receiver position (No compensar la posición del receptor) en Emlid Flow y asegúrese de que el mensaje ETC esté activado.
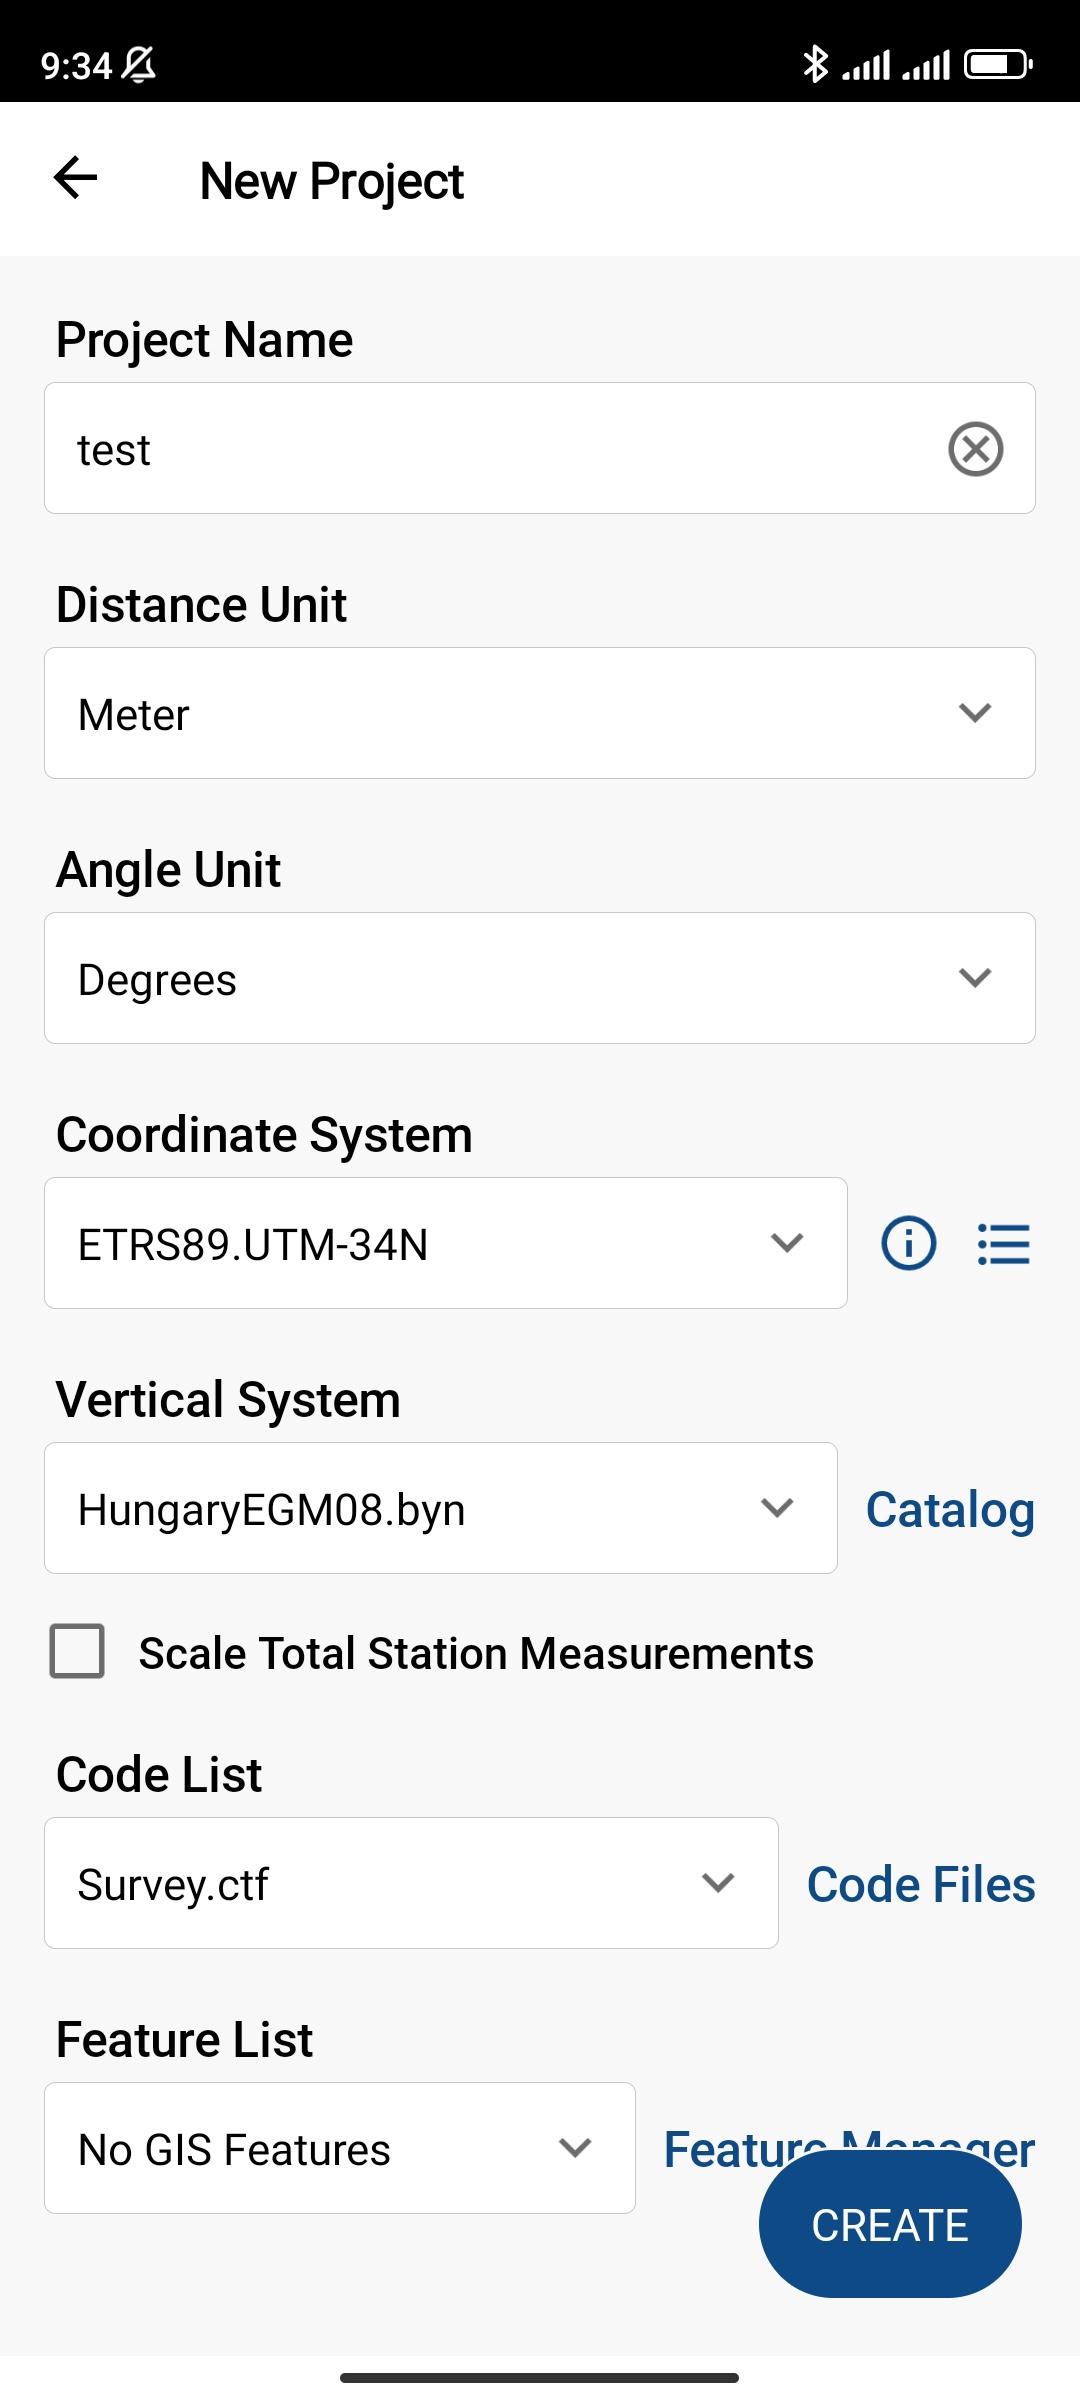
Crear un nuevo proyecto y un perfil de conexión de instrumentos
Para crear un nuevo proyecto y un perfil de conexión de instrumentos, siga los pasos que se indican a continuación:
-
Abra la aplicación FieldGenius, cree un nuevo proyecto y rellene todos los campos. Pulse Crear.
noteAsegúrese de haber configurado las unidades y el sistema de coordenadas adecuados en este paso.
- Para crear su perfil de rover GNSS, pulse Select Instrument (Seleccionar instrumento).
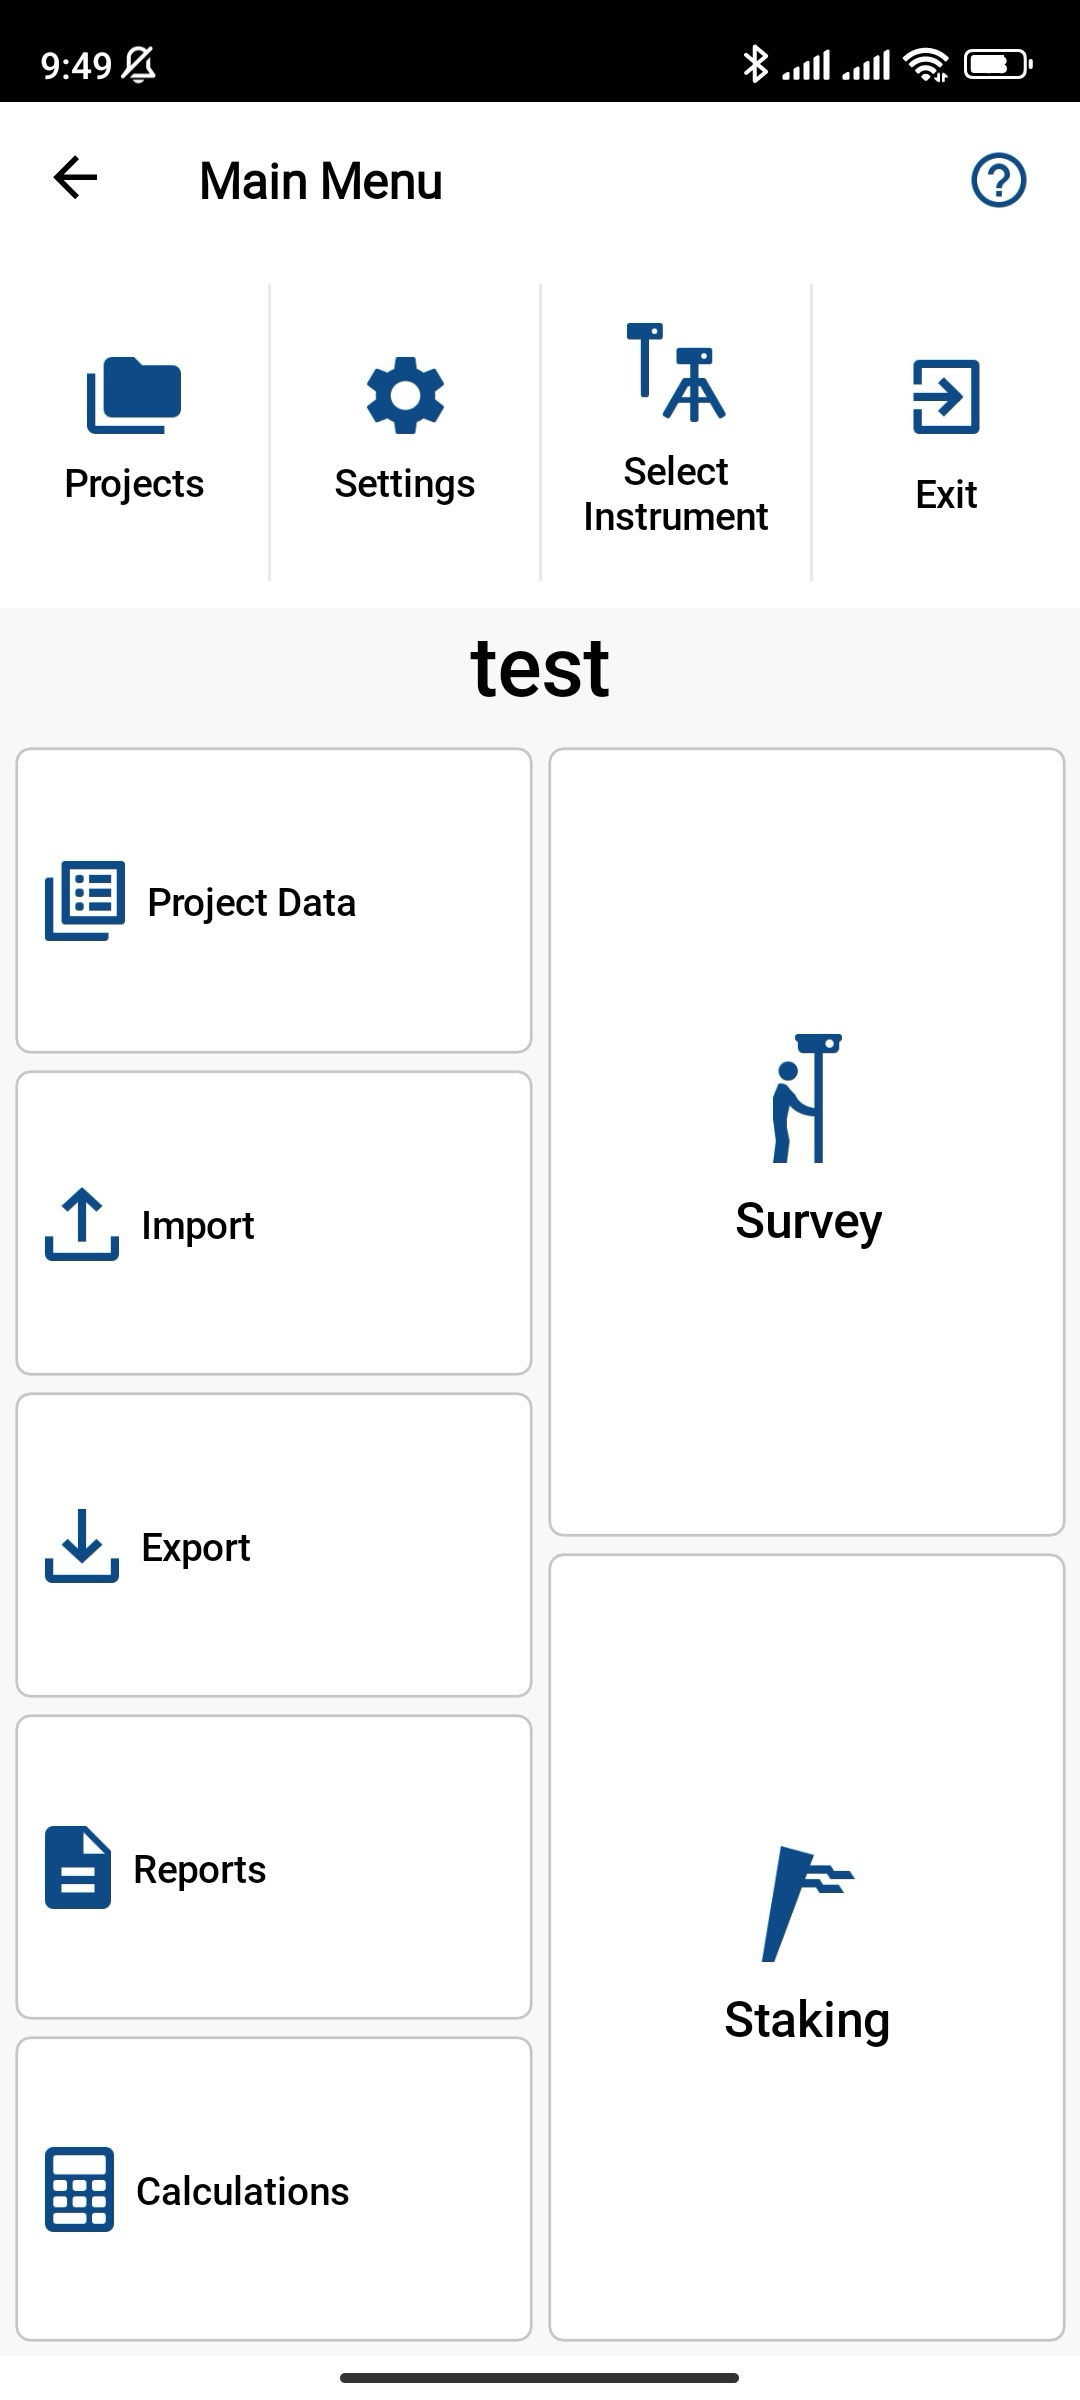
-
En la pantalla Instrument Profile (Perfil del instrumento), pulse Add profile (Añadir perfil).
-
Rellene los campos obligatorios como se indica a continuación:
- Seleccione Emlid en Make (Marca).
- Seleccione Reach RS3 en Model (Modelo).
- Especifique el nombre del perfil.
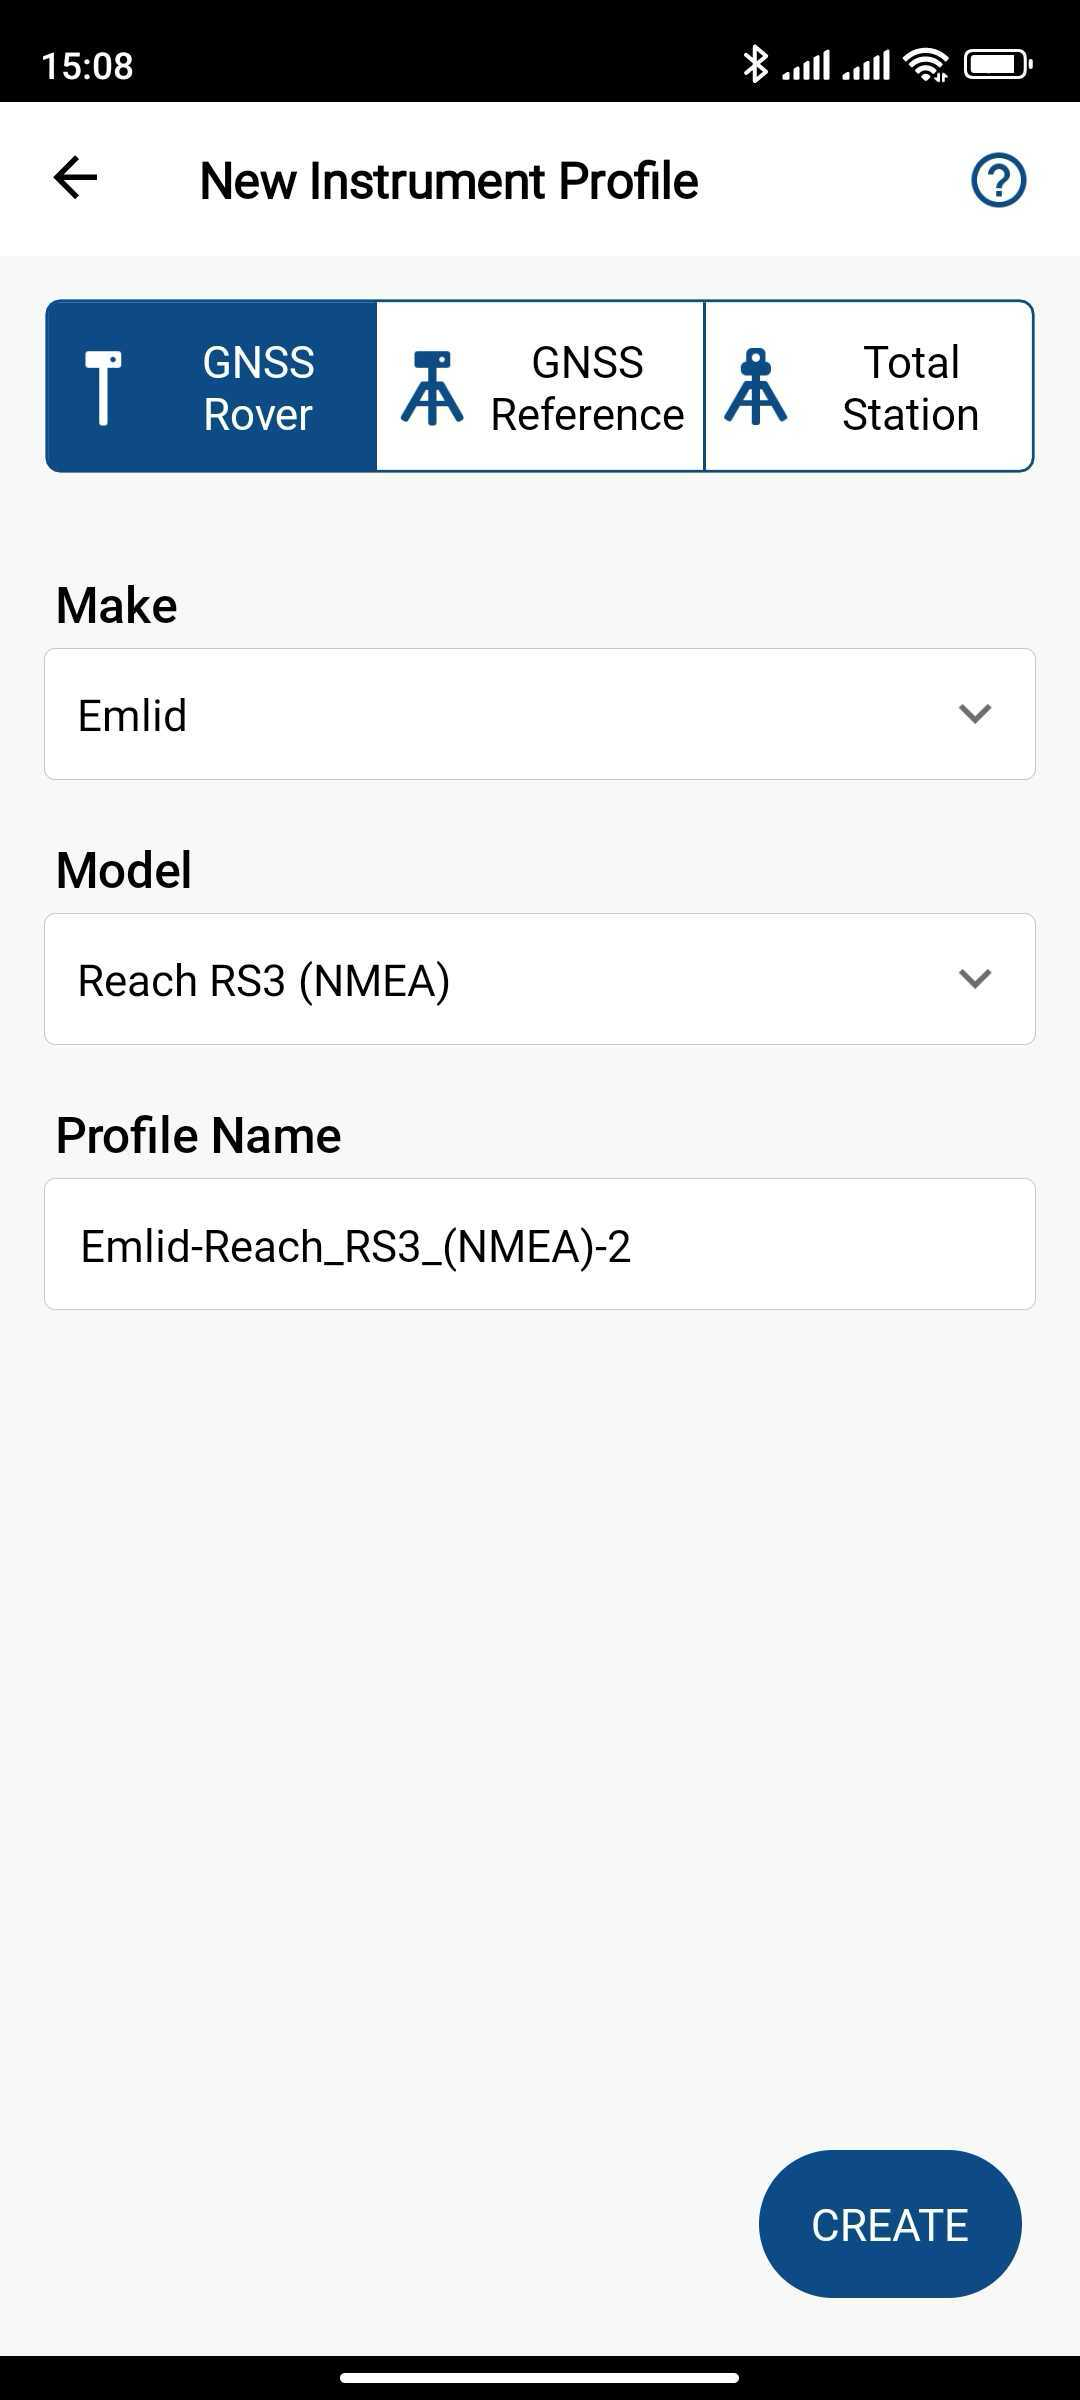
-
Pulse Crear.
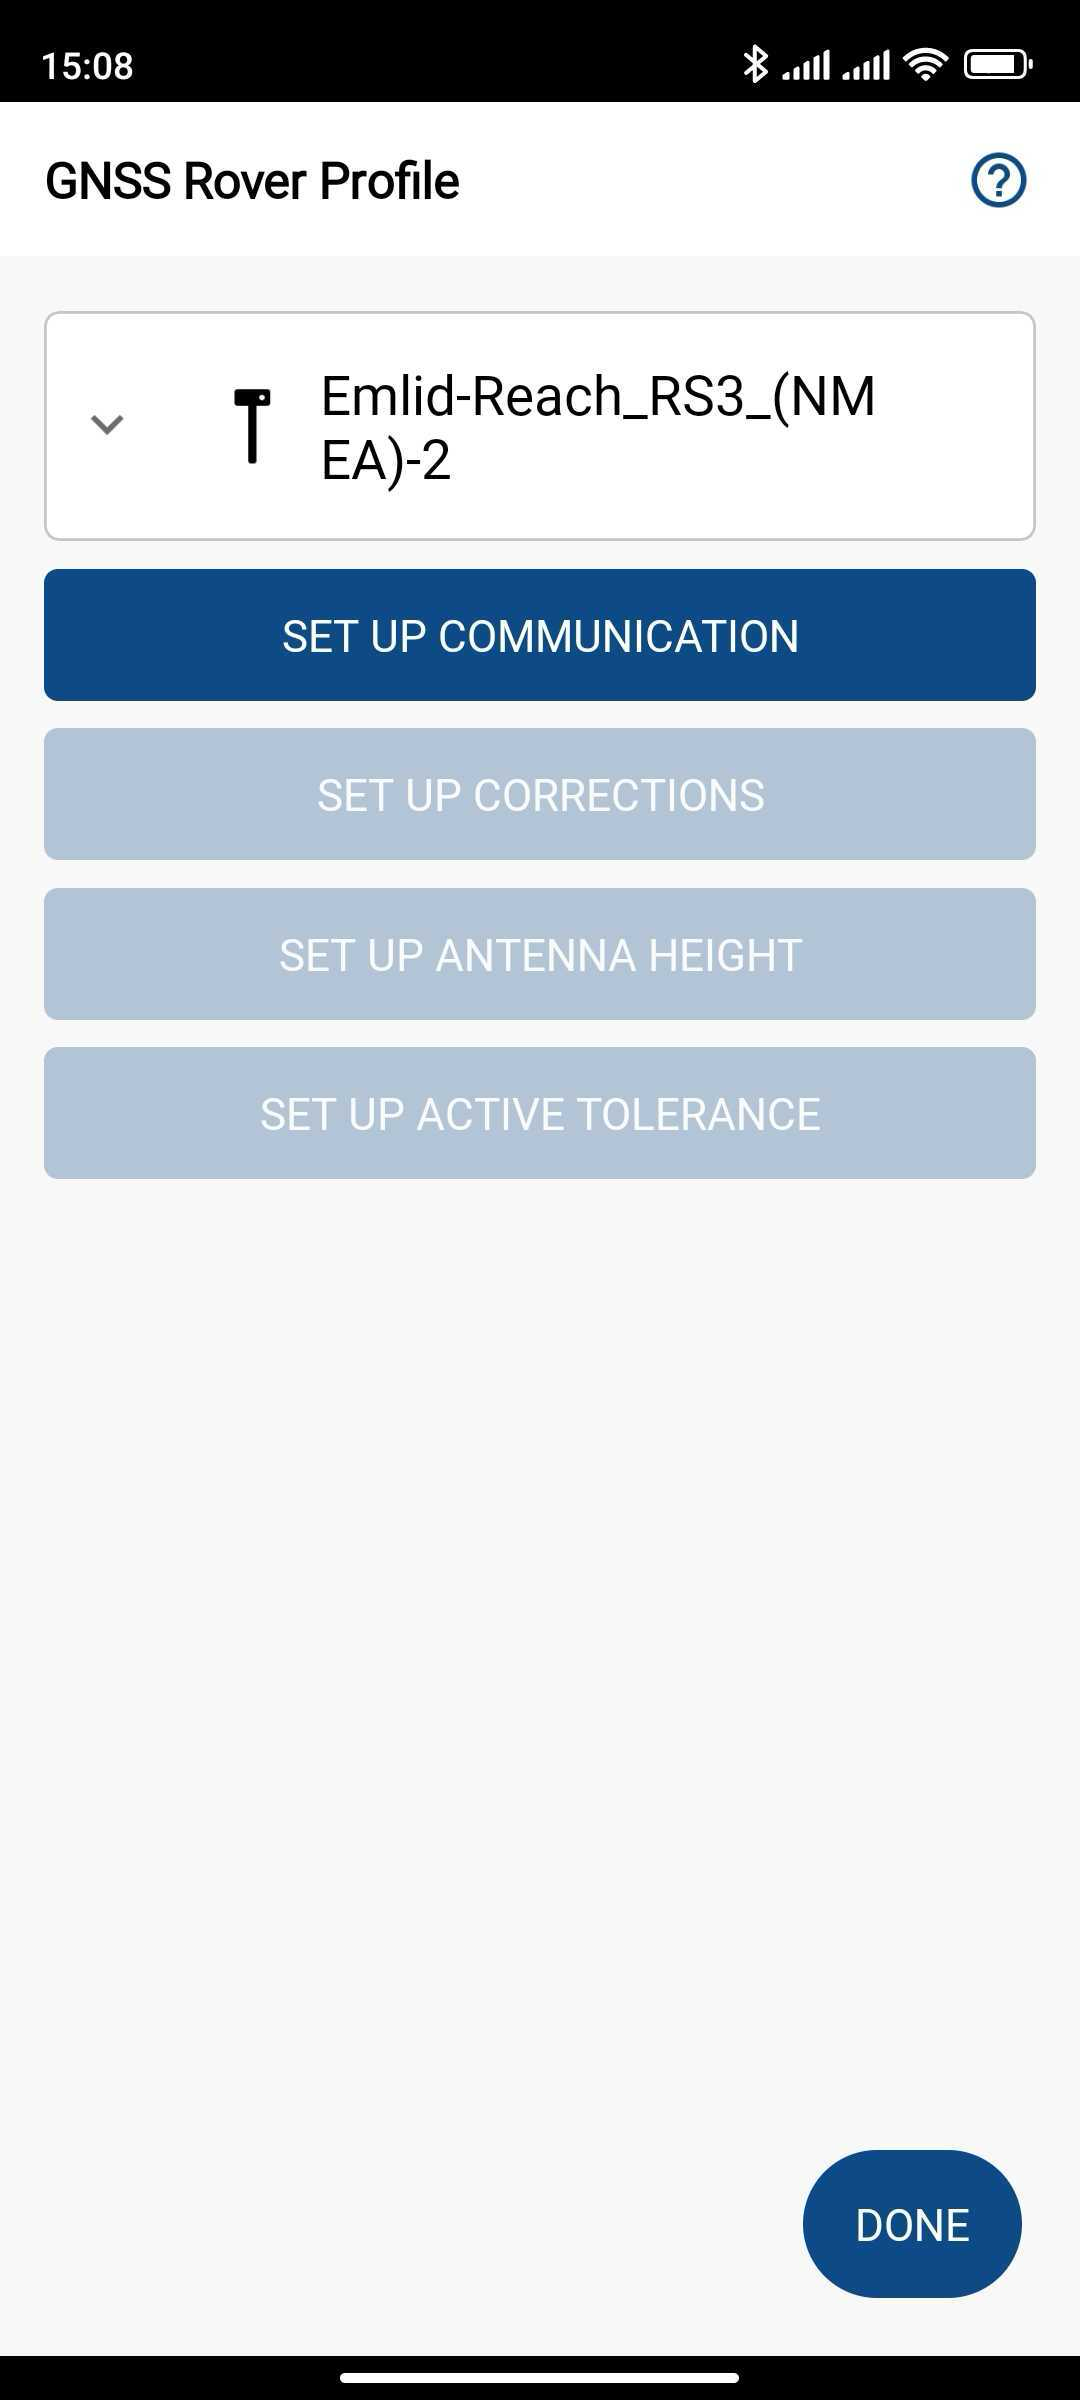
Configurar la comunicación entre MicroSurvey FieldGenius y Reach RS3
Cuando haya creado el proyecto y configurado el perfil de conexión del instrumento, puede configurar la comunicación entre FieldGenius y Reach RS3 a través de Bluetooth de la siguiente manera:
-
Pulse CONFIGURAR LA COMUNICACIÓN.
-
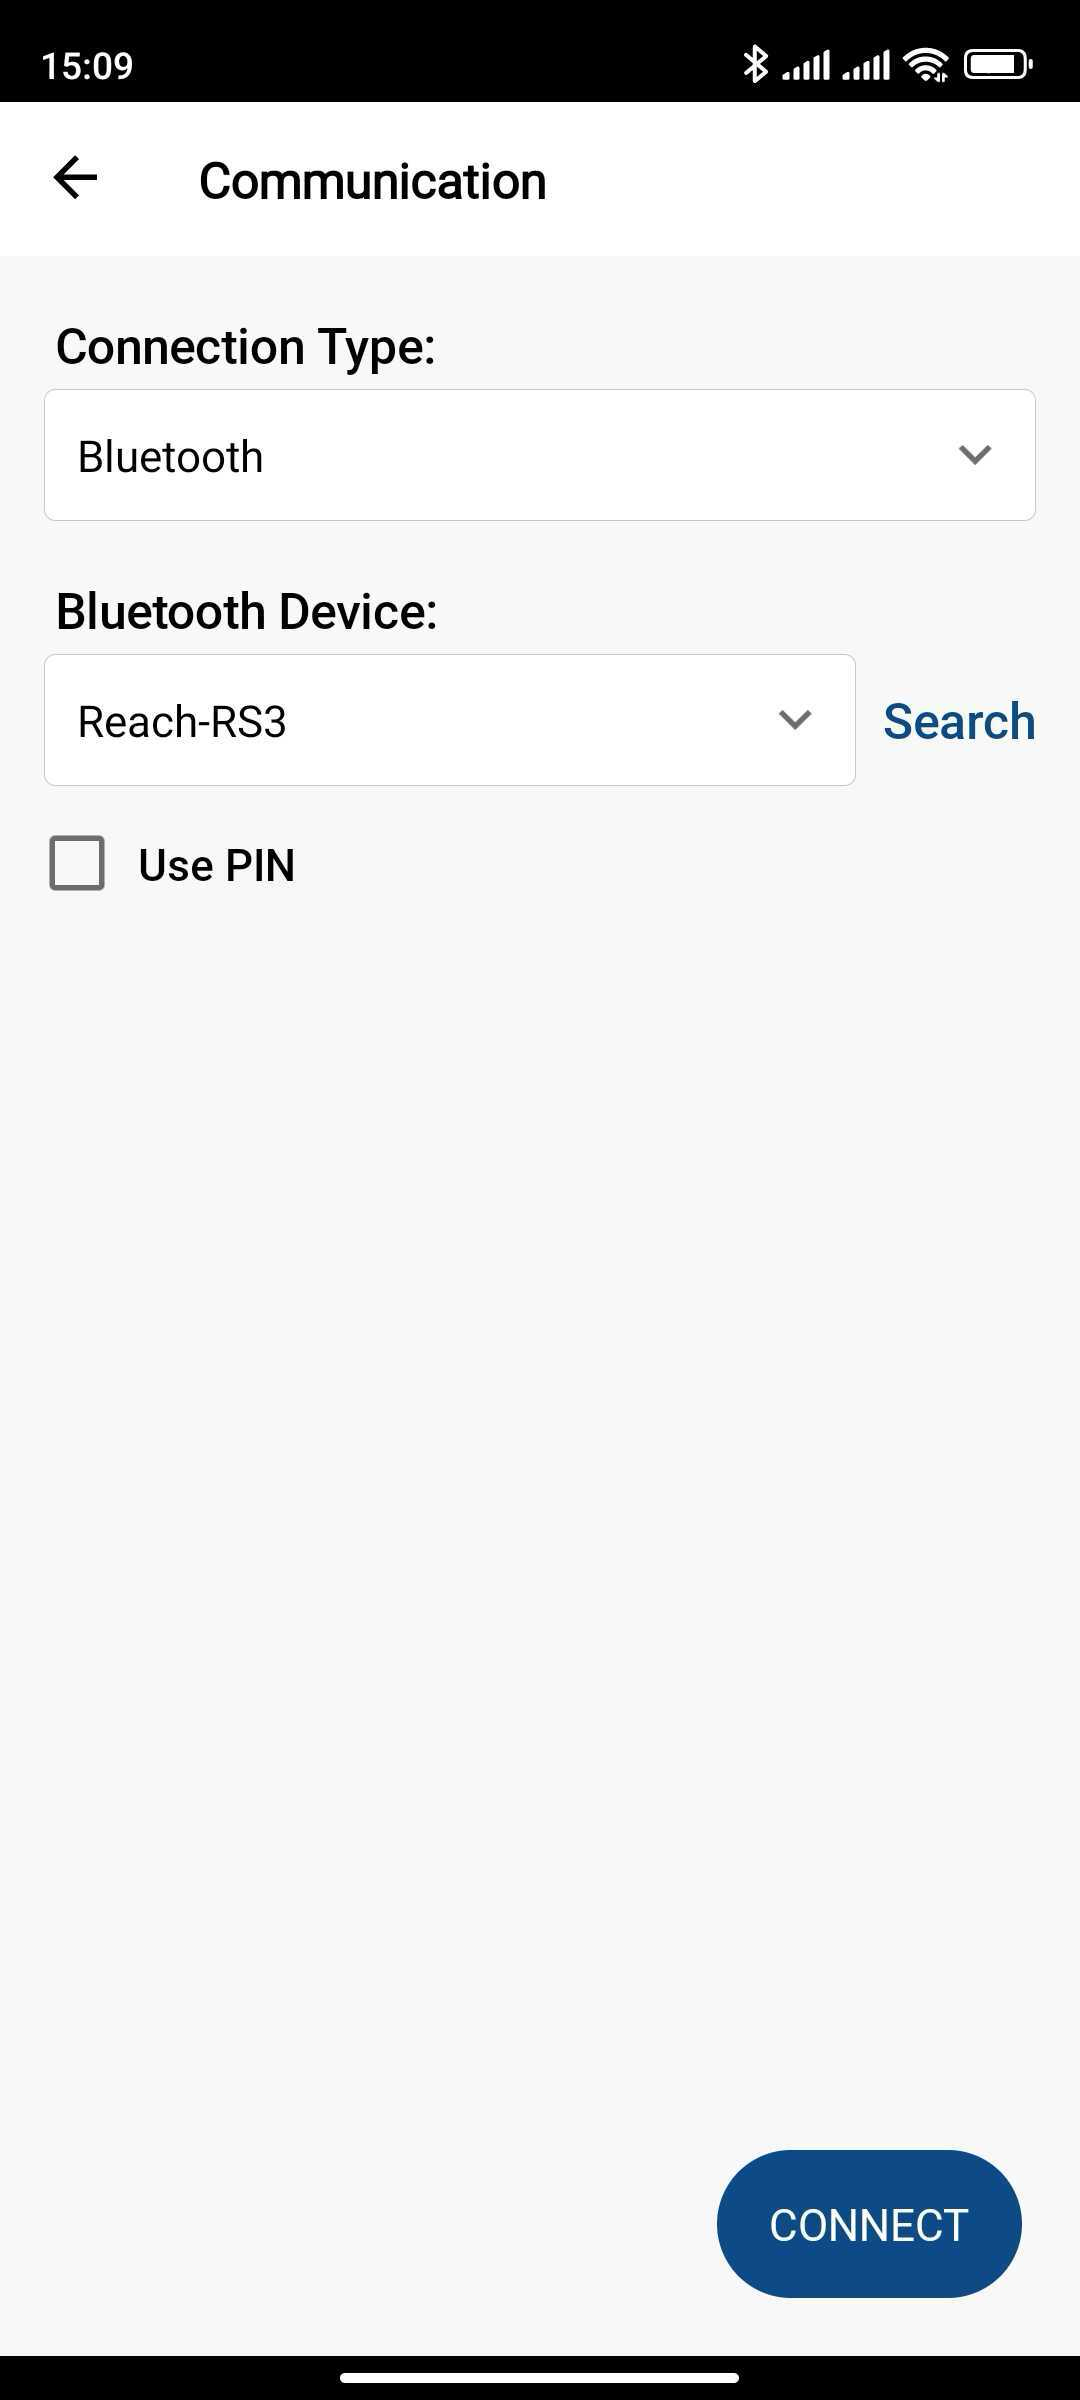
Seleccione Bluetooth como Connection type (Tipo de conexión) y pulse Search (Buscar) para encontrar su Reach RS3.
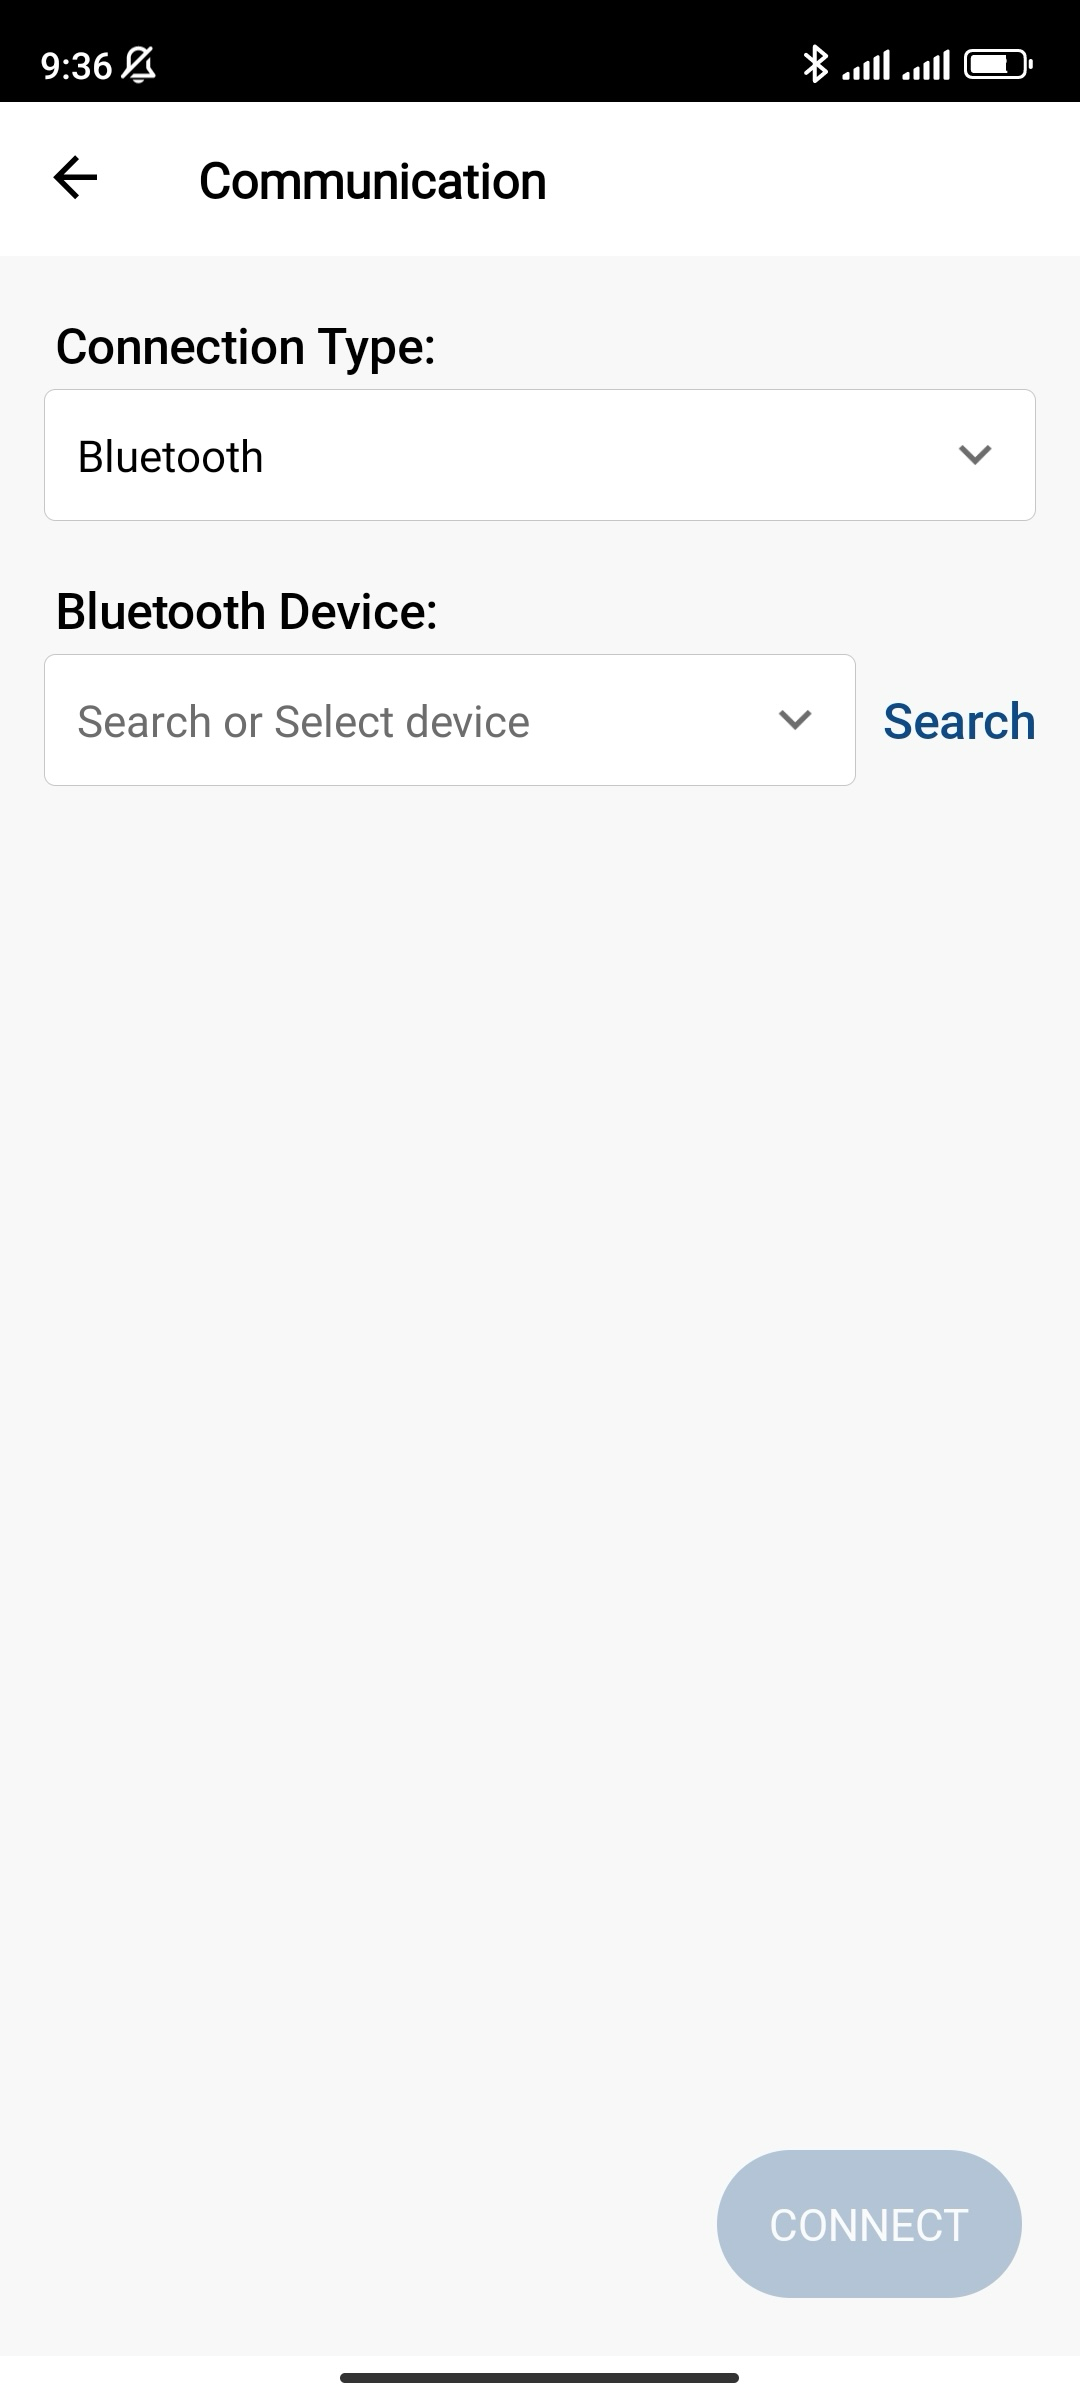
-
Elija su Reach RS3 y pulse Connect (Conectar).
tipAsegúrese de haber activado el Bluetooth en su dispositivo Android. Si el receptor sigue sin aparecer en la lista de dispositivos, pulse Actualizar lista.
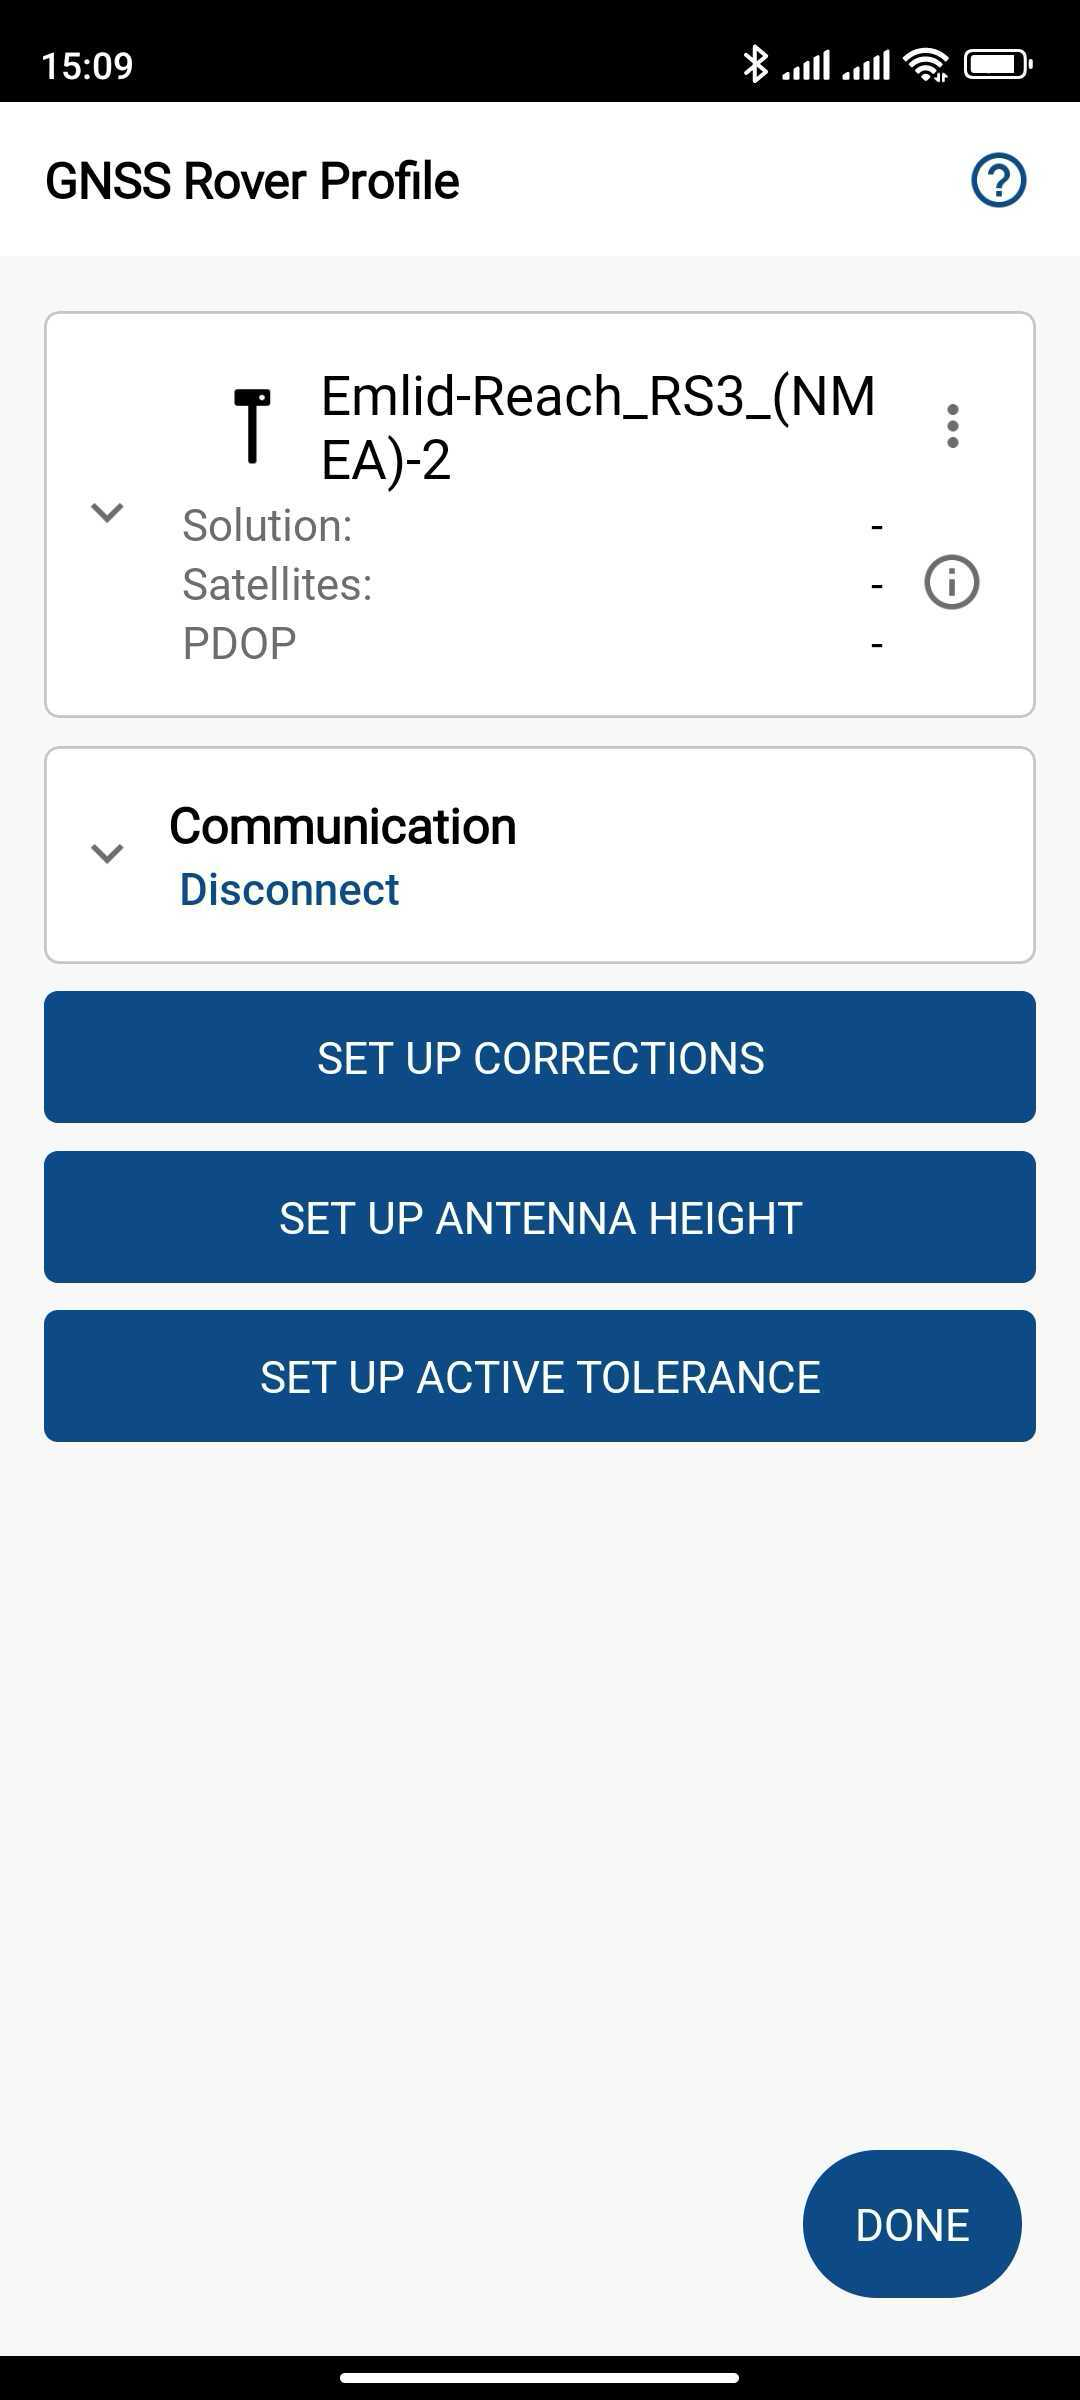
Cuando se haya conectado correctamente al Reach RS3, podrá configurarlo para recibir correcciones RTK.
Configurar FieldGenius para recibir correcciones
Si utiliza la radio LoRa o UHF para las correcciones en Emlid Flow, no configure las correcciones en FieldGenius.
Cuando haya configurado la comunicación entre FieldGenius y Reach RS3, debe configurar la recepción de correcciones RTK. Siga los pasos que se indican a continuación:
-
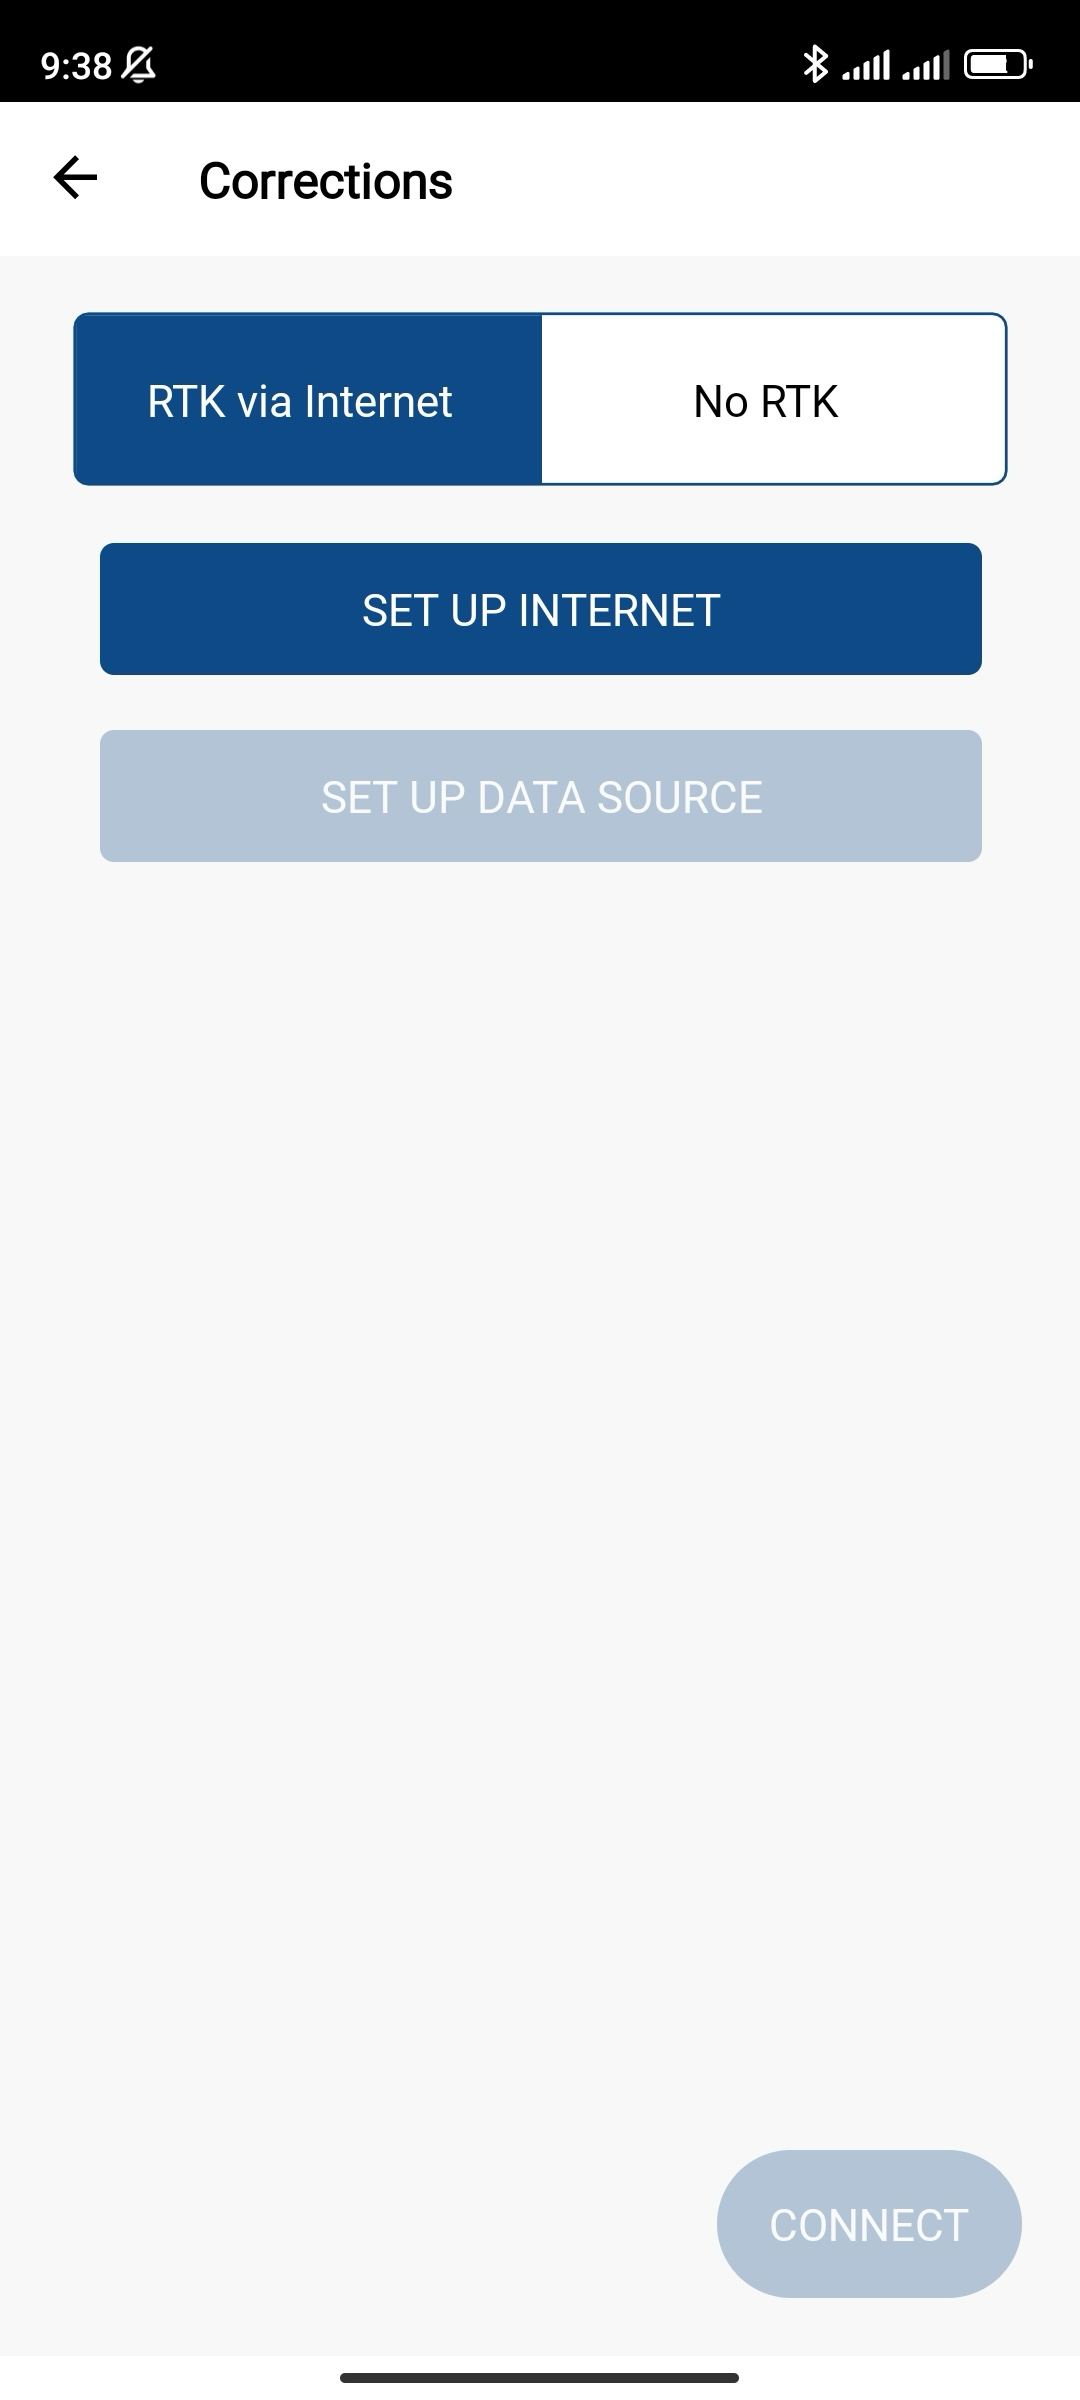
Pulse CONFIGURAR CORRECCIONES.
-
Para obtener correcciones de un caster a través de una conexión a Internet, seleccione RTK via Internet (RTK a través de Internet) y pulse Set up Internet (Configurar Internet).
noteAsegúrese de que su dispositivo móvil esté conectado a Internet.
-
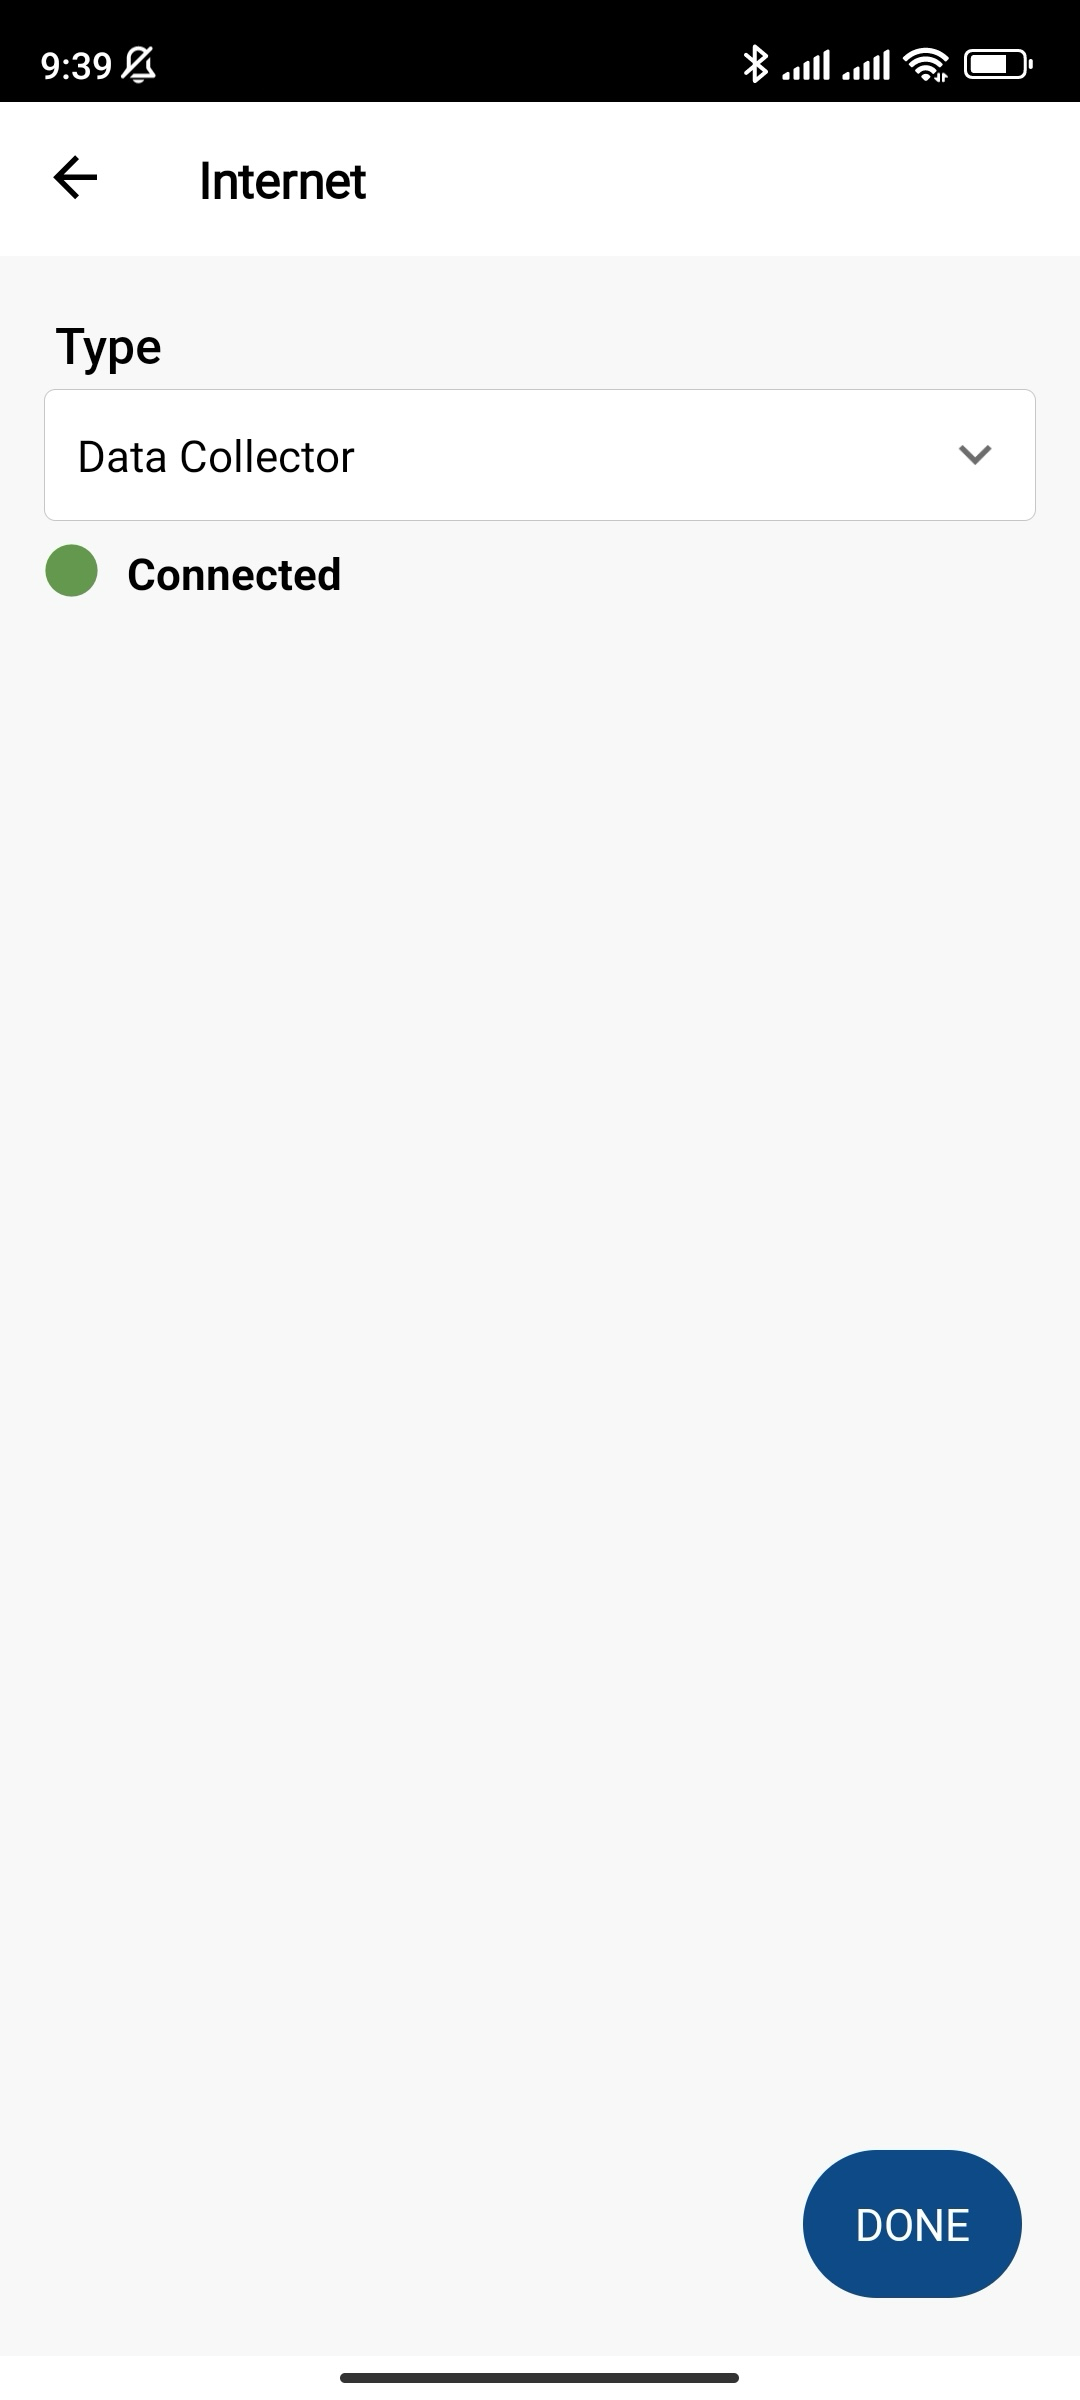
Seleccione Data collector (Recolector de datos) como tipo de comunicación y espere a que el estado de Internet pase a «Conectado».
-
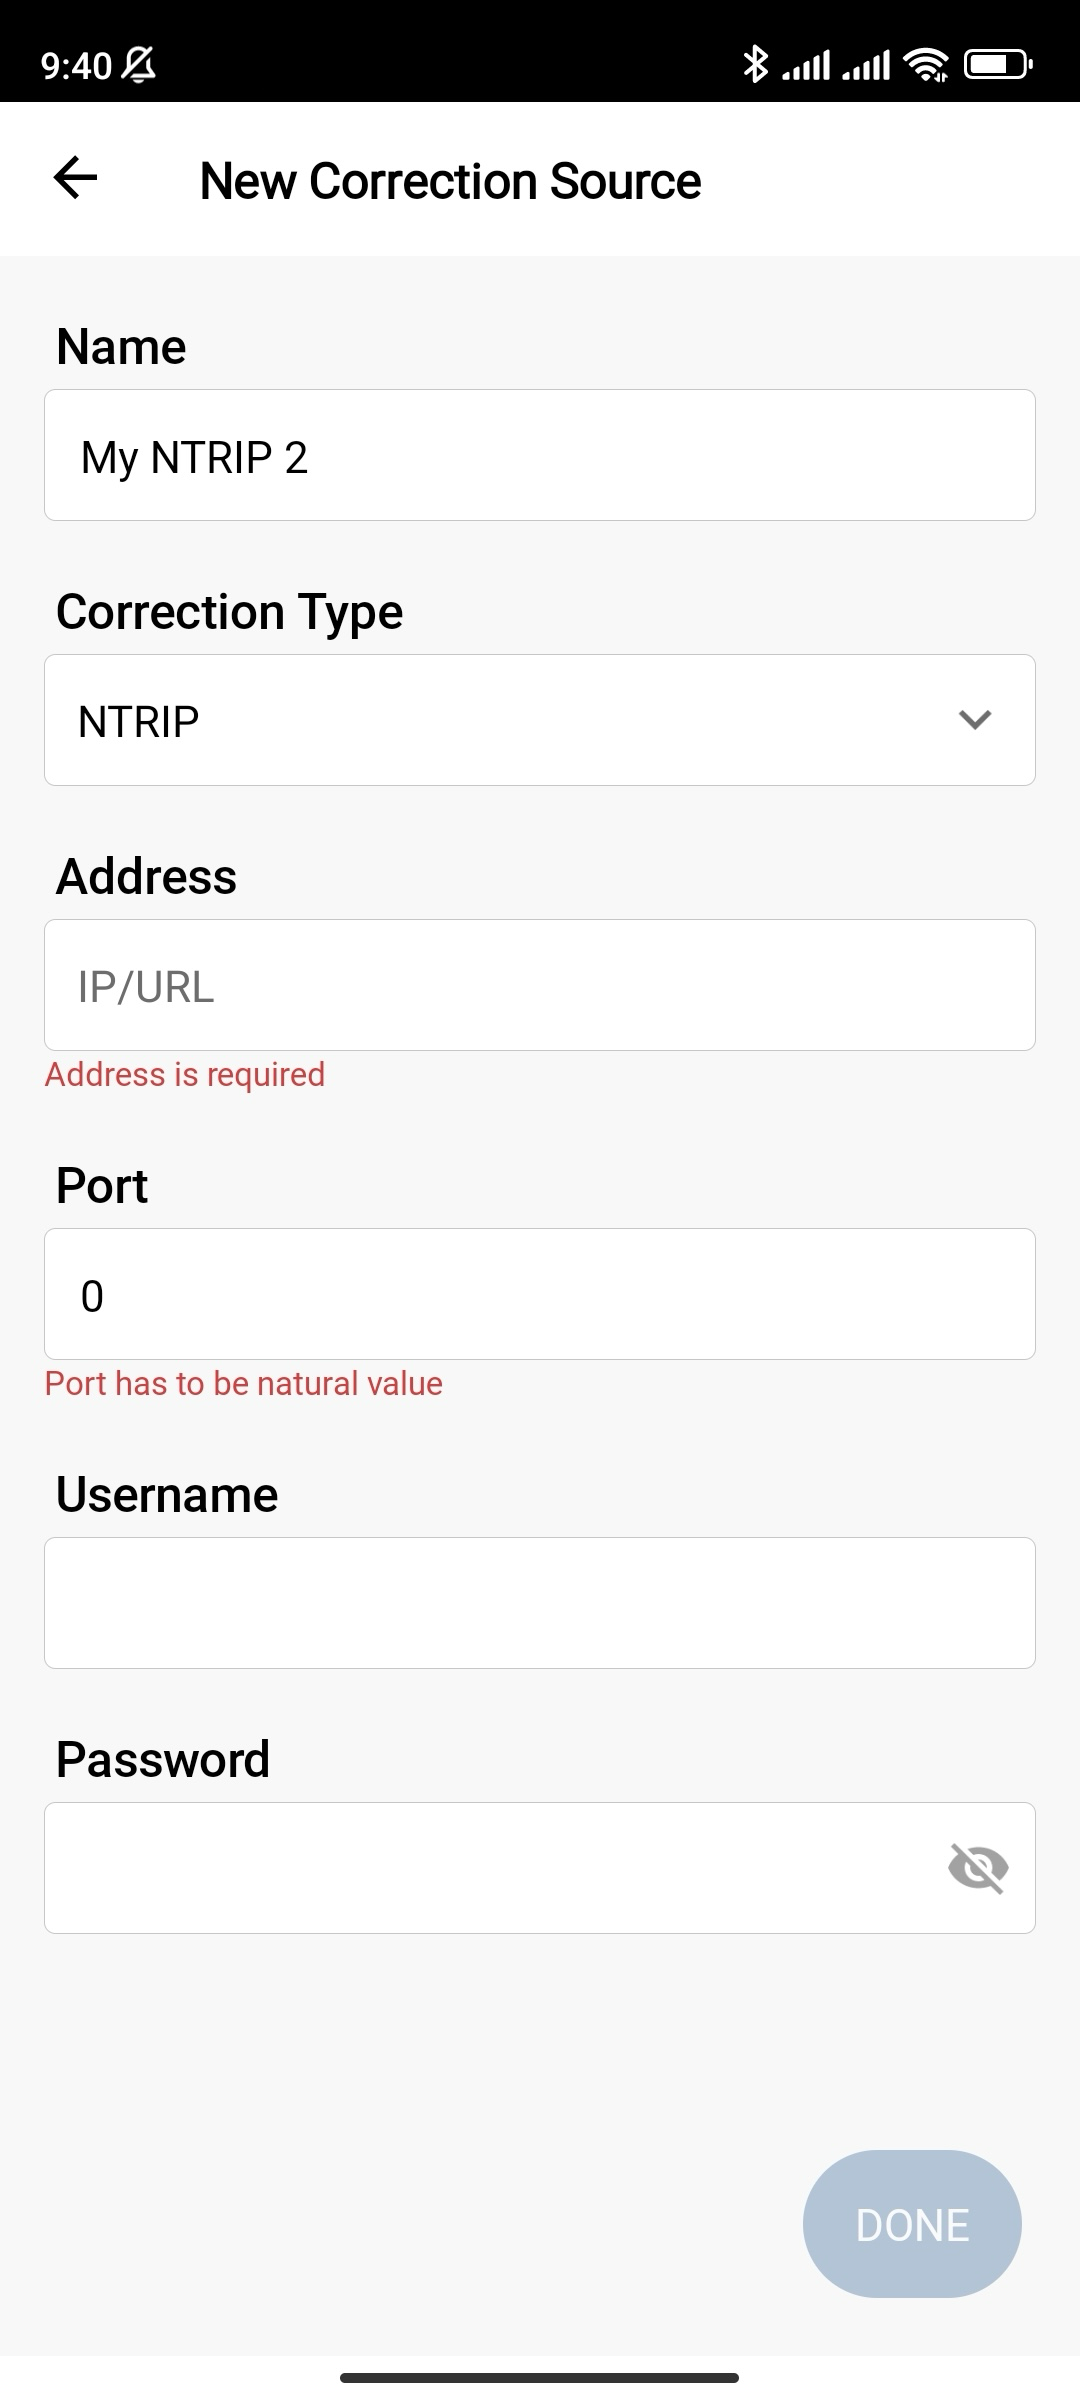
Pulse SET UP DATA SOURCE (CONFIGURAR FUNTE DE DATOS) y añada una nueva fuente de correcciones. Rellene la información de su proveedor NTRIP y pulse Done (Hecho).
-
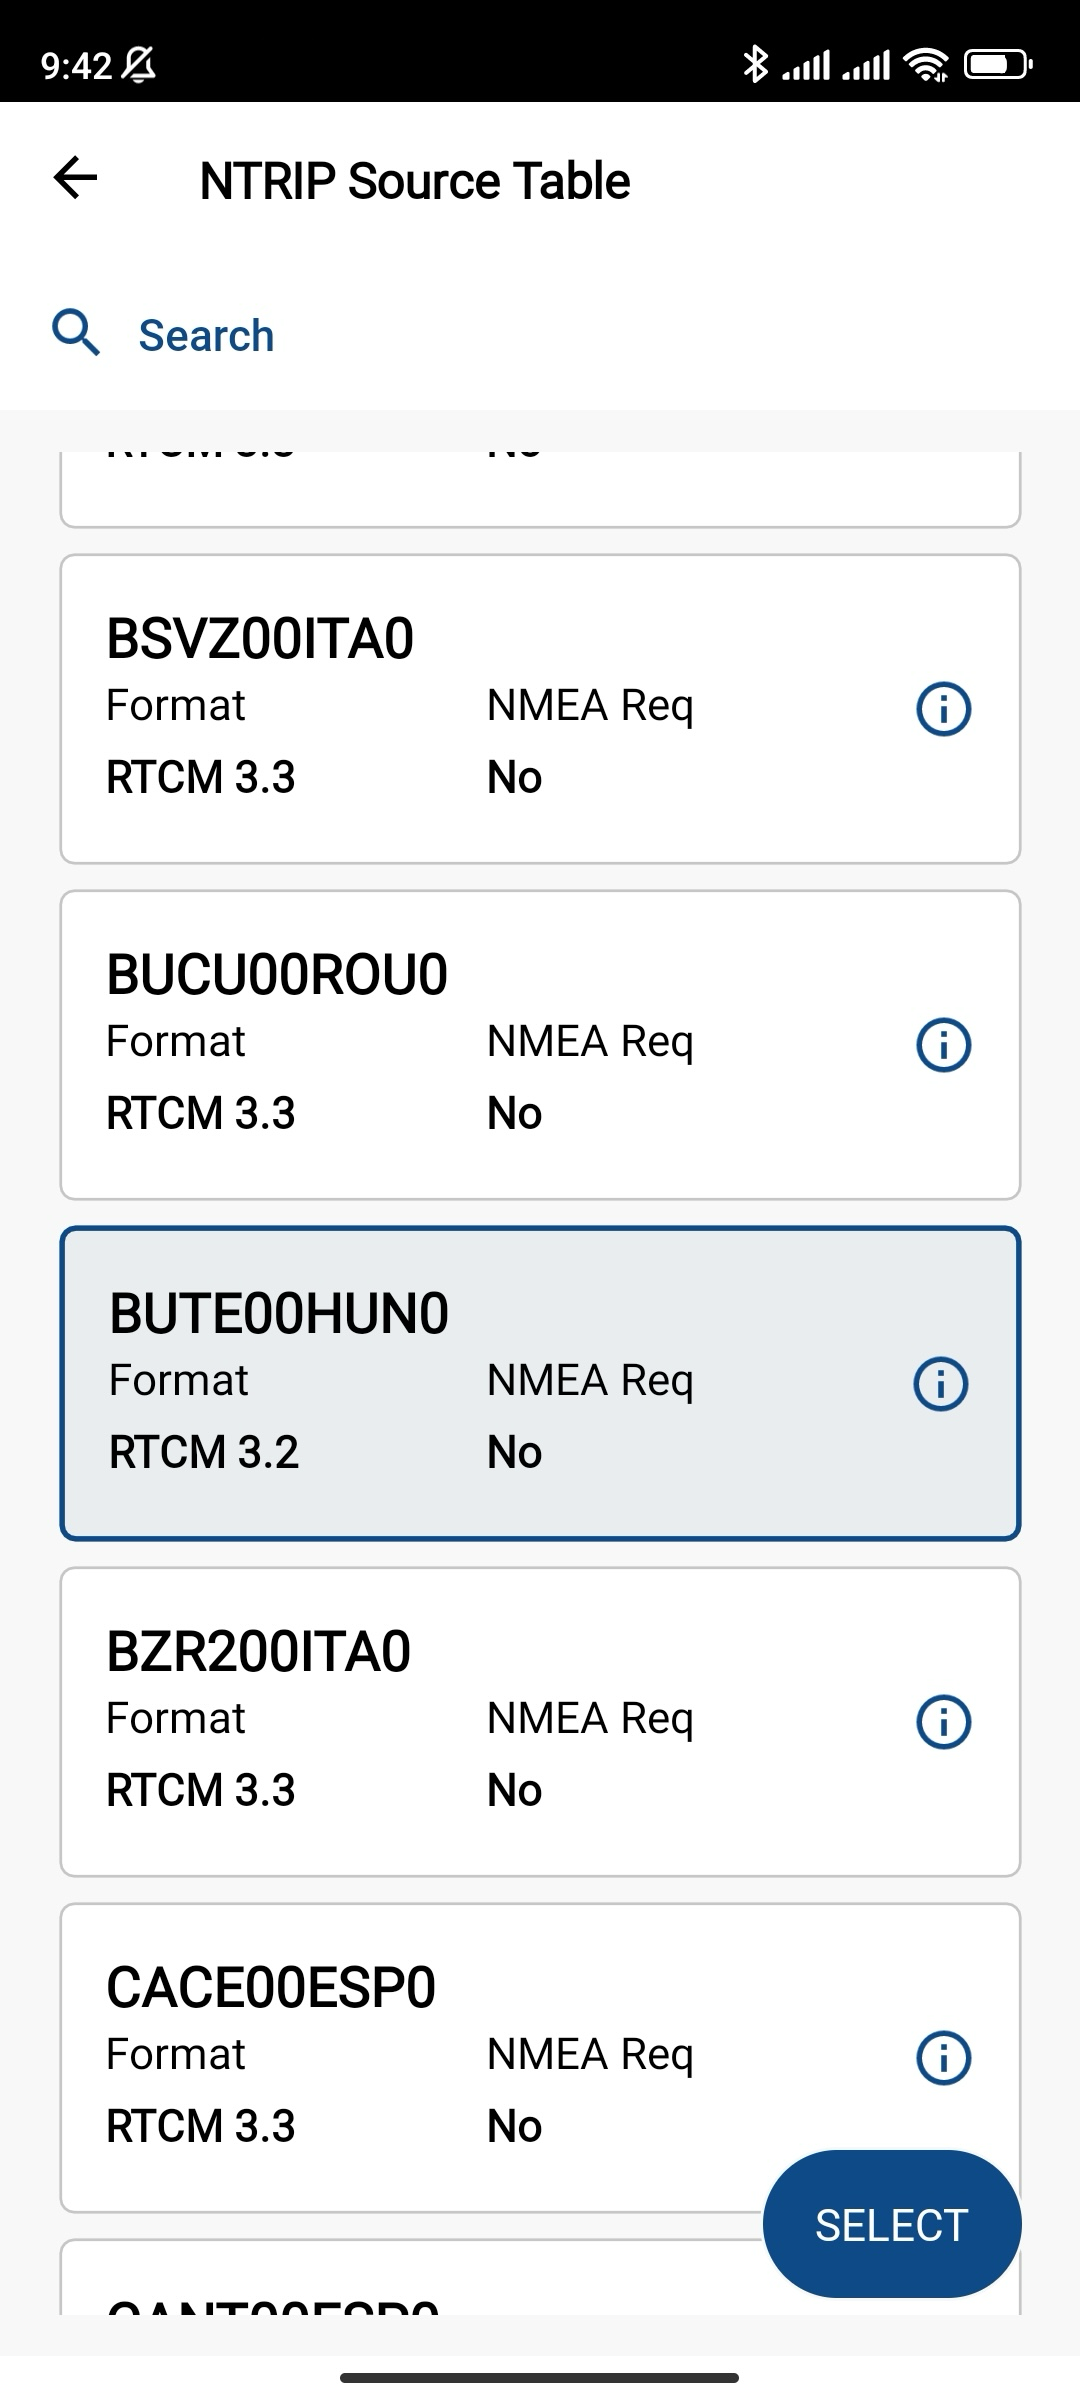
Pulse Connect (Conectar), espere a que se configure el puerto y elija el punto de montaje deseado. Pulse Select (Seleccionar).
-
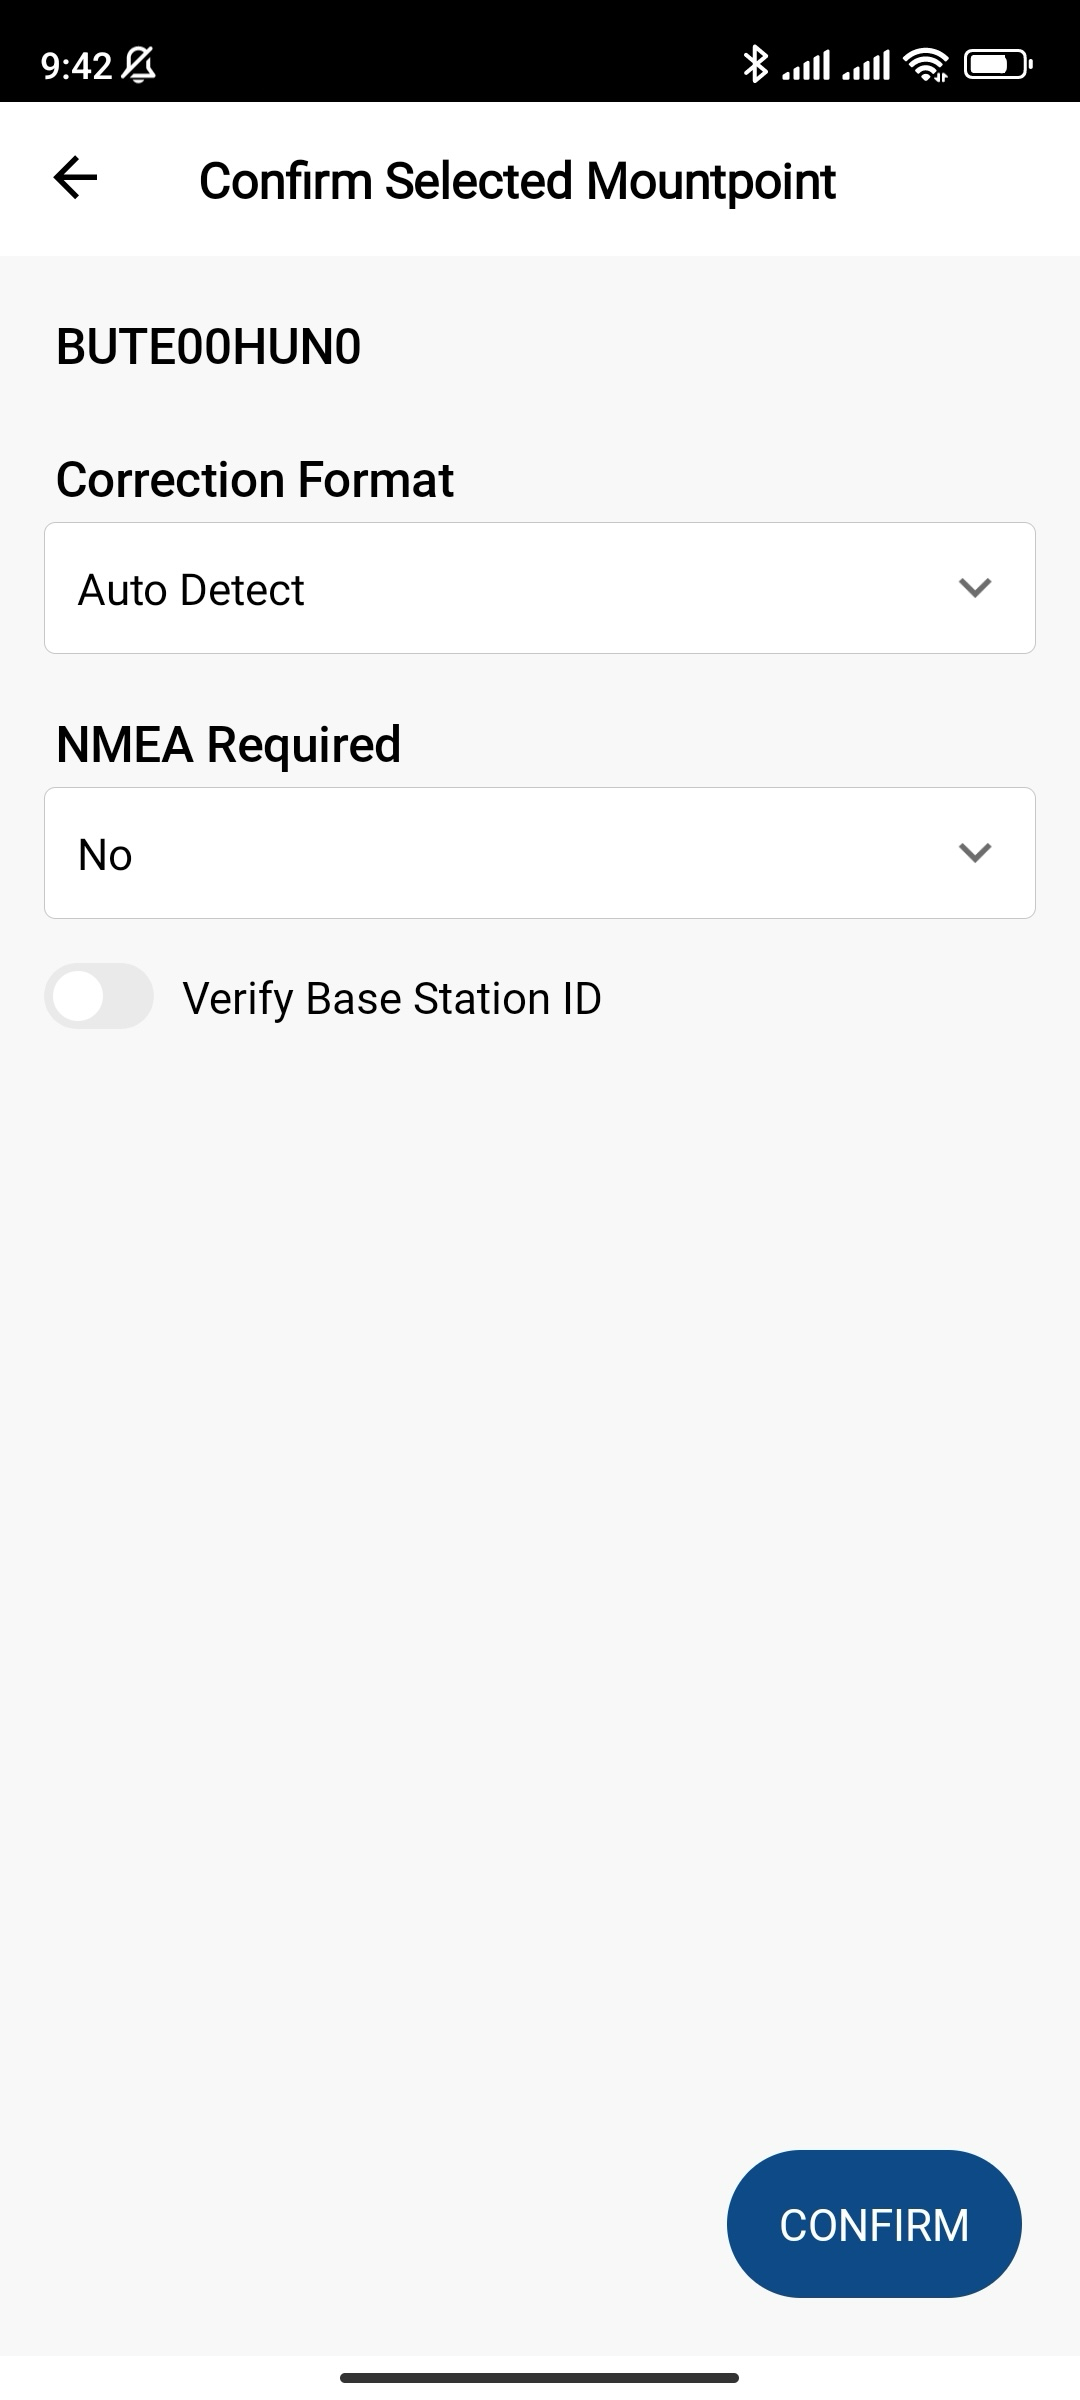
Compruebe la configuración en Correction Format (Formato de corrección) y en los campos obligatorios de NMEA, y confirme el punto de montaje seleccionado. Espere hasta que el puerto esté configurado.
 tip
tipAsegúrese de que el Reach RS3 esté recibiendo las correcciones. Compruebe el campo Correcciones en FieldGenius y compruebe el LED de estado del receptor: debería estar en verde fijo.
-
Configure la altura de la antena y pulse OK (Aceptar).
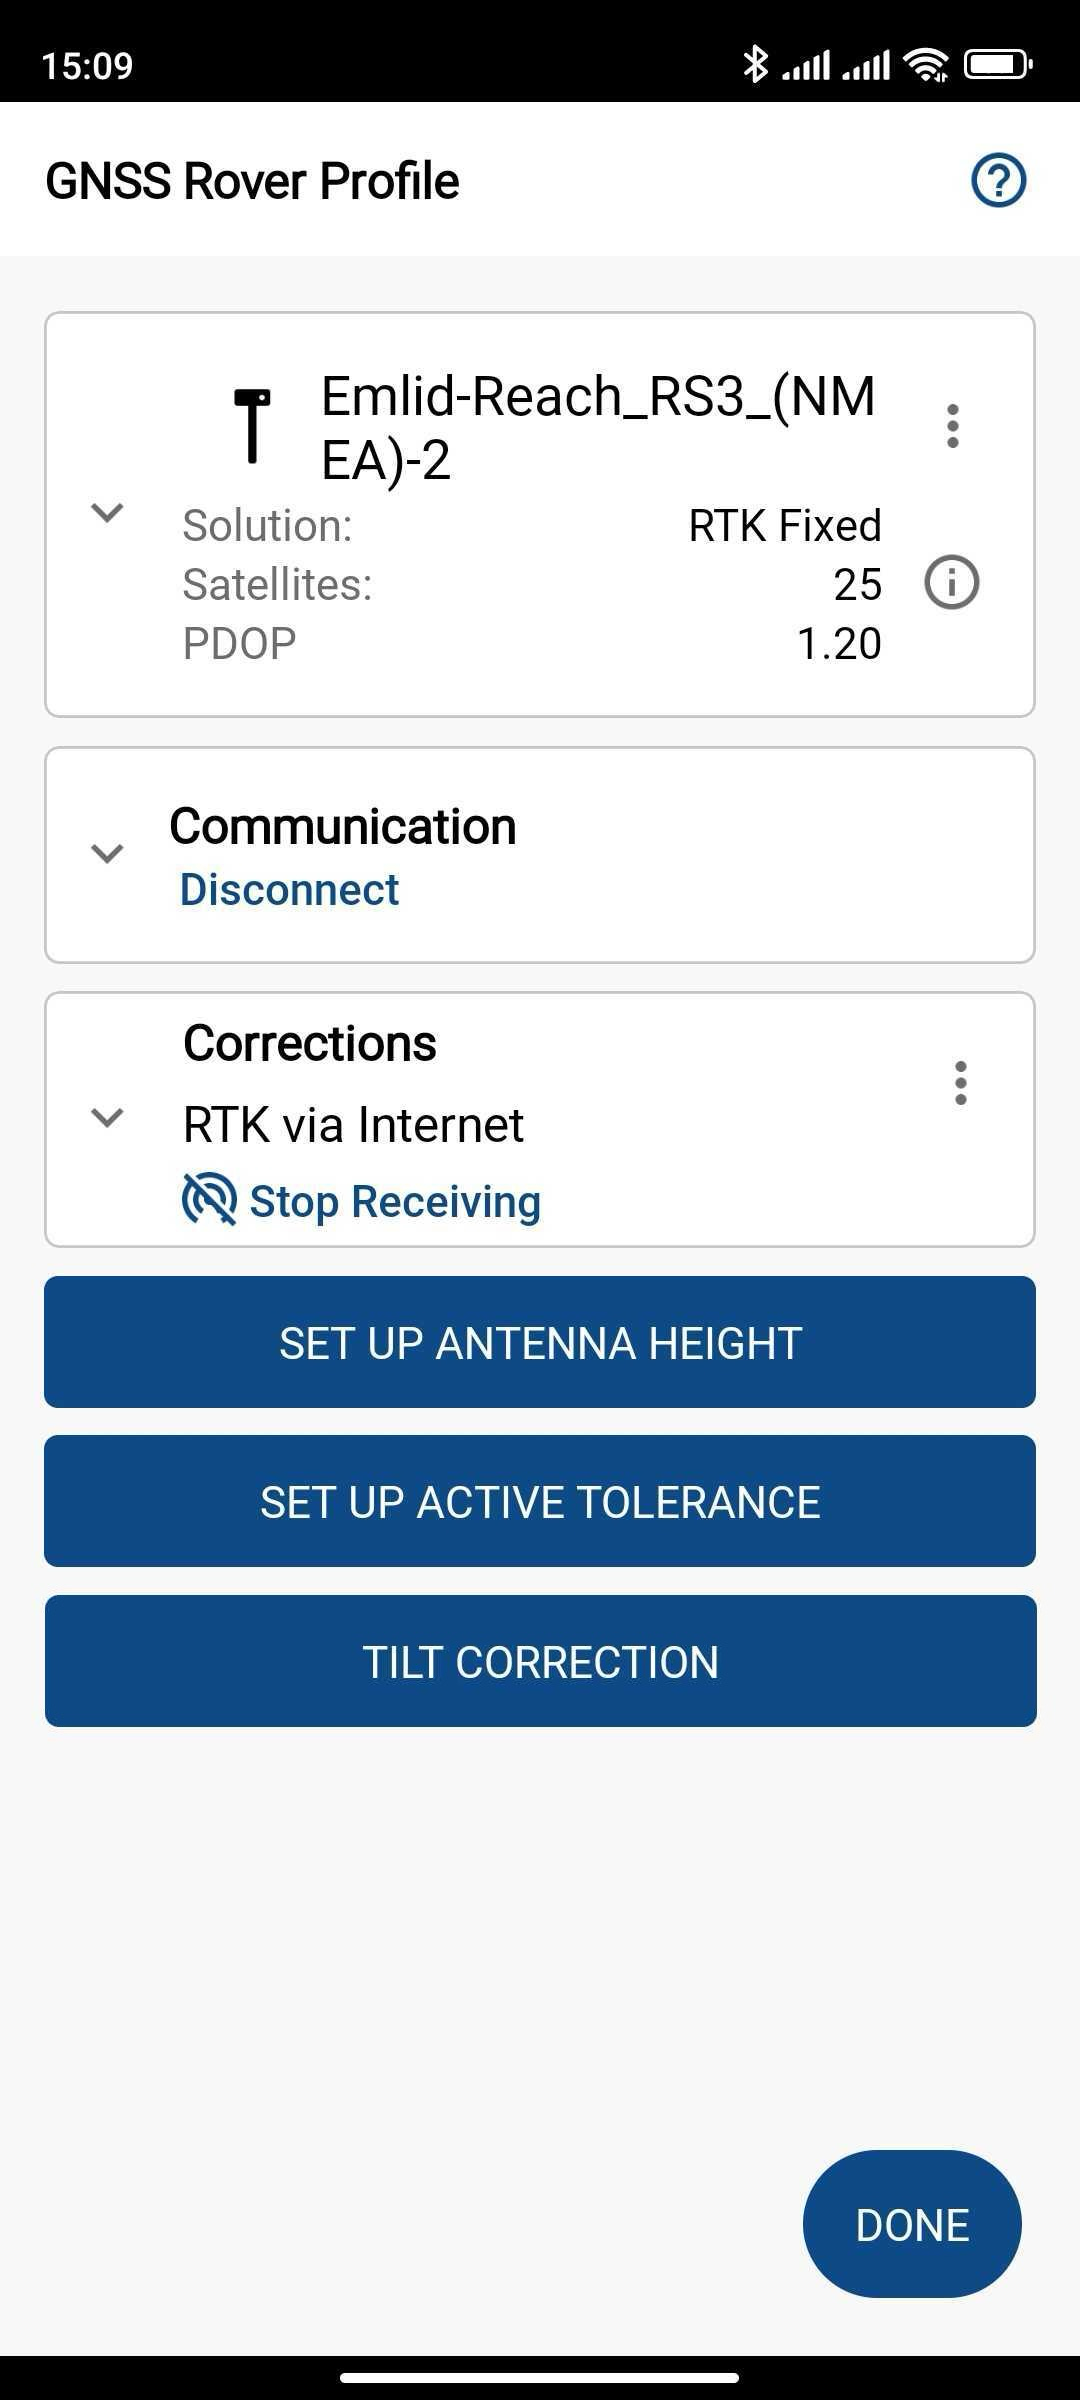
-
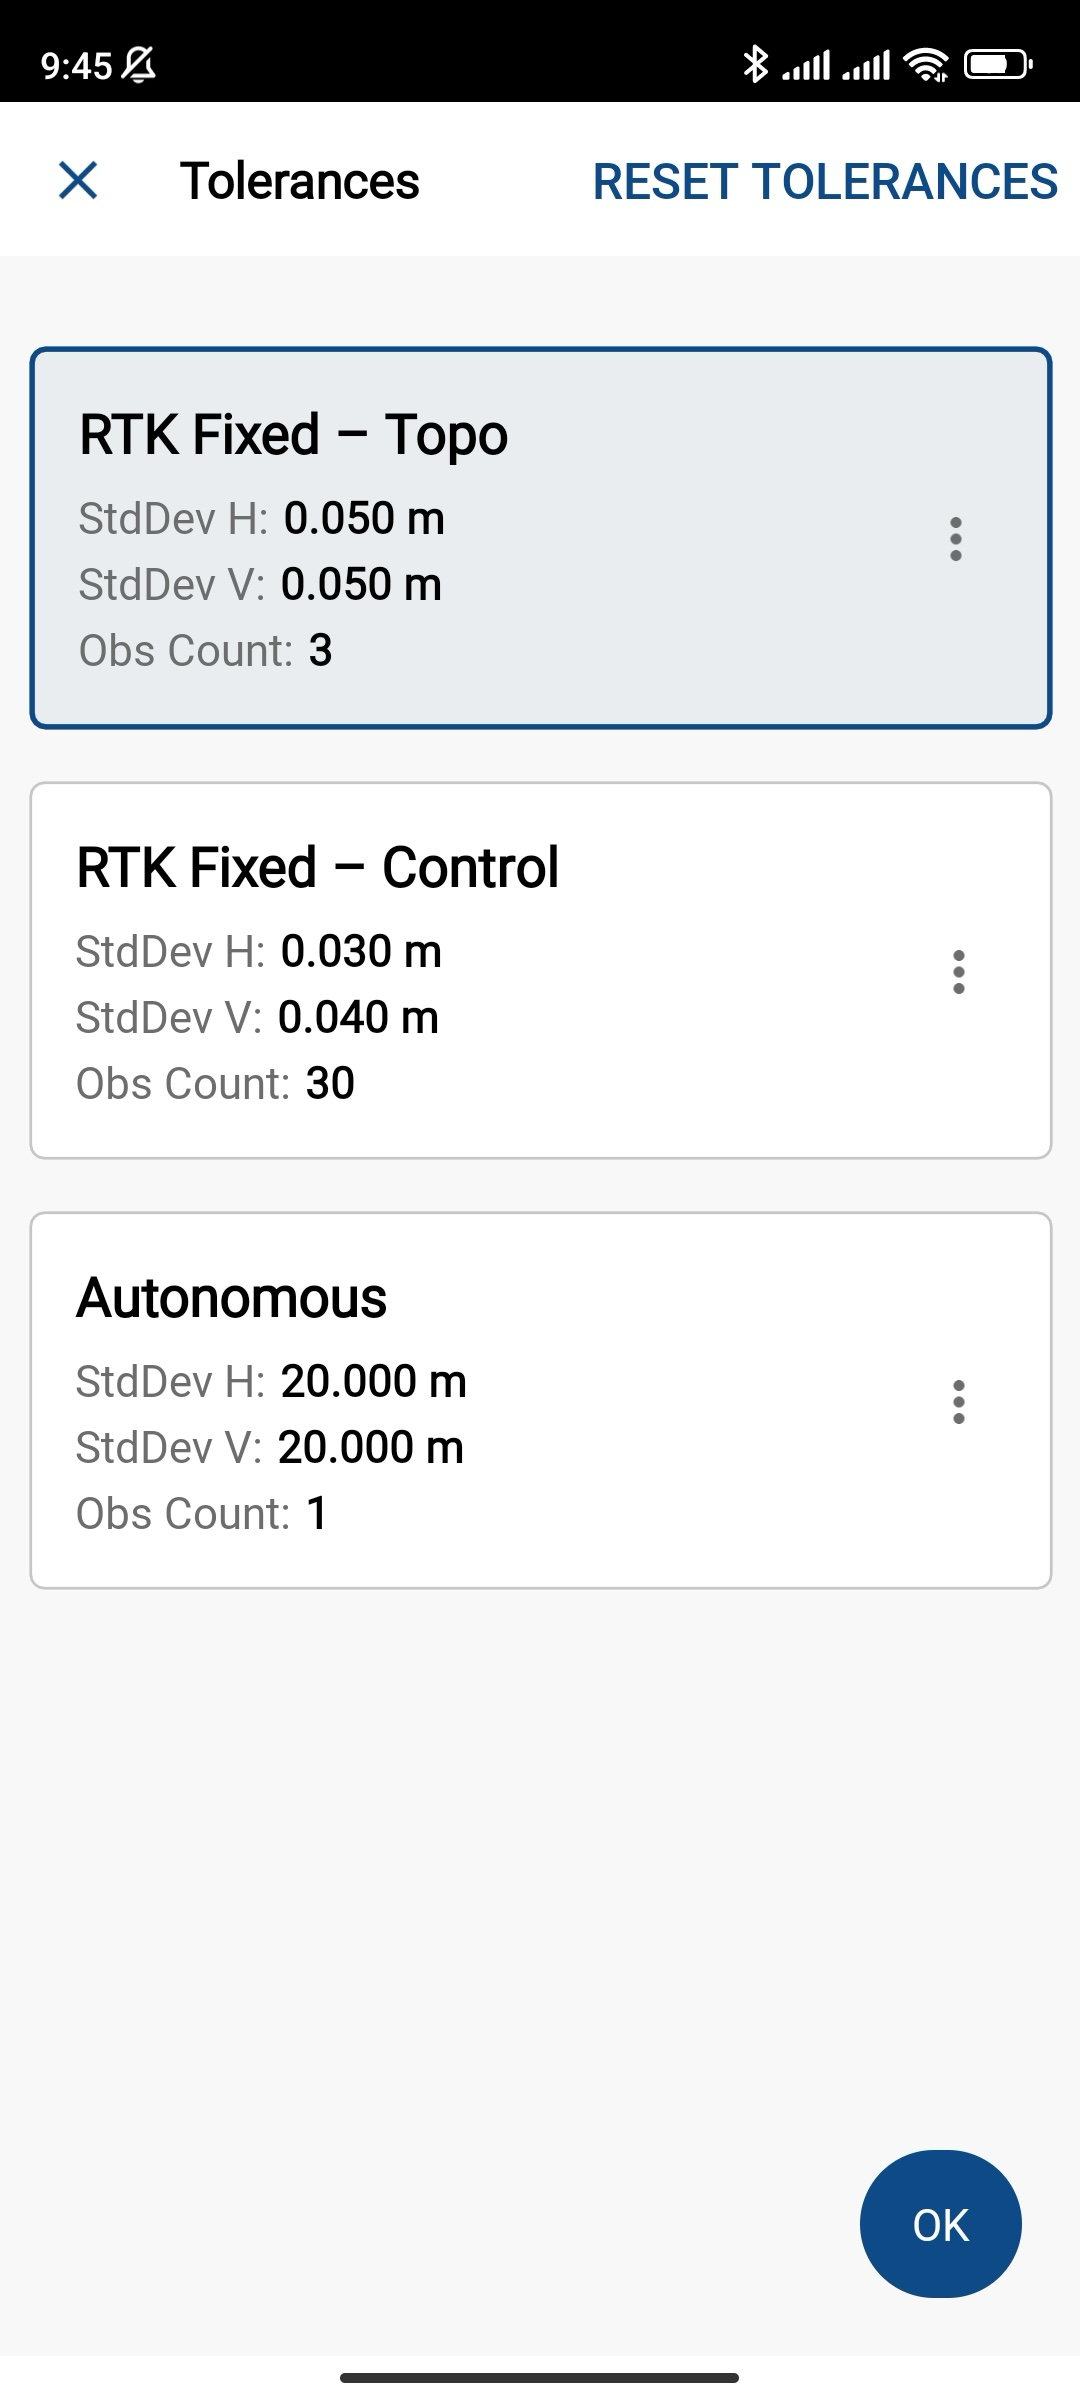
Configure las tolerancias activas y pulse OK (Aceptar).
-
Active la compensación de inclinación.
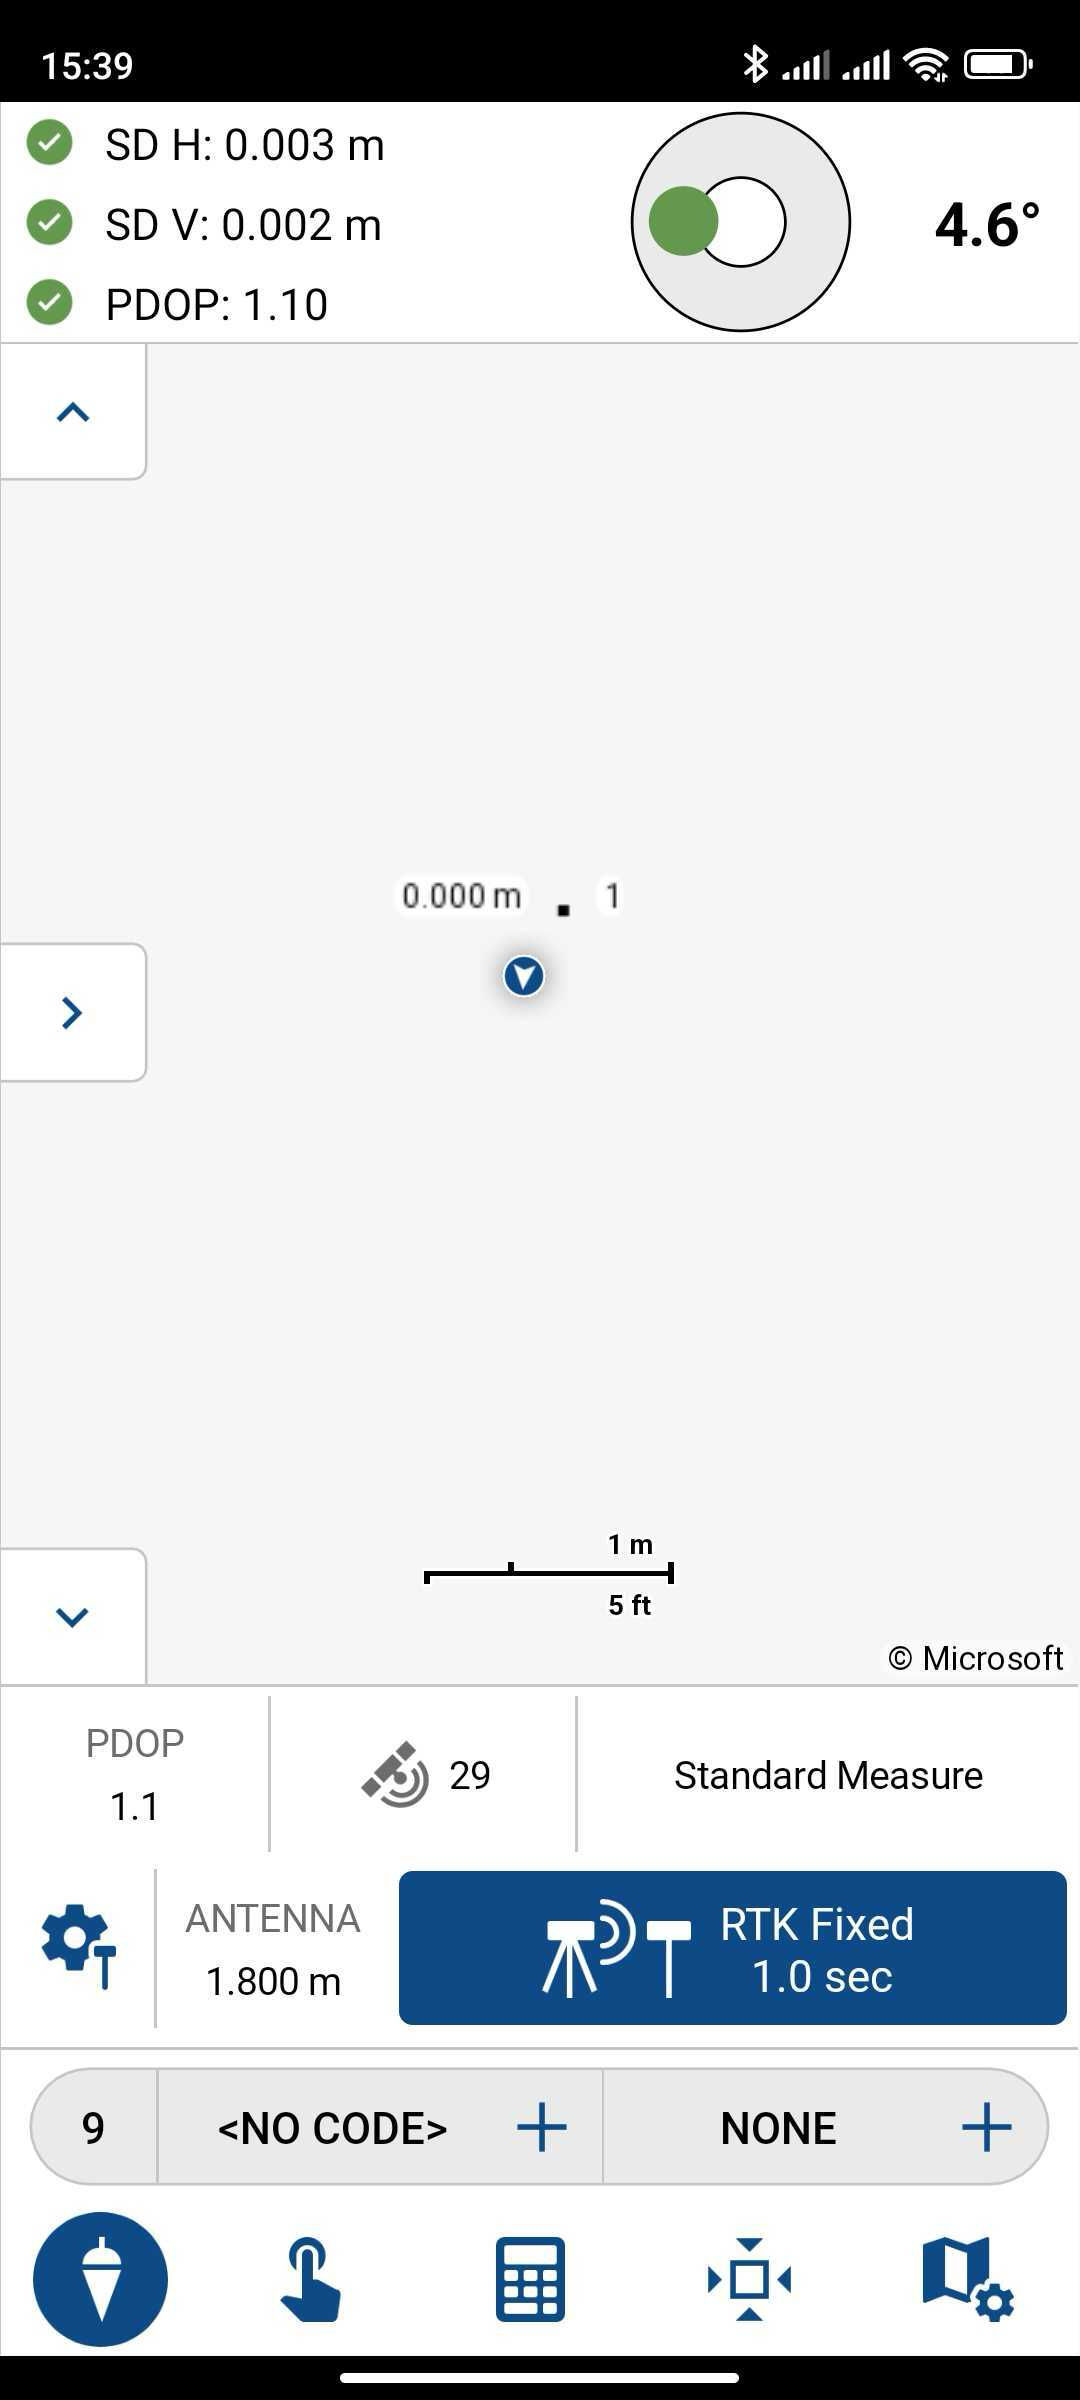
Cuando haya activado la compensación de inclinación, ya estará listo para realizar levantamientos.