Base and rover setup
Introduction
This tutorial will show how to set up two Reach M2 or Reach M+ devices as a base and a rover with the correction link over Wi-Fi.
For setting NTRIP base corrections, follow the steps from the Working with NTRIP service guide.
Rename Reach devices
By default, every Reach has the same name. To distinguish between the base and the rover in the field, you need to rename them. Follow the steps below:
- Connect to Reach you want to use as a base.
When you connect to your Reach, all LEDs will blink simultaneously. If you need to flash LEDs during a survey—tap the cell with your receiver’s name on the Receivers screen and get access to the Flash LEDs button.
-
Go to Settings and tap Receiver info.
-
In Receiver and hotspot name, change the name of your Reach to reach-base.
The name you enter will also be used as a Wi-Fi network label when Reach is in hotspot mode.
-
Press Save.
-
Do the same with the second Reach. However, use reach-rover name instead of reach-base.
Set up base station
Now you need to configure RTK settings on the base. Follow the steps below:
-
Connect to the base unit.
-
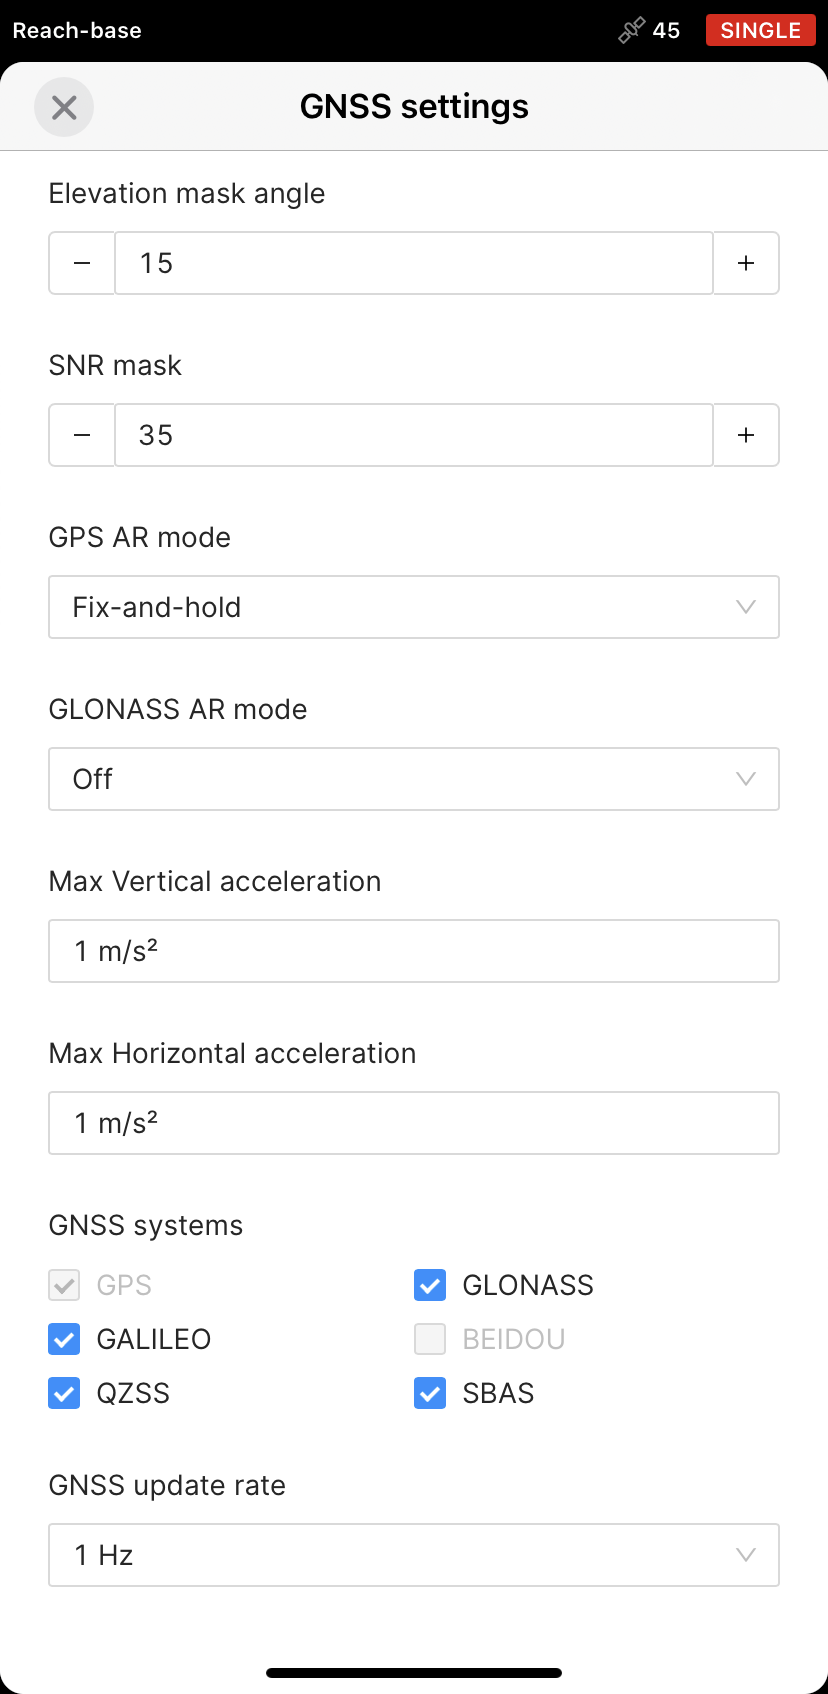
Go to Settings and tap GNSS settings. Select the satellite systems depending on what Reach device is used:
- Reach M2
- Reach M+
Pick each of the satellite systems. Set the GNSS update rate at 1 Hz.
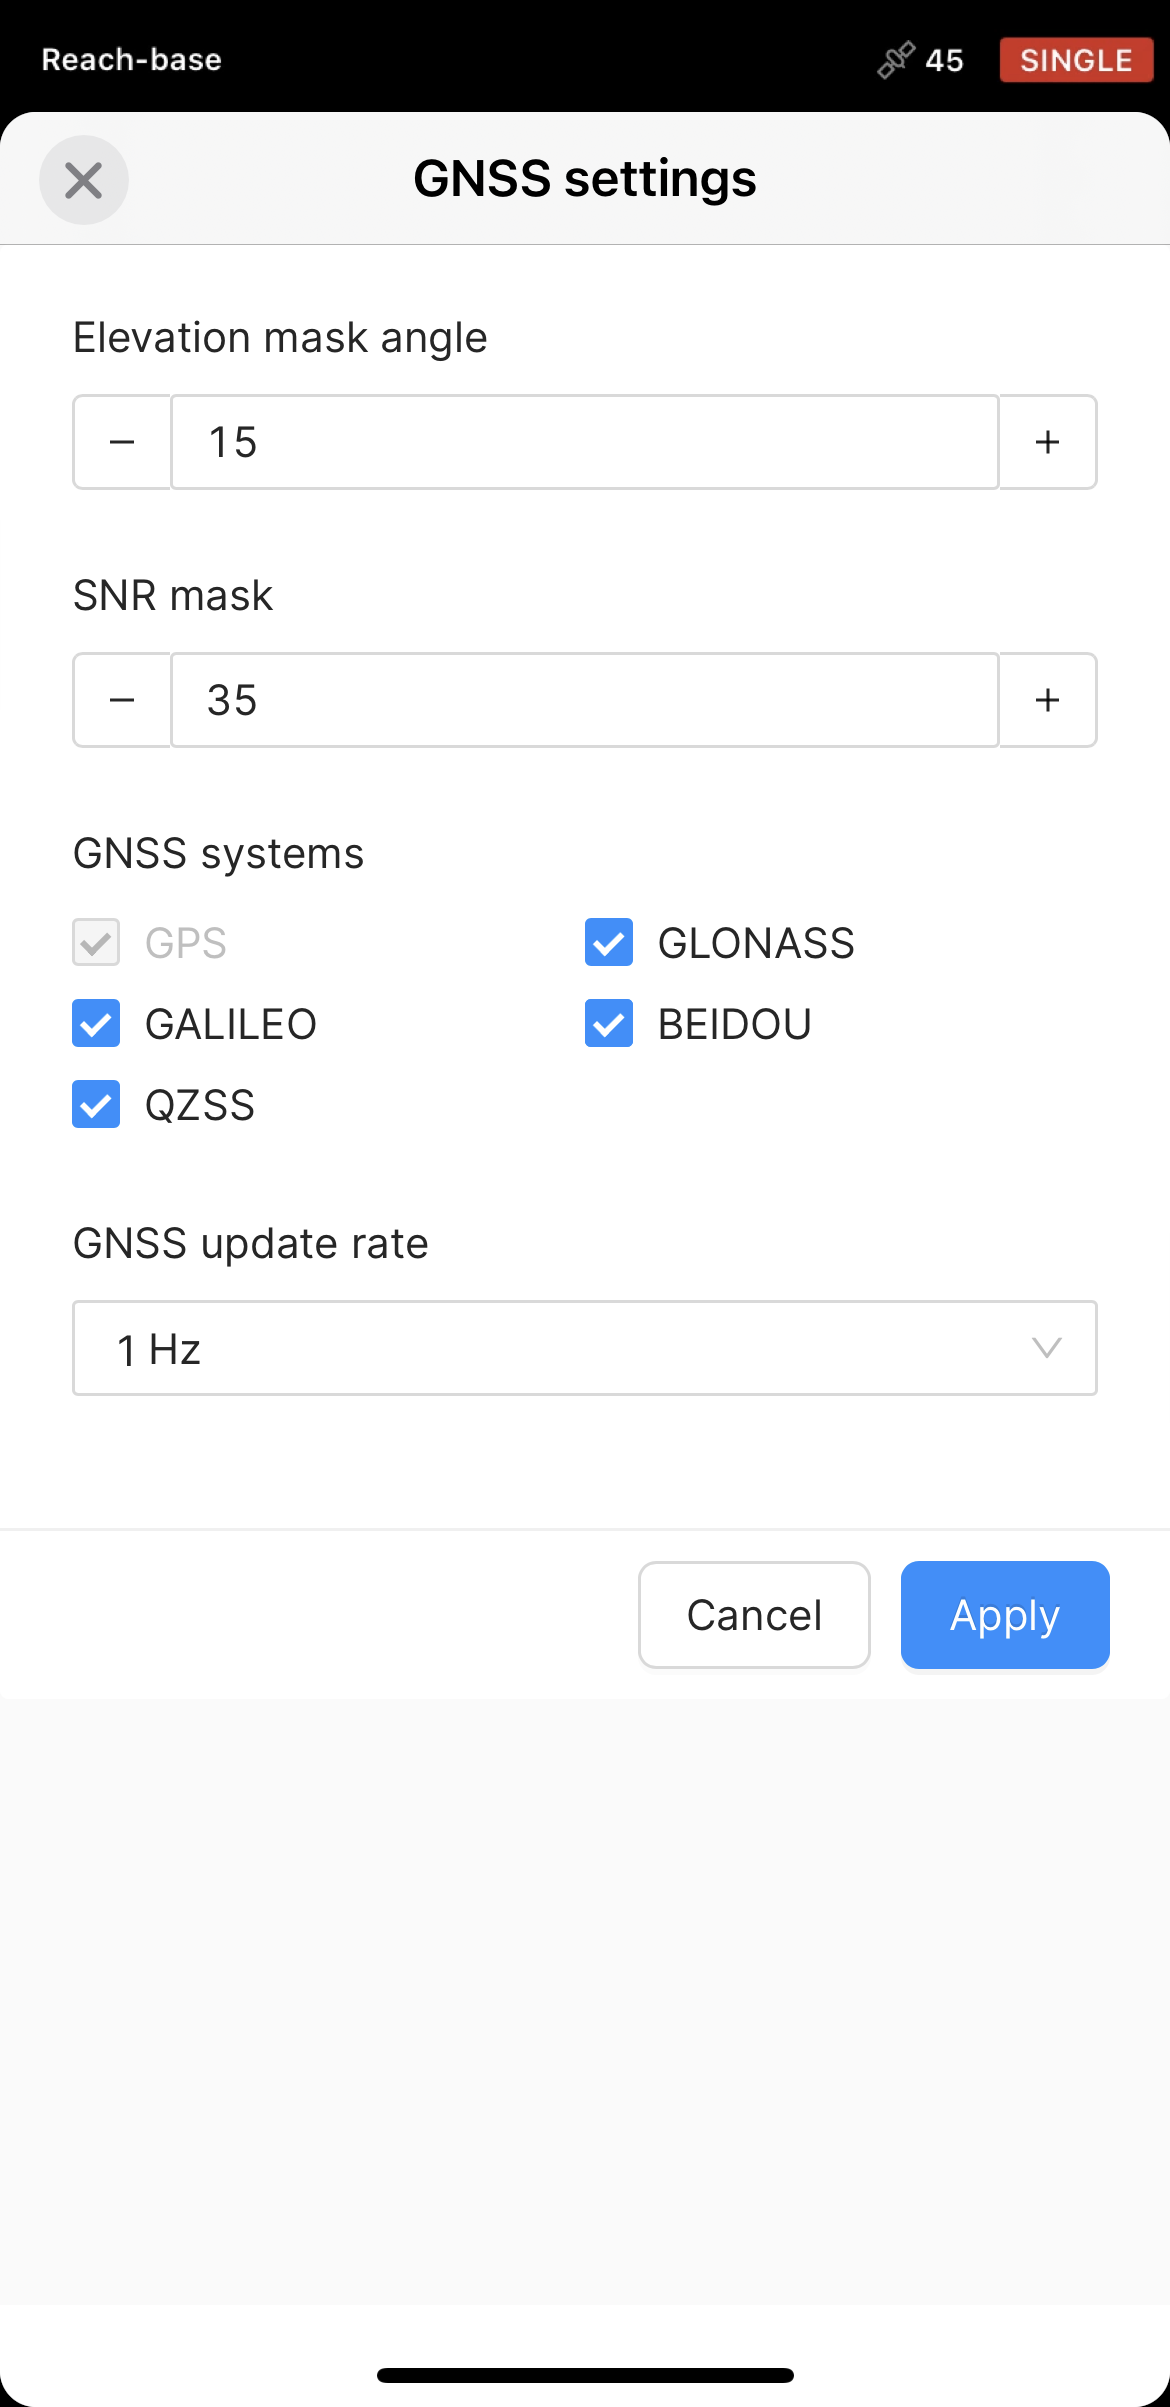
Choose GLONASS or BeiDou depending on your location. While GLONASS covers most of the world, BeiDou might be more efficient in the Asia-Pacific region. Pick the rest of the satellite systems. Set the GNSS update rate to 1 Hz.
After configuring RTK settings, you need to set up broadcasting RTK corrections via TCP. Follow the steps below:
-
Return to the Receivers screen and tap Base output.
-
Choose TCP server.
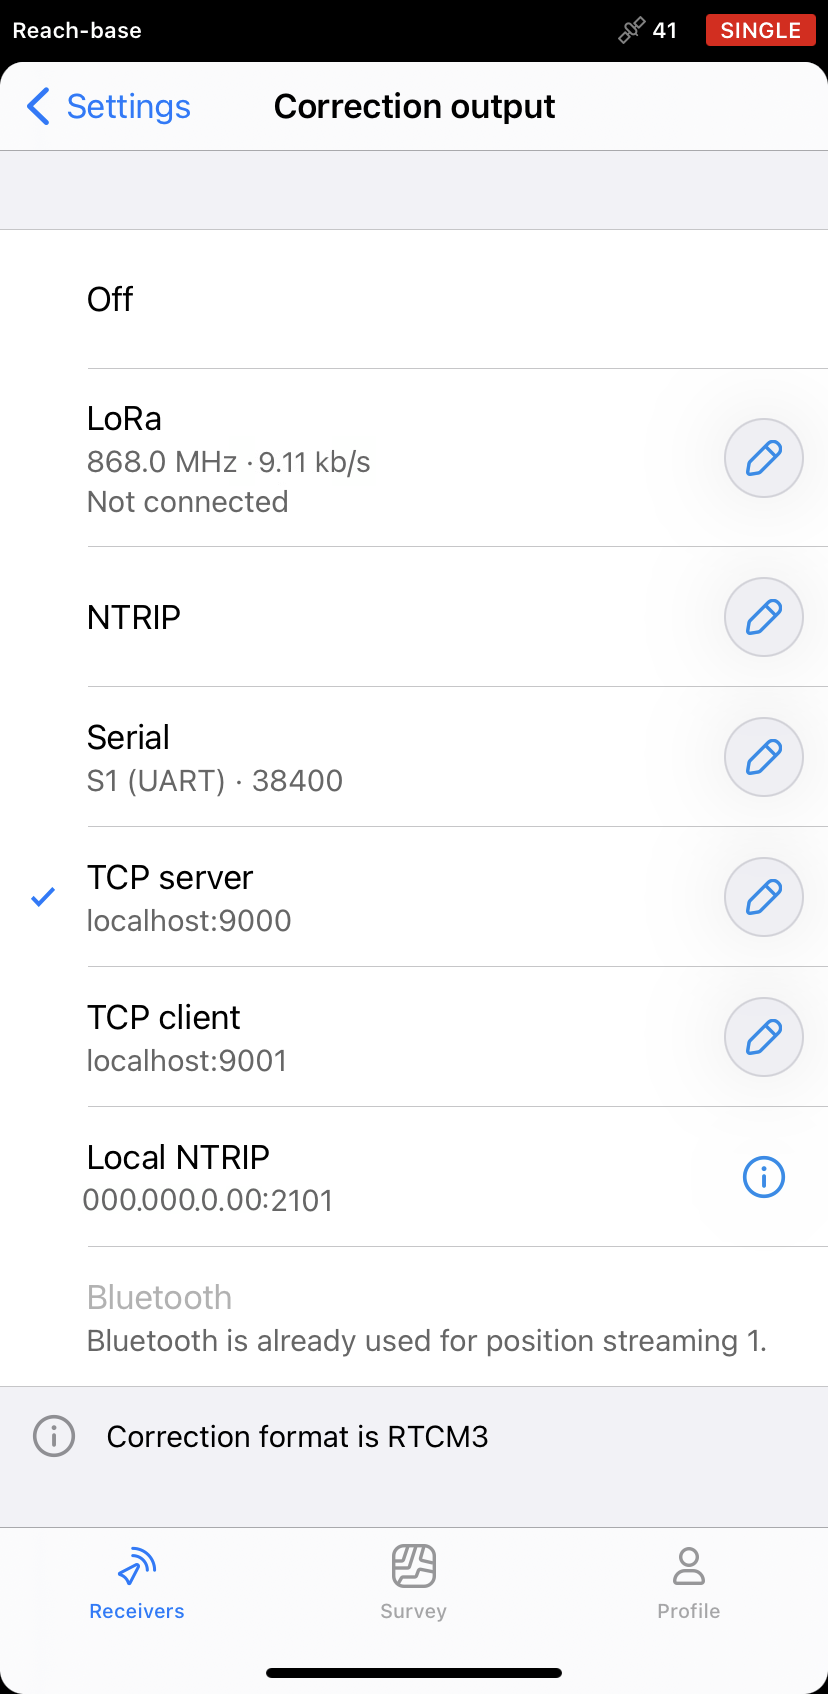
By default, the base will be configured as a localhost on the TCP port 9000.
-
Go to the Base settings screen and wait until the base averages its position.
-
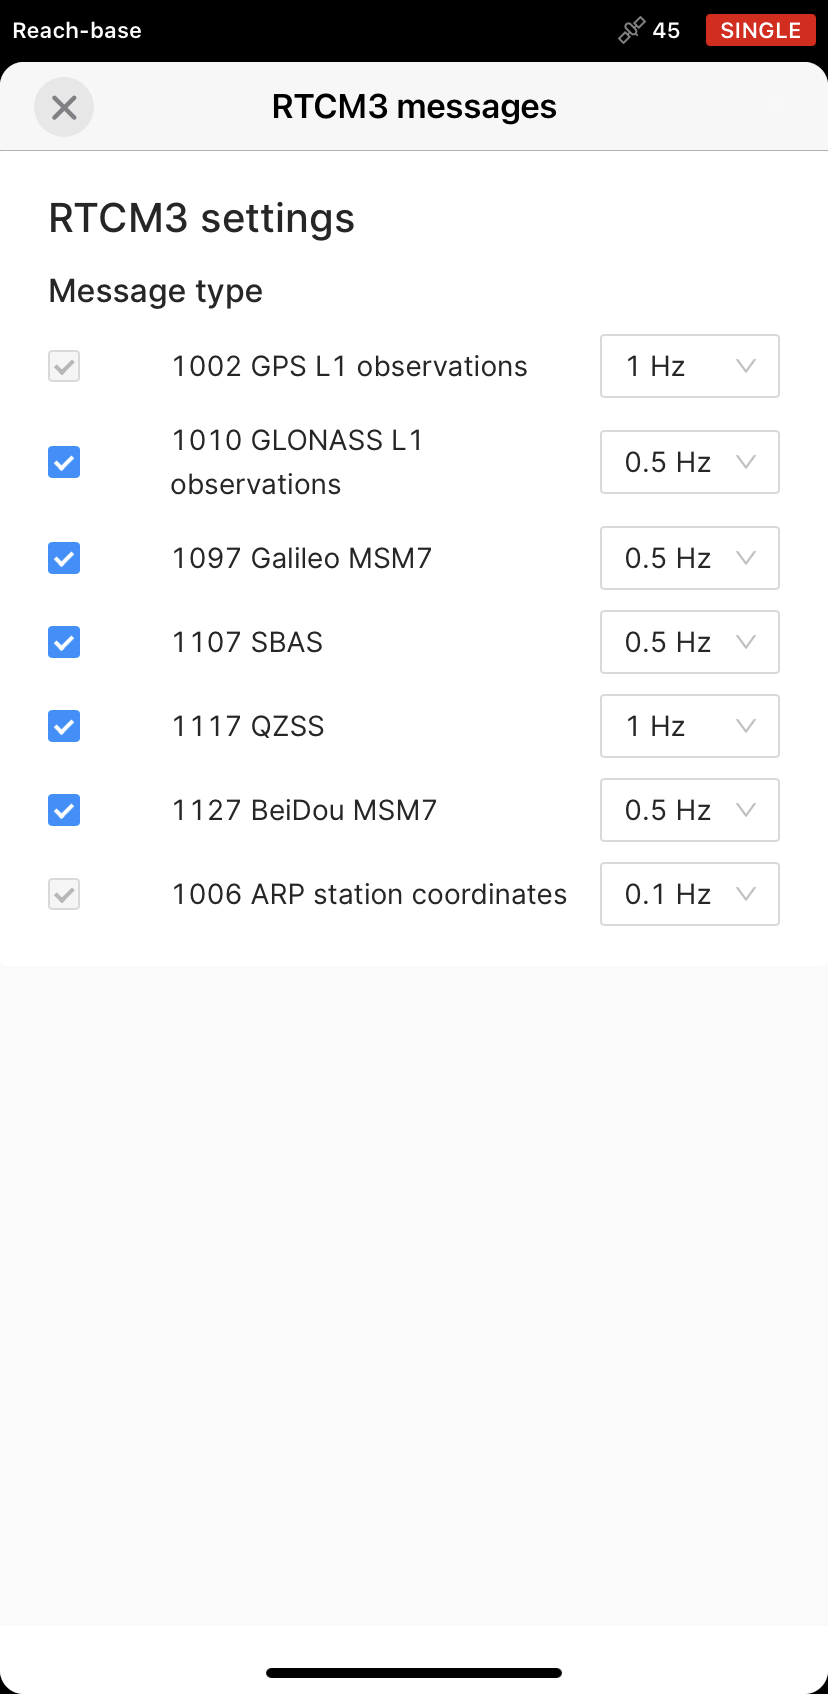
In the list of RTCM3 messages, select to output the messages depending on what Reach device is used:
- Reach M2
- Reach M+
Select to output ARP station coordinates at 0.1 Hz, MSM4 messages at 1 Hz, and GLONASS code-phase biases at 0.1 Hz.
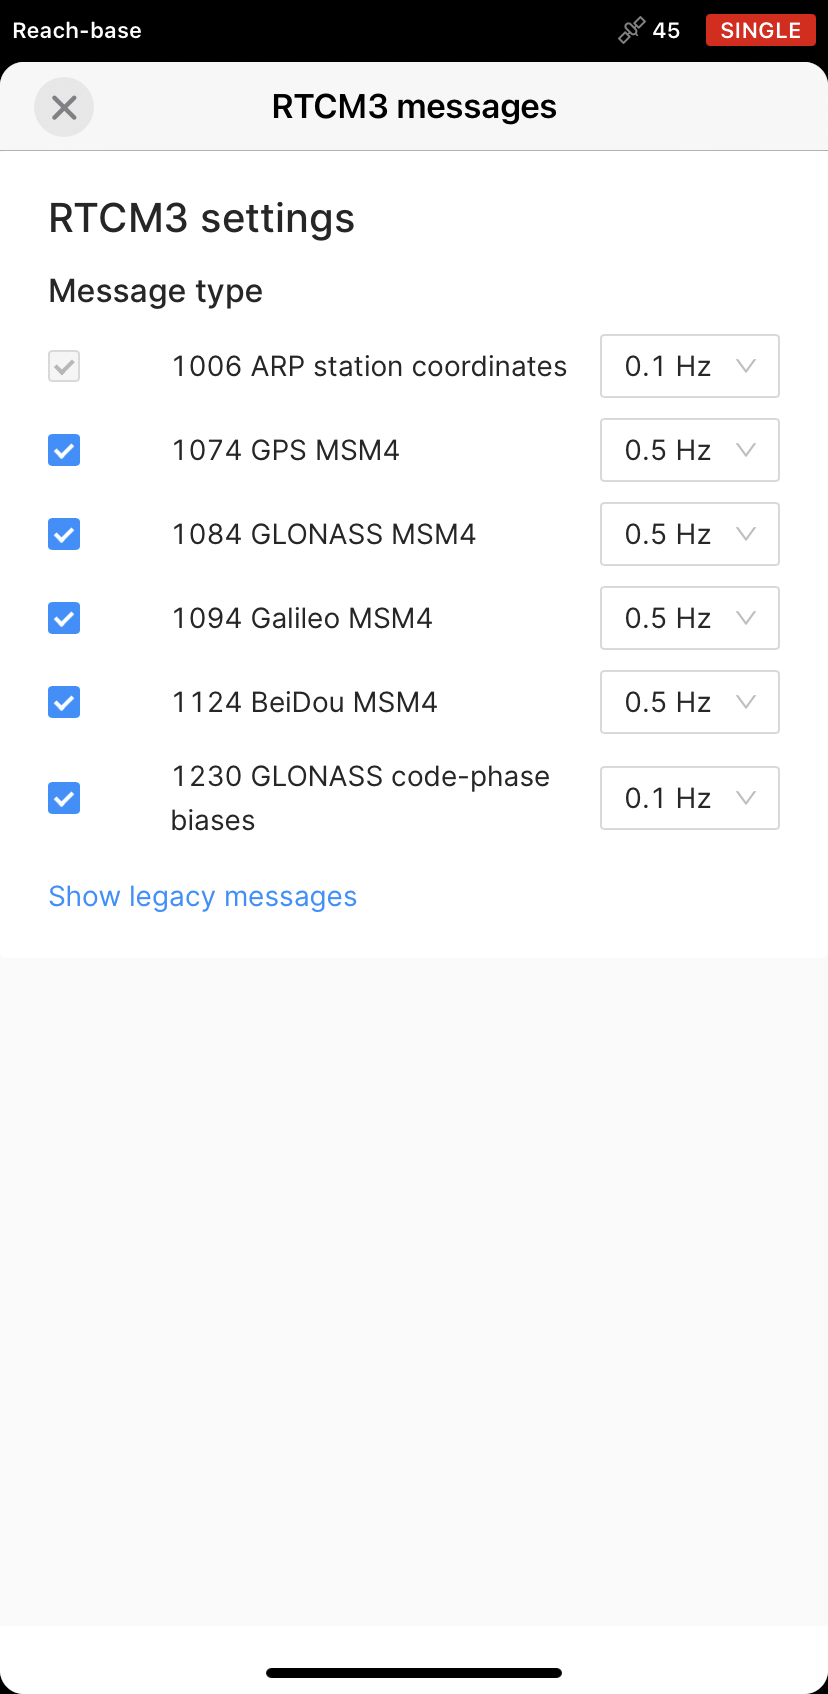
Select to output GPS L1 observations at 1 Hz, GLONASS L1 observations at 0.5 Hz, Galileo MSM7 at 0.5 Hz, SBAS at 0.5 Hz, QZSS at 1 Hz, BeiDou at 0.5 Hz, and ARP station coordinates at 0.1 Hz.
After the base position has been set, the base station transmits its known coordinates and observed satellite data to the rover. In this case, the base shows a SINGLE solution because it does not compute its own position and only provides reference data to the rover. The rover combines the data received from the base with its own satellite observations to compute an RTK solution and typically shows a FIX solution.
Set up rover
When you are ready with the base, you need to configure RTK settings on the rover. Follow the steps below:
-
Connect to the rover unit.
-
Go to Settings and tap GNSS settings.
-
Select the same GNSS systems as for the base, and set 5 Hz GNSS update rate. Apply changes.
When you are ready with the base, you need to configure RTK settings on the rover. Follow the steps below:
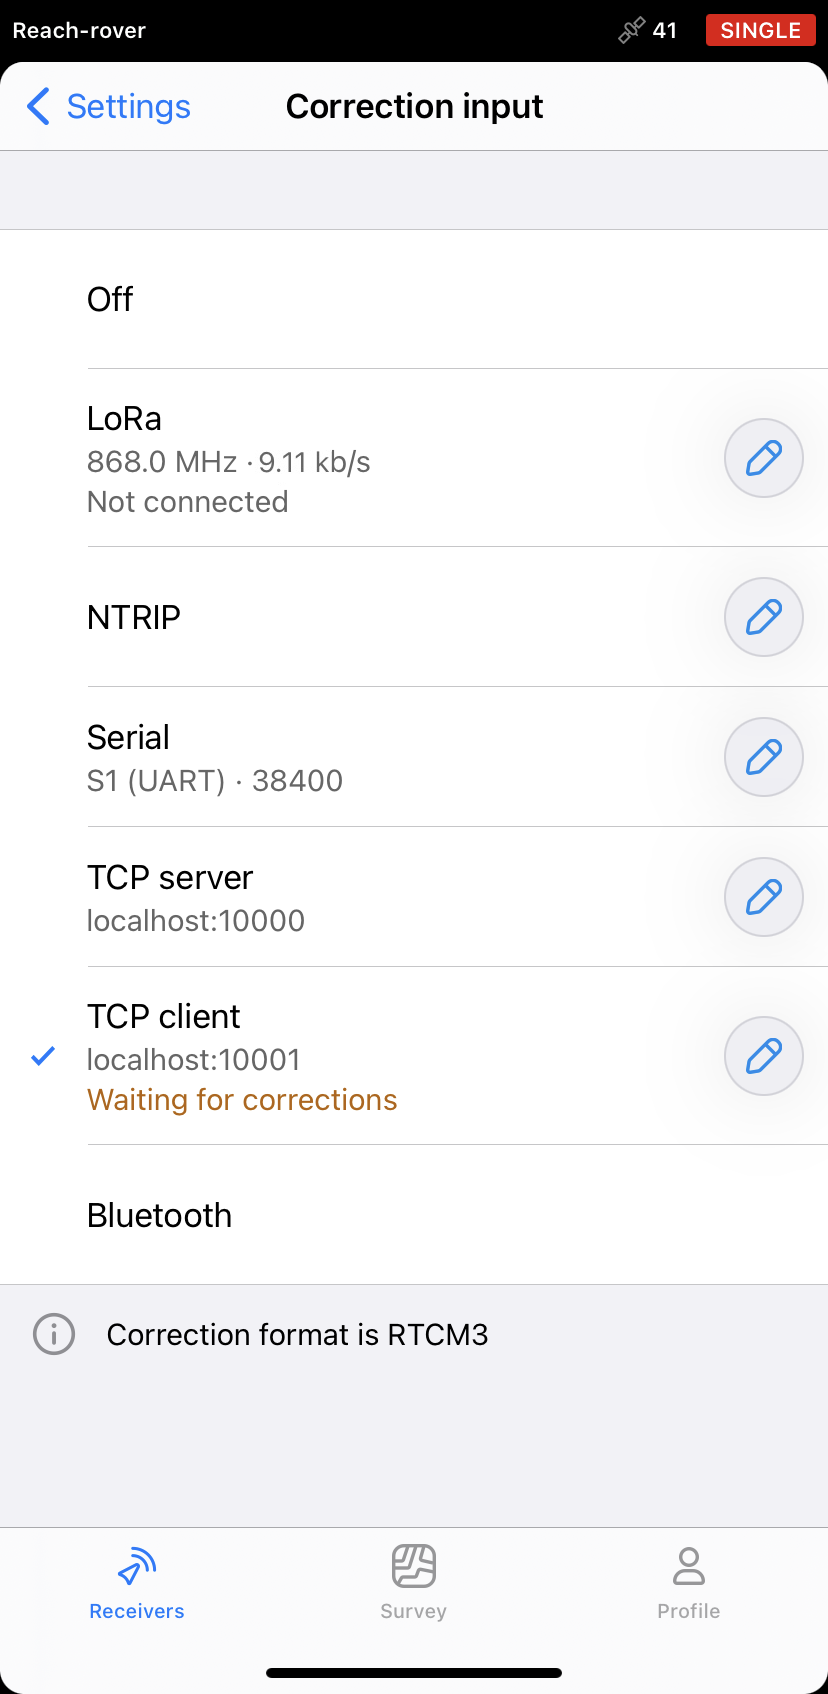
- Return to the Receivers screen. Go to Correction input and choose TCP client.
-
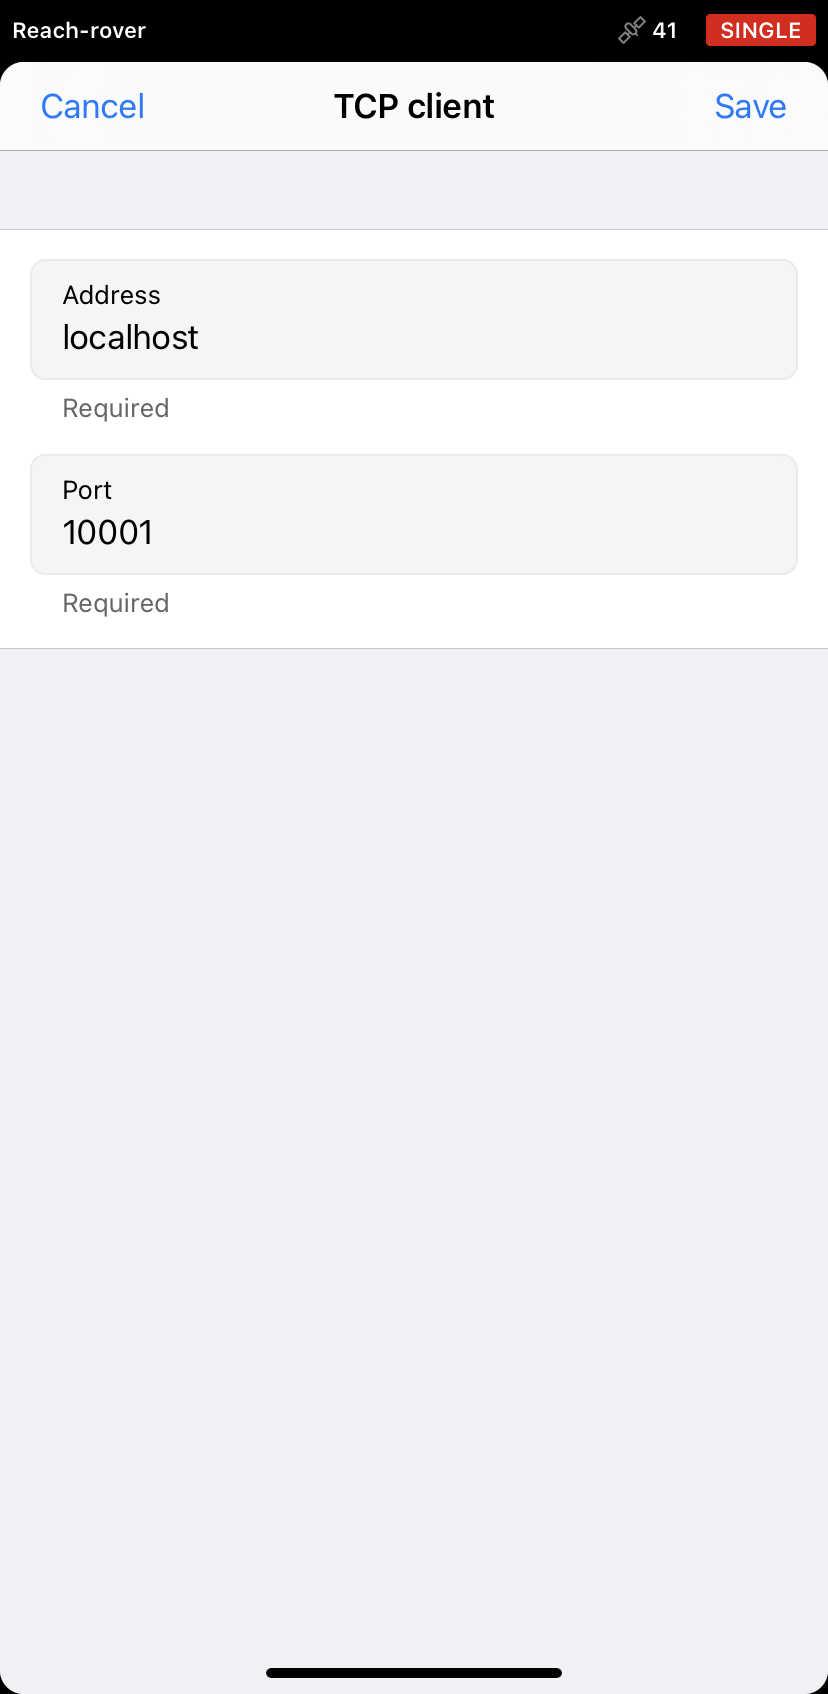
Add the base IP address in the Address field.
-
Add the base correction port in the Port field.
-
Tap Save to apply settings.
-
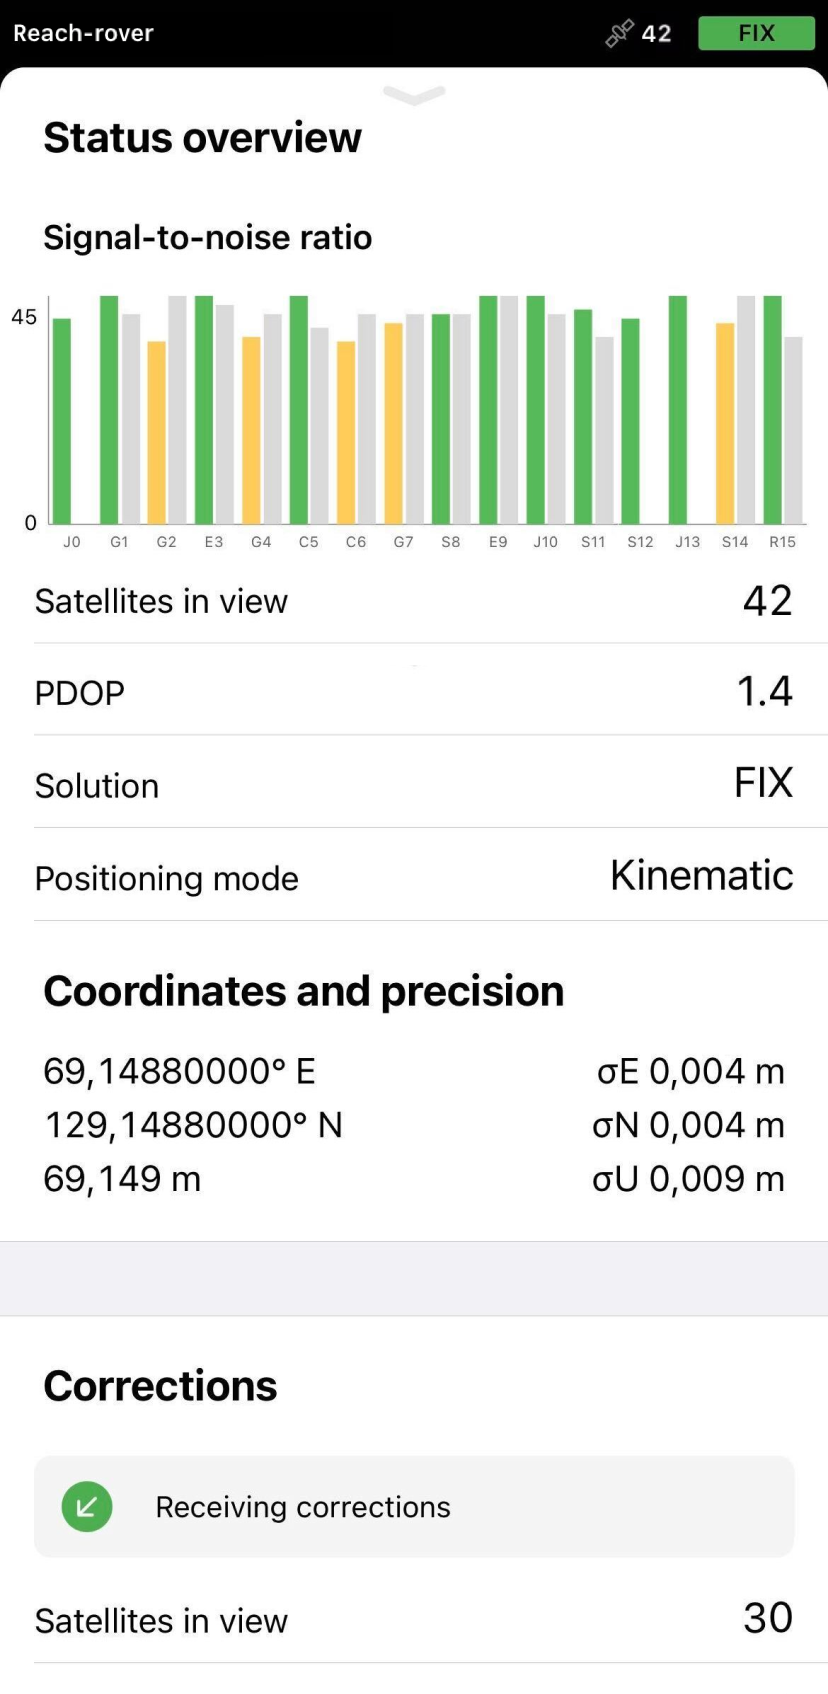
Go to the Status screen. If everything is configured correctly, you will see the Receiving corrections notification.
View results
You can see the current solution status in the top right corner of the Emlid Flow app:
-
SINGLE means that the rover has found a solution relying on its own receiver and base corrections are not applied. Precision in standalone mode is usually at the several-meter level.
-
FLOAT means that the rover receives the base station's observation data and position but cannot resolve ambiguities needed to calculate its position with centimeter-level accuracy. In this case, the positioning accuracy can vary from a few centimeters to about 1 meter.
-
FIX means that the rover using corrections from the base resolved the ambiguities in its positional calculation and achieved the solution with the centimeter-level precision.
After a short period of time, the rover gets a fixed solution. In good environments, it will take a couple of minutes to get a fixed solution. In tough conditions, it may take a little longer. Once rover gets FIX, you are all set for surveying.
You can also find the current solution status as well as your position in real time on the Status screen.
For more information on placing the receivers, check the Antenna placement guide.