Video streaming
Video Streaming with Navio2
Streaming real-time video from a drone powered by a Raspberry Pi 2 has never been easier. There is only a handful of actions that you need to make to get a drone streaming real-time video to a remote PC, tablet, phone or whatnot.
Hardware setup
This instructions are for Raspberry Pi Camera Module.
Please note that Raspberry Pi Camera Module emits a lot of RF noise which may affect GPS performance. To workaround that wrap Camera Module and its cable using tape and alumnium\copper foil (use tape to keep foil from short curcuiting Camera Module pcb).
Raspberry Pi 2 configuration
First things first. You need to expand filesystem and enable camera using Raspberry Pi configuration tool. Type the following command in console:
pi@navio: ~ $ sudo raspi-config
Raspi-config menu will appear on your screen. After changing the options press the Finish button. Expand filesystem and enable camera options require a reboot to take effect. Raspi-config will ask if you wish to reboot now when you select the Finish button.
After the installation has completed, you can choose whatever platform you want to stream FPV to.
Ubuntu installation
If you plan to stream to some Ubuntu PC, install the required packages locally beforehand.
user@ubuntu: ~ $ sudo apt-get update
user@ubuntu: ~ $ sudo apt-get install gstreamer1.0-tools gstreamer1.0-plugins-good gstreamer1.0-plugins-bad
Android installation
If you prefer working with Android device, do the following:
Download and install QGroundControl for Android.
Find IP address of your device in preferences. You'll need it in order to connect to the phone from your RPi.
Use our tutorial to run ArduPilot using the IP you just found out.
Run QGroundControl. It will automatically detect your vehicle.
Launch video streaming on your Raspberry Pi and the pictute will appear in left bottom corner of application screen. Tap it to run fullscreen mode.
note
Default port for video in QGC application is 5600.
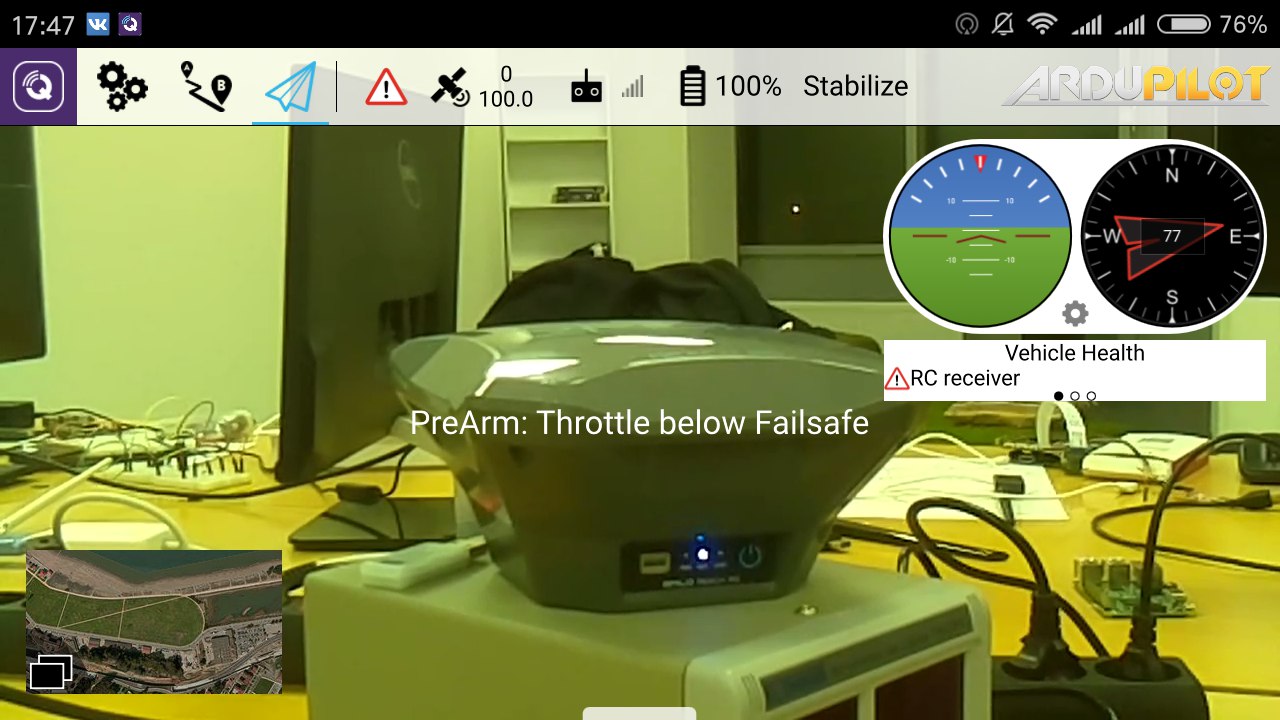
In the screenshot below, you can see the app in action:
Mac OS X installation
The simplest way is to use brew. To install it, run the following in your Mac terminal:
user@mac: ~ $ /bin/bash -c "$(curl -fsSL https://raw.githubusercontent.com/Homebrew/install/master/install.sh)"
user@mac: ~ $ brew update
user@mac: ~ $ brew install gstreamer gst-libav gst-plugins-ugly gst-plugins-base gst-plugins-bad gst-plugins-good
Windows installation
Download and install gstreamer for Windows.
Launch video stream
Now everything is ready for streaming.
On your computer
For Ubuntu or Mac OS X:
gst-launch-1.0 -v udpsrc port=9000 caps='application/x-rtp, media=(string)video, clock-rate=(int)90000, encoding-name=(string)H264' ! rtph264depay ! avdec_h264 ! videoconvert ! autovideosink sync=f
For Windows:
gst-launch-1.0 -v udpsrc port=9000 caps="application/x-rtp, media=(string)video, clock-rate=(int)90000, encoding-name=(string)H264" ! rtph264depay ! avdec_h264 ! videoconvert ! autovideosink sync=f
From now on, your computer will be waiting for the input stream from Raspberry Pi 2. Once it gets a stream, you will see the real-time video from your drone.
On Raspberry Pi 2 board
raspivid -n -w 1280 -h 720 -b 1000000 -fps 15 -t 0 -o - | gst-launch-1.0 -v fdsrc ! h264parse ! rtph264pay config-interval=10 pt=96 ! udpsink host=<remote_ip> port=9000
where <remote_ip> is the IP of the device you are streaming to.
tip
In case your video lags behind, adjust bitrate with -b or -fps switch.
Autostart on boot
To automatically start videostreaming on boot, you need to create systemd service:
sudo touch /etc/systemd/system/raspicam.service
Edit the service to make it look like this:
[Unit]
Description=raspivid
After=network.target

[Service]
ExecStart=/bin/sh -c "/usr/bin/raspivid -n -w 1280 -h 720 -b 1000000 -fps 15 -t 0 -o - | gst-launch-1.0 -v fdsrc ! h264parse ! rtph264pay config-interval=10 pt=96 ! udpsink host=<remote_ip> port=9000"

[Install]
WantedBy=default.target
tip
Do not forget to set IP of the device you are streaming to.
After that, run these commands:
sudo systemctl daemon-reload- to let systemd know of this servicesudo systemctl enable raspicam- to enable on bootsudo systemctl start raspicam- to test it out
From now on raspivid will start automatically on boot. To disable autostart, run this command:
sudo systemctl disable raspicam