Placing the base
Overview
Real Time Kinematic technique requires 2 receivers. One of them is stationary and is called “base station”, the other one is “rover”. The base station measures errors, and knowing that it is stationary transmits corrections to the rover (refer to How RTK works for more information about RTK). Sometimes CORS and NTRIP networks take the place of traditional base stations. They provide accurate absolute position and send corrections over the Internet. Typically the distance between the reference station and local rover shouldn't exceed 10-15 km due to the ionospheric effect. So if the reference station is located too far or simply is absent in the area you will need a local base station. Other advantages of your own base are independence from the Internet connection and lack of NTRIP subscription fees.
If you are setting up your own base it is important to pay attention to this article. A good understanding of different ways to set up the base will help you to reach the desired accuracy for your application.
This tutorial will show you how to set up a Reach RS2/RS2+ base over a known point.
Absolute and relative position
Emlid Flow has several ways to determine or set the base station position providing various levels of accuracy. Let's take a look at the illustration below (figure 1). RTK algorithm precisely calculates the distance between base and rover. This distance is called the Baseline. The Rover position is precisely determined relative to the Base position. At the same time, the rover coordinates offset from the real location depends on the position accuracy of the base. If the position that has been set in the base station is different from the actual True position on earth the offset equal to this difference will be in the rover position as well.
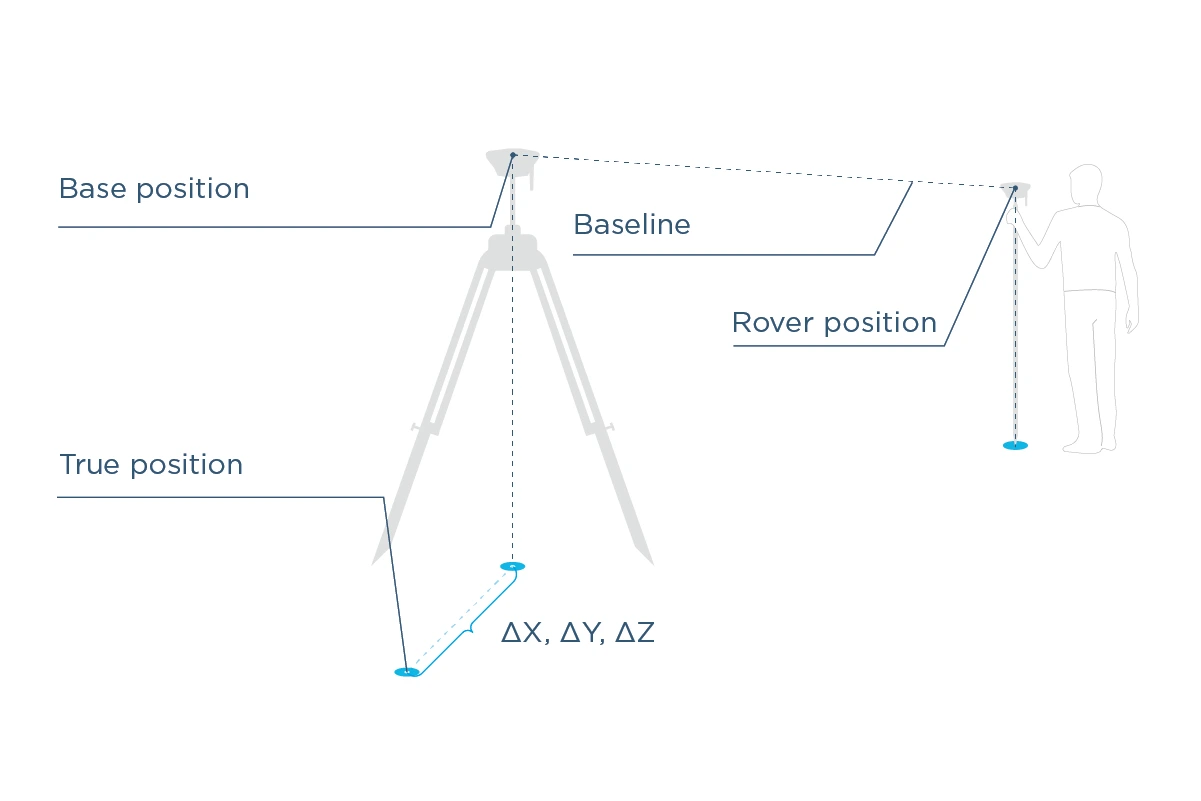
Figure 1
It is often enough to know the precise position of an object relatively to the base station but for some applications like survey and mapping it is critical to get an accurate absolute position. In this case, the offset ΔX, ΔY, ΔZ between actual True position and the Base station position should be avoided or reduced.
The absolute position of the rover is accurate only to the same accuracy as the position of the base station.
Proper positioning of the base station is a key to successful data collection. The shift of base coordinates will keep the collected data precise but will make it inaccurate (which is absolutely fine for volumetric measurements but unacceptable if you have to tie collected data to the global coordinates). For example, if you are processing the map using data collected by RTK-equipped drone using corrections from the shifted base your map will be later geo-referenced with the same offset (figure 2).
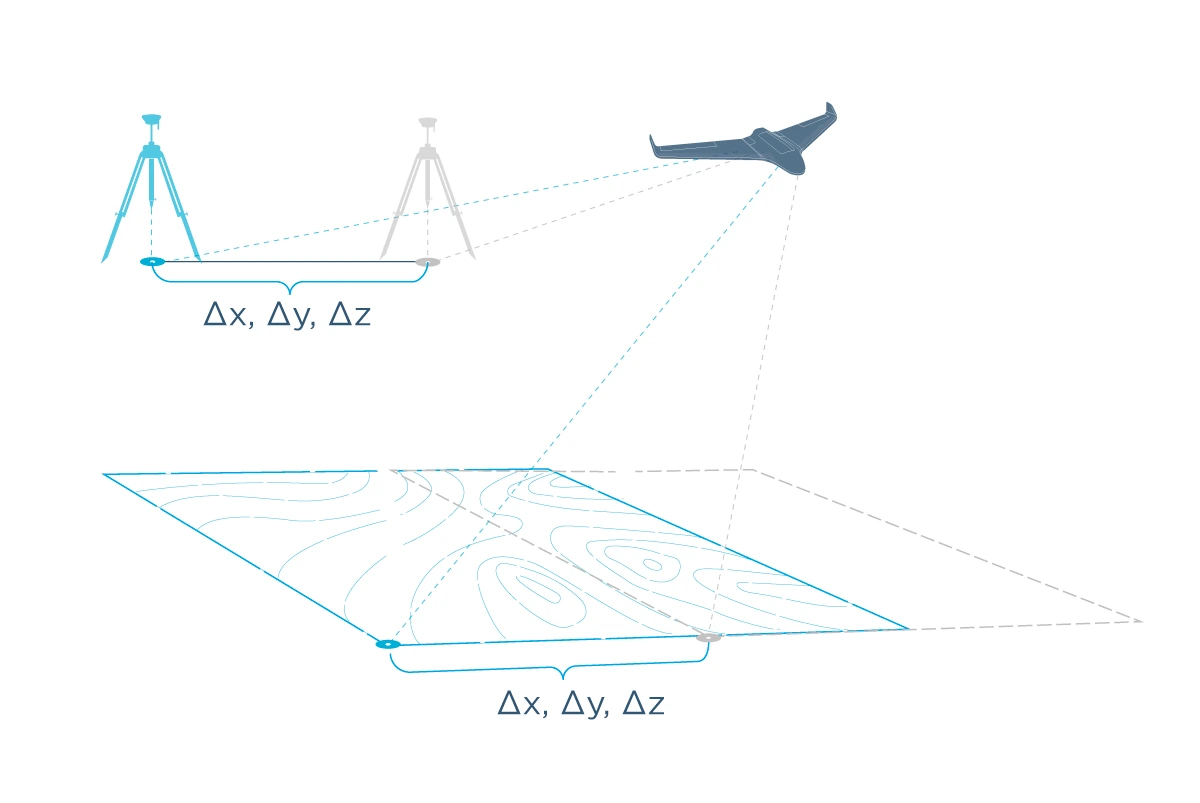
Figure 2
The same shift producing effect may be noticed if the base is placed inaccurately over a known point or just moved from it's determined position without relevant amendments.
If the accurate absolute position of the base has been determined only after the job has been done, the offset of the map can be determined and corrected.
Ways to set the base
As already mentioned Reach used as a base may be positioned using various ways. You can manually enter the base coordinates, use the averaging feature or use PPP and PPK techniques to determine the coordinates.
| Base setup method | Accuracy | Requirement | Observation time | Processing time | Cost |
|---|---|---|---|---|---|
| Manual, on a known point | same as the point | Known point | 0 min | Immediate, no processing required | Free |
| Average single position | ~2.5 m | - | <5 min | Immediate, processing on Reach | Free |
| RTK FIX position | H:7mm+1ppm V:14mm+1ppm | NTRIP stream from base <10km for RS/RS+ <60km for RS2/RS2+ | <5 min | Immediate, processing on Reach | Free/$$ depending on local provider |
| RTK Float position | 1.0m | NTRIP stream from base <10km for RS/RS+ <60km for RS2/RS2+ | <15 min | Immediate, processing on Reach | Free/$$ depending on local provider |
| Static processing | H:4mm+0.5ppm V:8mm+1ppm | RINEX logs from base <30km for RS/RS+ <100 km for RS2/RS2+ | ~1 h | 15min on PC after log from reference station available, usually posted hourly | Free/$$ depending on local provider |
| Precise Point Positioning | ~30cm for RS/RS+ ~1-2cm for RS2/RS2+ | - | ~4 h | In ~24h after submitting logs to NRCan online service | Free |
Numbers in the table are approximate and only for reference purposes. Your experience may vary in different conditions, always follow appropriate survey practices!
No matter which method you use, the relative position of the rover will always be cm-precise, the actual accuracy will be set by the accuracy of the base position.
Manual
On some Android devices, default keyboards do not provide a minus sign. To get access to it, we recommend downloading Gboard, a virtual keyboard app, from the Google Play Store.
Manual input of the position is rather straightforward and is used when you have access to a known point. The most popular scenarios include finding a trig point or hiring a surveyor who will set the benchmark point. In this case, absolute accuracy depends on how accurately the point's coordinates were determined.
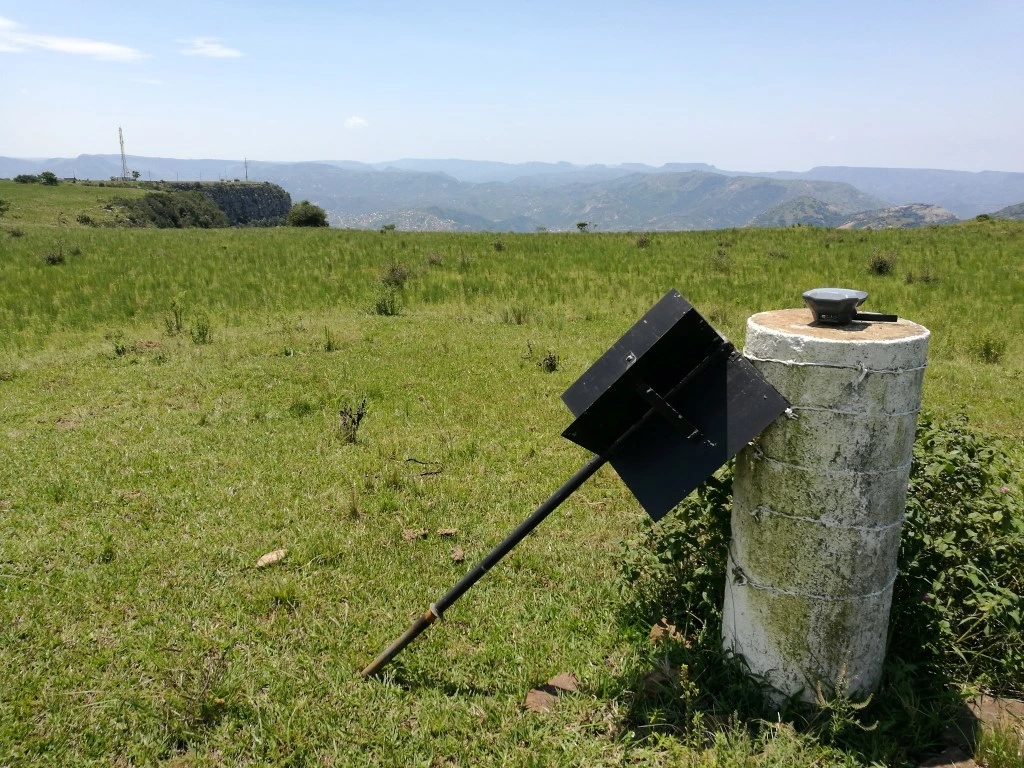
Triangulation station also known as trig point or trig beacon with Reach RS/RS+ on top (photo by Luke Wijnberg)
Pay attention and carefully place the base over a known point and measure the height of the antenna from the mark. It will help to avoid shifts from the absolute position and keep measurements accurate. Refer to Placing Reach RS2/RS2+ in the field for detailed instructions.
Average
Let’s take a closer look at setting up the base using the position averaging with single, float and fix solutions. All these ways provide different levels of base coordinates accuracy and are suitable for different applications.
Averaged single
This approach is used when you don't require absolute accuracy. The averaging happens in stand-alone GPS mode without using any corrections and this provides you with a several meters absolute accuracy.
The left illustration below (see figure 3) shows the paths of the rover which passes the marked rectangular contour several times. This rover receives the corrections from the base configured using averaged single solution. While the position for each individual path lies within the receiver precision limits, the absolute position may differ by up to a few meters. We can see this if we repeat averaging of the static base station and build the path of rover immediately after each reaveraging. Take a look on the right of figure 3.
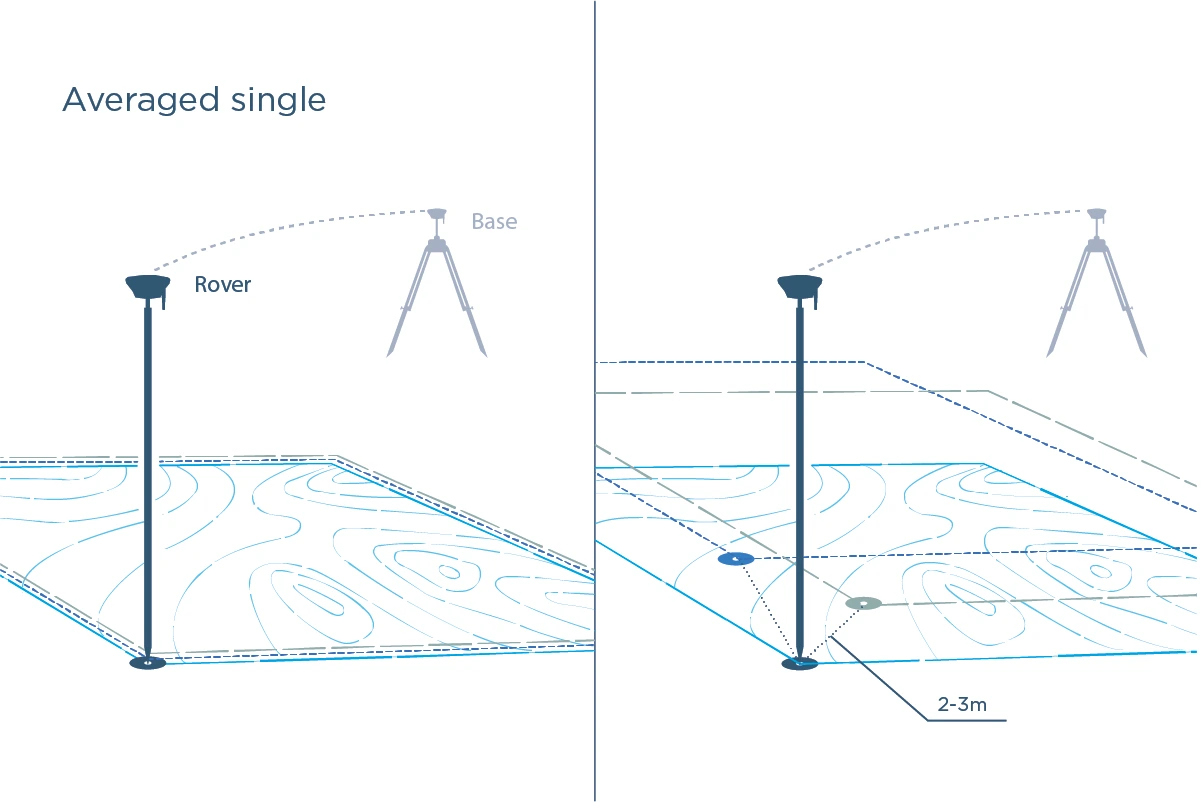
Figure 3
If you only need accurate relative positioning the easiest way is to average the position using single solution. Just physically mark the point on the ground and save coordinates to manual in ReachView. Day-to-day result would look almost identical to those obtained using NTRIP corrections.
Averaged FLOAT and FIX
Averaging RTK fix solution is much more accurate than single averaging and is made possible when the receiver used as the base is configured to obtain NTRIP corrections over the Internet. This might be useful if the reference station is located far away. Reducing the baseline by installing the local base improves the positioning performance of rover.
On the left of the next illustration (see figure 4) the rover passes the marked rectangular contour several times. This rover receives the corrections from the base configured using averaged fix position.
When the base is set up using averaged fix solution, the coordinates are determined with centimeter accuracy (if obtaining survey-grade NTRIP corrections). In this case, the deviations of each path built immediately after reaveraging several times will be within a few centimeters. Take a look on the right of figure 4.
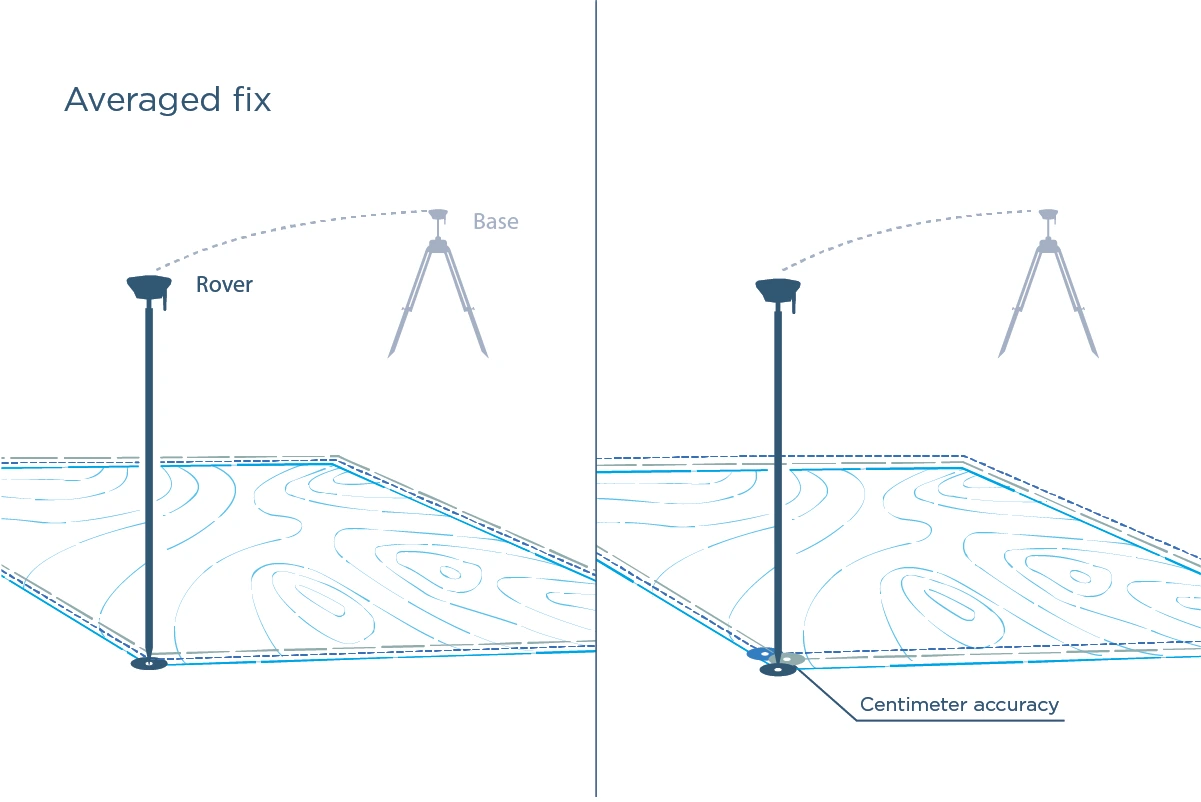
Figure 4
If the baseline is too long to obtain fix, averaging float solution will still improve the position to ~1m level.
The base position averaged using fix solution provides several centimeters accuracy and works great when you need accurate absolute position!
Static processing
With Static processing, you may determine base coordinates without real-time corrections with centimeter accuracy. You will need RINEX logs from the reference station in the area of 100 km and the raw data log from the receiver.
General steps:
-
Enable logging of raw data and record a log for about an hour.
-
Export the log with the collected data from Emlid Flow to your PC.
-
Refer to the Static processing tutorial. It will take you about 15 minutes to calculate the position of your base station.
-
After you get the coordinates you may enter them manually in the Base coordinates section. Comparing the position obtained using Static processing to the averaged position and applying corrections to the collected data is the way to compensate the shift shown in the example in Figure 2.
Precise Point Positioning
With precise point positioning technique, you may accurately determine base coordinates anywhere in the world without real-time correction or base station nearby however it may take a considerable time to get coordinates.
General steps:
-
Enable logging of raw data and record log for a few hours.
-
Export log with the collected data from Emlid Flow to your mobile device or PC.
-
Upload the collected file to PPP service (for example, NRCan).
-
After you get the coordinates you may enter them manually in Base coordinates section.
Placing the base station in the field
The mismeasured height of the antenna above the mark is probably the most pervasive and frequent blunder in GPS control surveying.
When placing your Reach RS2/RS2+ in the field, make sure your Reach device is placed precisely above the marked point on the tripod and leveled. If you are setting up base coordinates manually, you need to measure the antenna height offset. Follow the steps below:
-
Measure the distance between the mark and the bottom of your Reach (h on Figure 5).
-
Specify the measured distance in Emlid Flow. It will automatically calculate the antenna height.
noteFor Reach RS2/RS2+, the antenna height is the distance from the mark on the ground to the center point on the Reach’s bottom (h in Figure 1), antenna reference point (ARP), plus the height of the receiver to the antenna phase center (APC), antenna height offset. Emlid Flow automatically adds the antenna height offset, which is 134 mm.
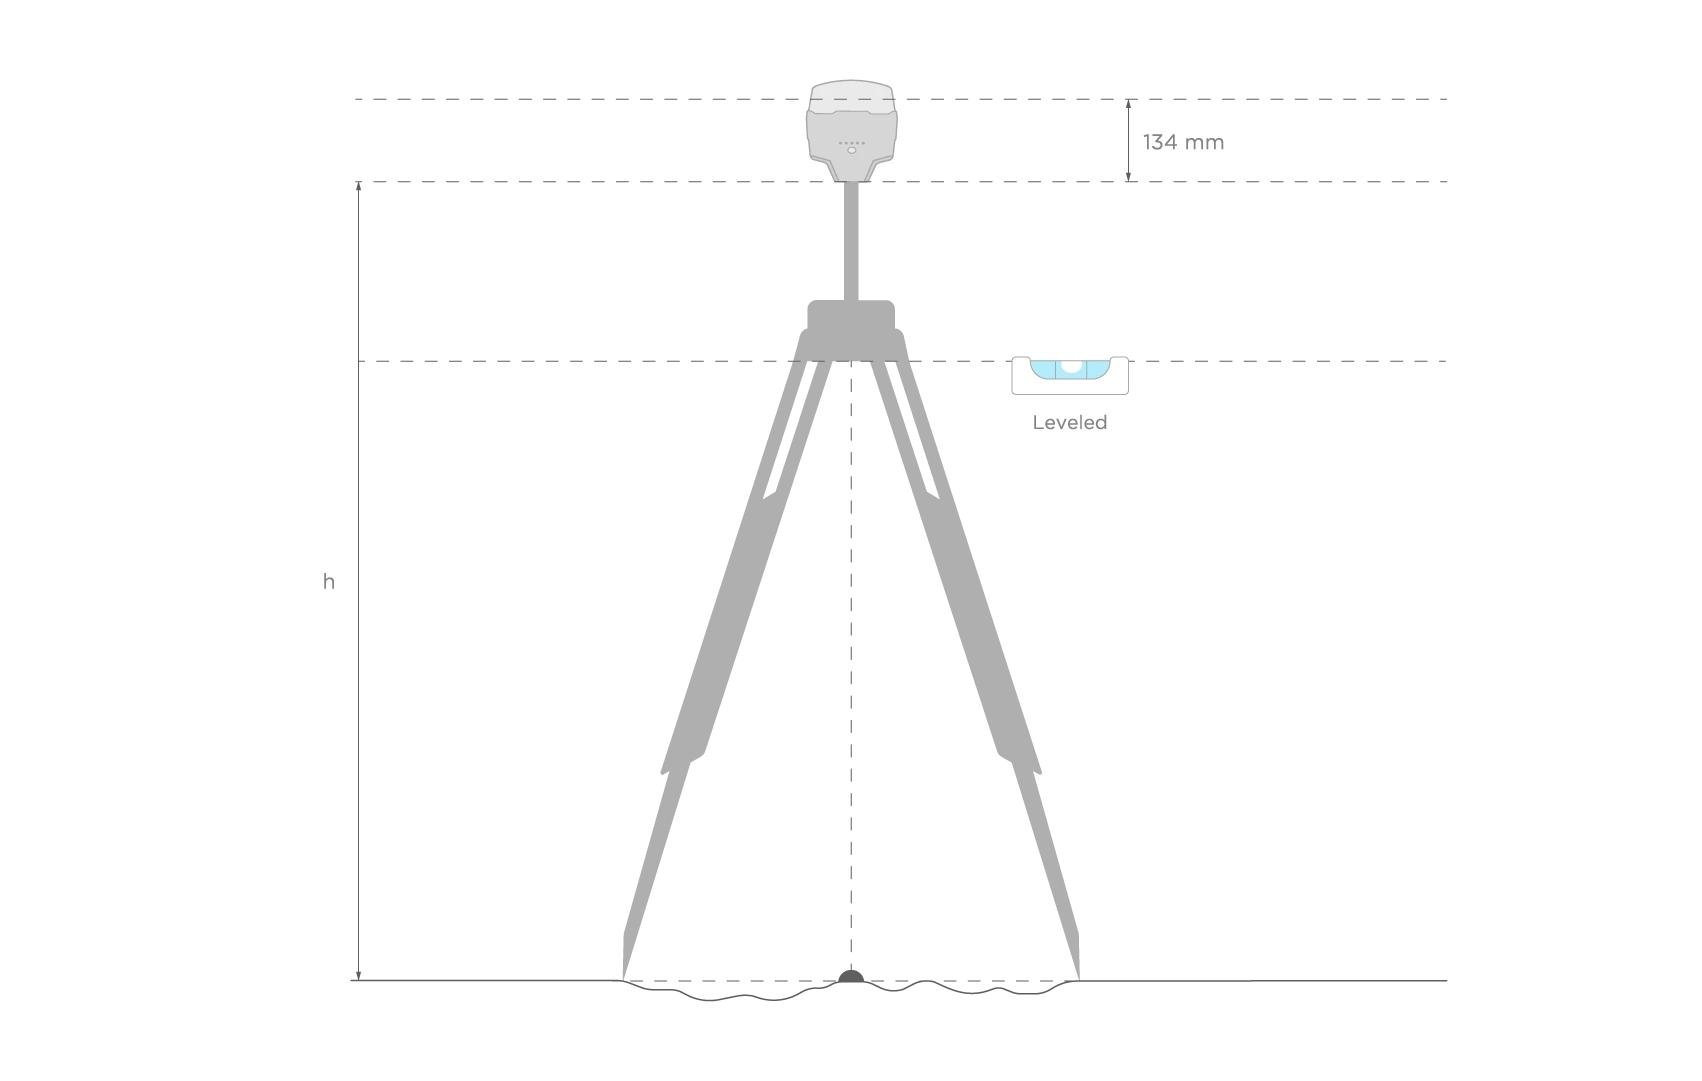
Figure 5
When you securely placed Reach RS2/RS2+ over the mark, you are ready to set or determine its position.