Settings overview
This guide provides a description of the Reach RS2/RS2+ settings. It includes the following sections:
- General settings
- Networks and connections
- Sound notifications and LED indication
- GNSS and RTK settings
- Base configuration
- Rover configuration
In the upper part of the Receivers tab and Settings screen, you can also find the section with the name of your Reach RS2/RS2+, its IP address, and a lamp-shaped button.
Tap the name of your Reach to open the menu with the following options:
-
Reach Panel
Use this button to access Reach Panel
-
Disconnect
Use this button to disconnect from your unit
-
Restart
Use this button to restart your unit
-
Shut down
Use this button to shut down your unit
Tap the lamp-shaped button next to the Reach's name to understand which unit you are connected if you use two receivers. All LEDs on your unit will blink simultaneously.
General settings
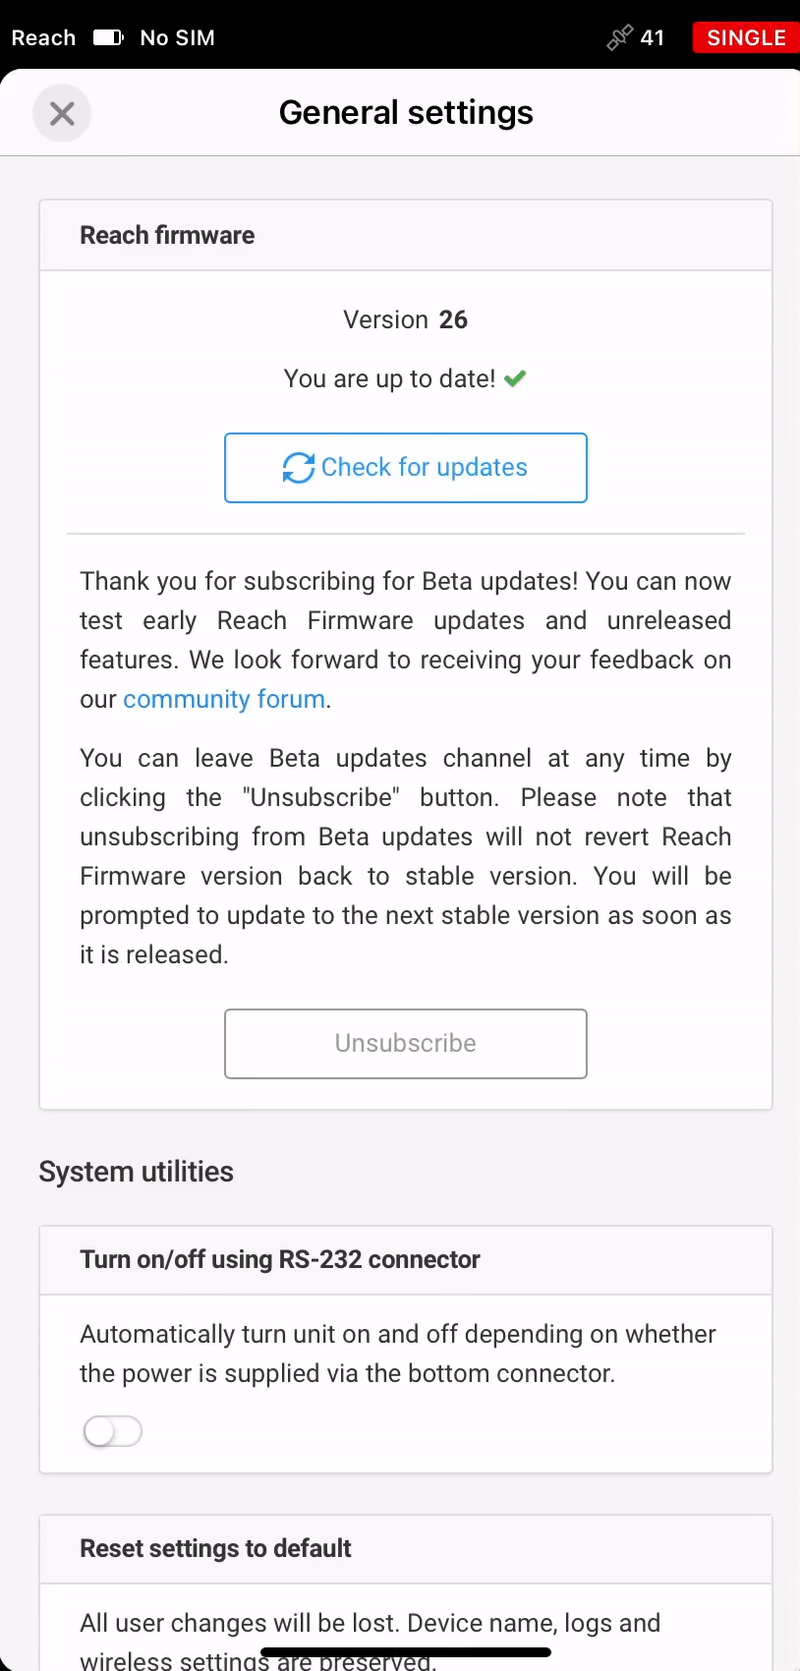
Go to Settings and pick the General settings screen. On this screen, you can get information about the firmware of your receiver and manage system utilities.
Check the firmware version and update the receiver
Find the current firmware version in the Reach firmware section, check for its update, and subscribe for Beta updates. If the update is available, you will see a notification.
Turn the unit on and off automatically
Use Turn on/off using RS-232 connector to automatically turn the unit on and off depending on whether the power is supplied via the bottom connector. It is useful when you want to set up your Reach RS2/RS2+ as a permanent base or integrate it with a tractor for precise agriculture.
Reset your receiver or share your data with the support team for debugging
- Use Reset settings to default to reset the receiver to its default settings.
This action deletes all user changes. Device name, logs, and wireless settings are preserved.
-
Use System report to download a simple or a full system report to facilitate issue solving.
-
Use Raw data debug to supplement the raw data log with additional data for debugging purposes. This feature provides more information on the RTK calculation that can be used for debugging purposes in particular cases.
This option turns off after rebooting the receiver.
Secure access to Reach
Use Secure access to Reach to protect your Reach RS2/RS2+ from being visible from outside the local network.
Change the receiver and hotspot name
Use Change of receiver and hotspot name to change your receiver and its hotspot name. This will help in distinguishing between two receivers in the field.
The change is applied after reboot.
Networks and connections
Go to Settings and select Mobile data, Wi-Fi, or Bluetooth depending on the use case to set up networks and connections on your Reach RS2/RS2+. Connections allow devices in a network to communicate with your unit and share information such as corrections and position data.
Find information on how to connect your Reach RS2/RS2+ to the Internet in the Connecting Reach to the Internet via built-in modem, Connecting Reach to the Internet via Wi-Fi, or Connecting Reach to the Internet via mobile hotspot guides.
Mobile data
Enable Mobile data on your receiver to get corrections from NTRIP over the Internet if a SIM card is inserted.
Before enabling Mobile data, follow the steps from the Reach RS2/RS2+: Inserting a SIM Card video guide.
Check the Working with NTRIP service guide to set up your Reach RS2/RS2+ to receive NTRIP corrections using a built-in cellular modem.
Wi-Fi
Update your Reach RS2/RS2+ and connect it to NTRIP.
Check the Working with NTRIP service guide to set up your Reach RS2/RS2+ to receive NTRIP corrections using a Wi-Fi connection.
Bluetooth
Turn Bluetooth on to scan for other devices. This allows outputting the Reach RS2/RS2+ position to external devices or software or inputting corrections.
Check these guides to learn more:
Sound notifications and LED indication
Switch on and off sound notifications on your receiver and adjust the volume of sound using the Sounds tab in Settings.
Use Night Mode to turn lights and sounds off until the next reboot.
GNSS and RTK settings
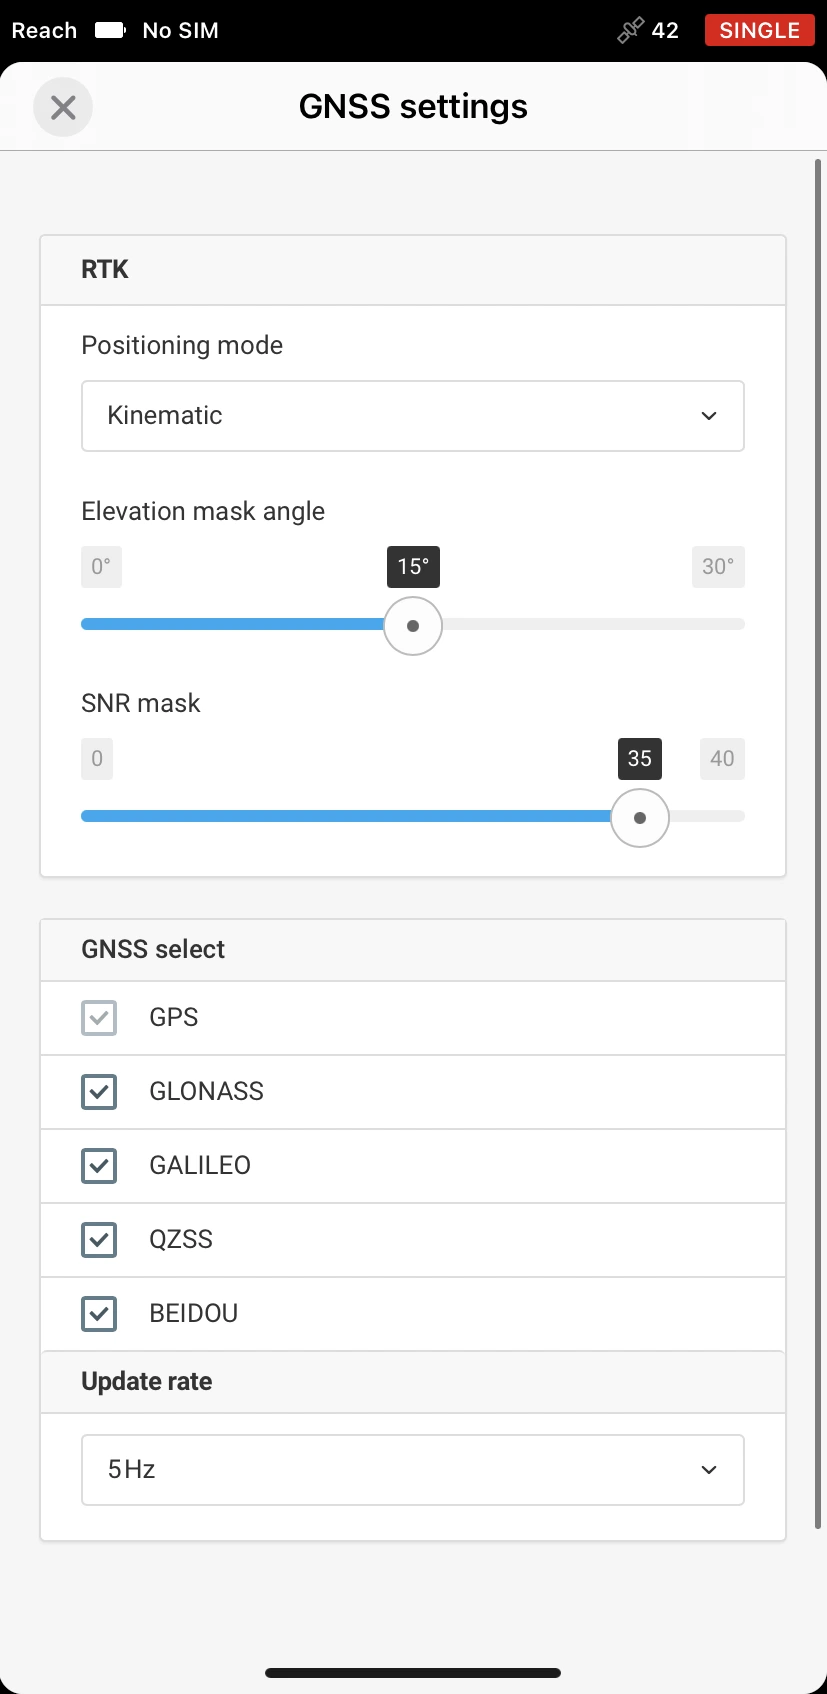
This section describes the recommended settings for both base and rover. Set up RTK, GNSS select, and Update rate based on your use case.
Check the Base and rover setup guide to learn more.
RTK
Сonfigure communication settings for your Reach RS2/RS2+. Set up the following settings:
Positioning mode
Select a positioning mode for your receiver: static or kinematic.
Set the elevation mask angle to ignore any satellite signals that come from below the specified angle above the horizon.
The default setting is 15 degrees.
Mask the satellite measurements that have degraded quality. This helps to make an efficient selection of satellites.
GNSS select
Set up an optimal set of satellite systems. Reach RS2/RS2+ tracks GPS, GLONASS, Galileo, QZSS, and BeiDou satellite systems.
Update rate
Set up the update rate for data logging. The data can be logged with 1 Hz, 5 Hz, and 10 Hz update rate.
The default update rate is 5 Hz.
Base configuration
This section provides the settings used to configure your Reach RS2/RS2+ as a base so it can transmit the corrections to the rover with the required accuracy. Consider your use case and choose the appropriate settings in the Correction output and Base mode sections.
Correction output
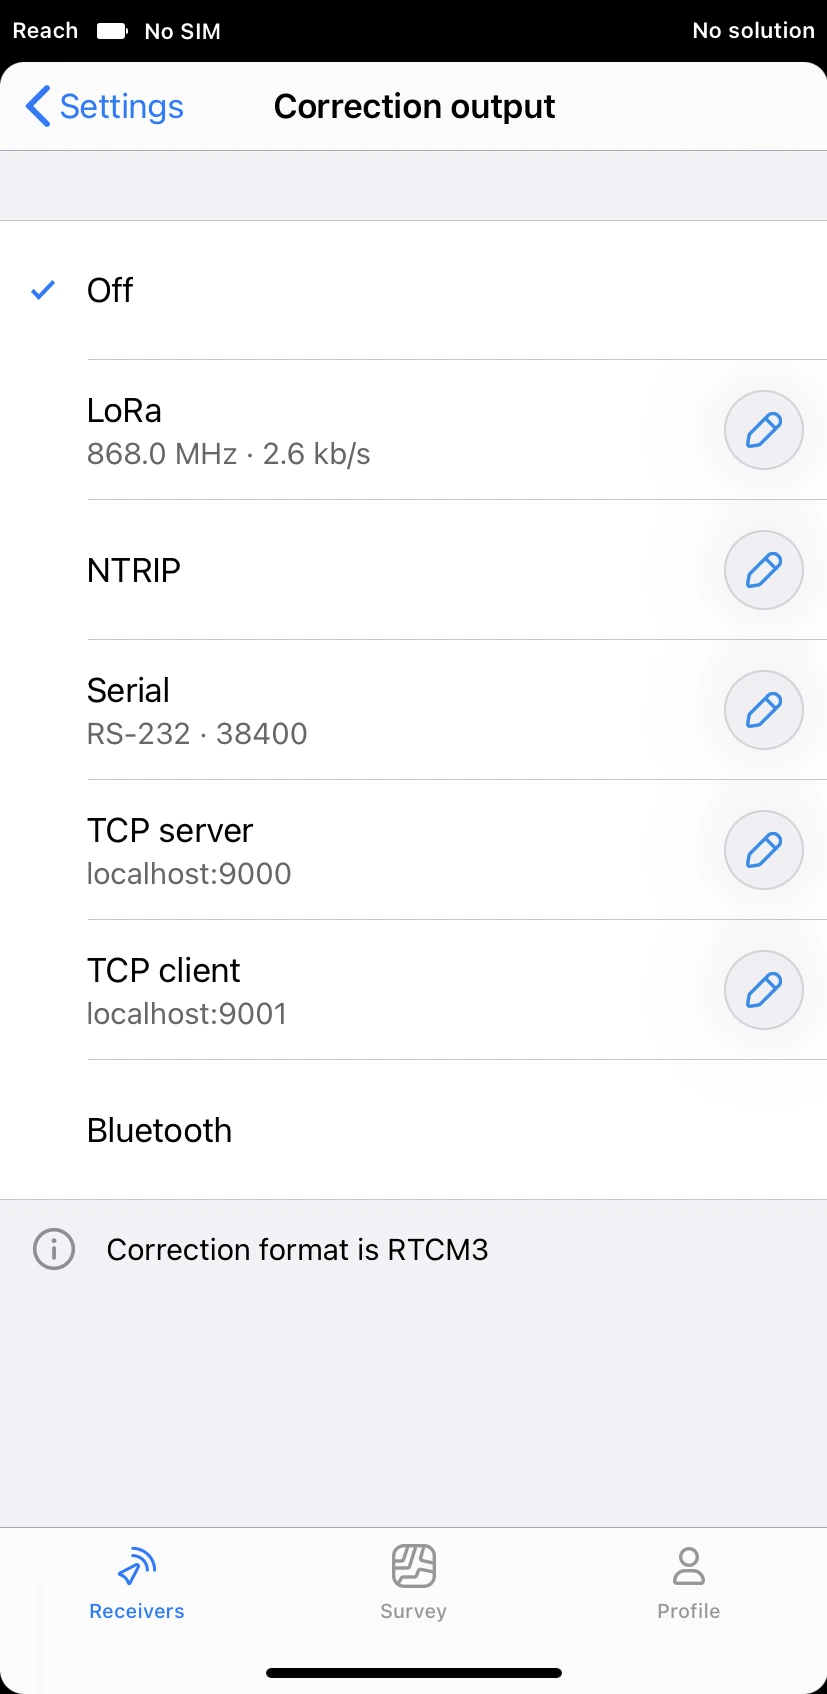
Set up the way your base sends the corrections: Serial, TCP, NTRIP, Bluetooth, or LoRa. Reach RS2/RS2+ supports the correction output in the RTCM3 format.
When setting up correction output, apply all the necessary settings. They may differ depending on the chosen output.
Base mode

Select the coordinate input mode depending on the required accuracy.
- Average single
- Average float
- Average fix
- Manual
Choose a set of RTCM3 messages and set up their update rate. Reach RS2/RS2+ also supports messages for legacy third-party rovers.
The settings you use to configure your Reach RS2/RS2+ coordinate input mode are determined following the method you want to place the base. Check the Placing the base guide to learn more.
Rover configuration
This section provides the settings used to configure your Reach RS2/RS2+ as a rover so it can receive the corrections. Consider your use case and choose the appropriate settings in the Correction input and Position streaming sections.
Correction input
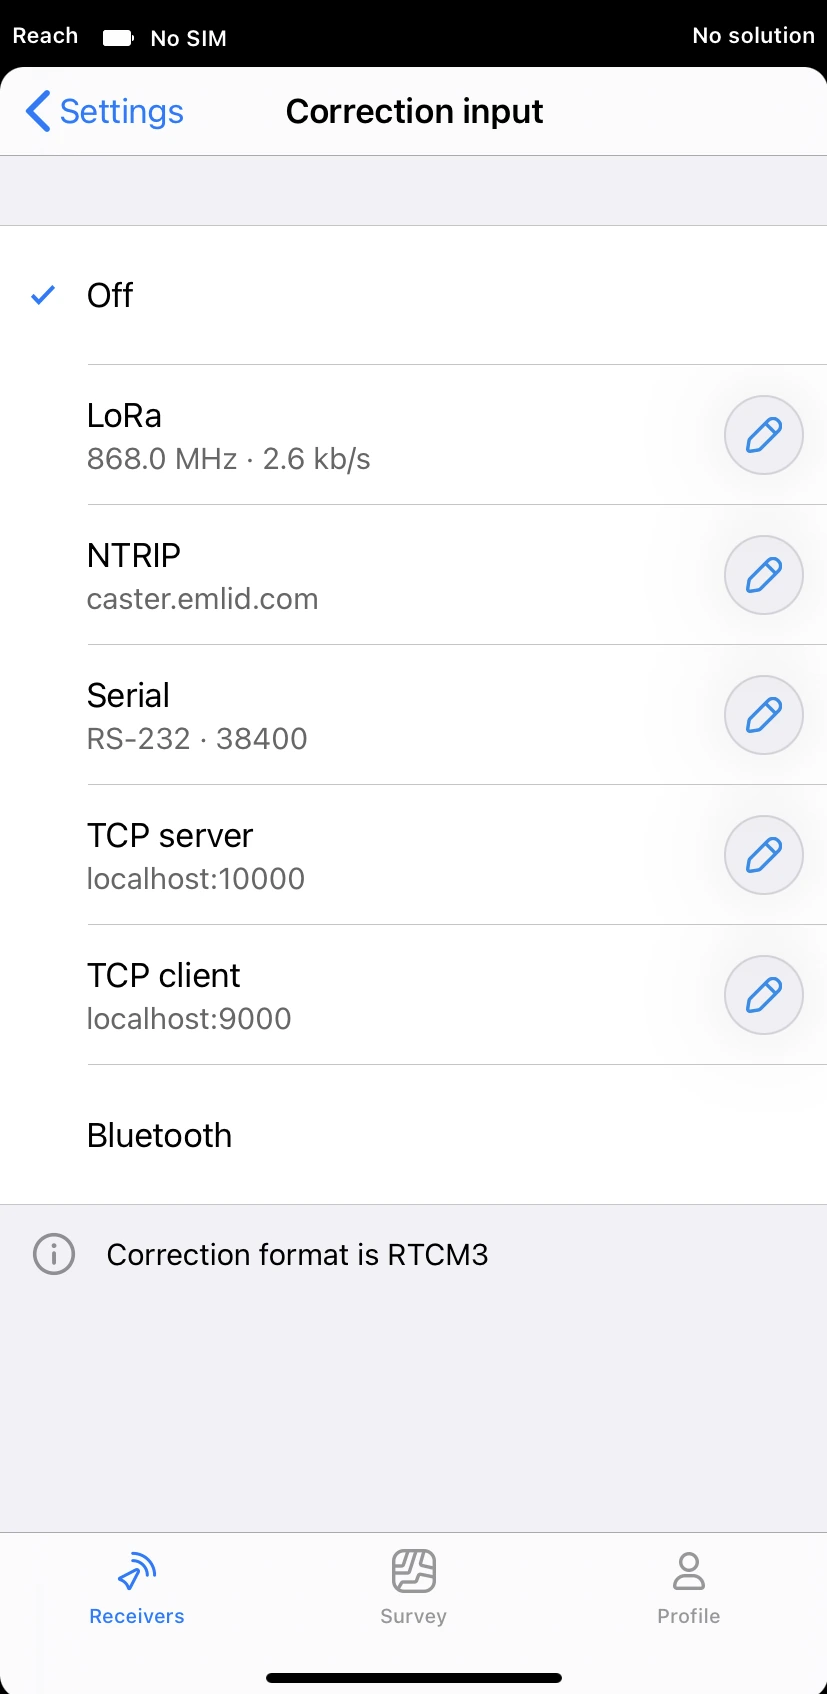
Set up the way your rover receives the corrections: Serial, TCP, NTRIP, Bluetooth, or LoRa. Reach RS2/RS2+ supports the correction input in the RTCM3 format.
Correction input on the rover must match the settings configured for the correction output on the base.
Check the Working with NTRIP guide to learn more.
Position streaming
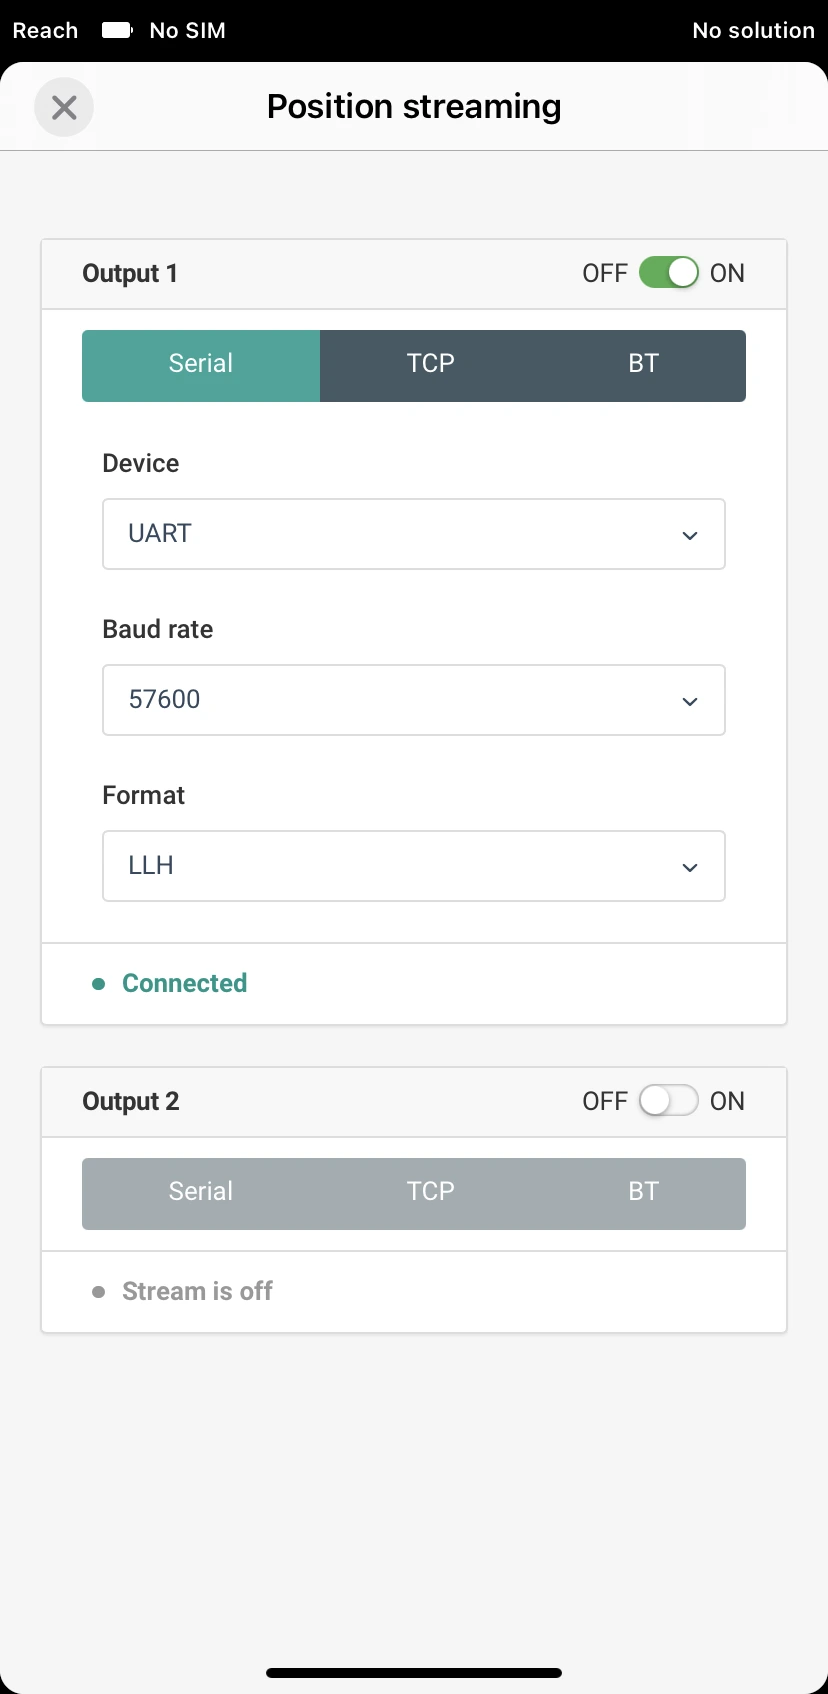
Set up the way your rover streams its position: LLH, XYZ, ENU, NMEA, ERB. When NMEA output is enabled, you can change Talker ID from GP to GN, select the required messages, and set the output rate.
Data in any of these formats can be sent via Serial, TCP, and Bluetooth.
When setting up position streaming via the specified outputs, apply all the necessary settings. They may differ depending on the chosen output.
Check the Getting Reach coordinates on Android via BT guide to learn more.